New to Rust? Grab our free Rust for Beginners eBook Get it free →
Creating a Text Widget with Scrollbar in Tkinter
Do you know how much the text boxes with scrollbars are important for making things user-friendly? Well, we can make it in Python using a few lines of easy code. Stick with us and we will learn how to create a Text Widget and Scrollbar with Tkinter and make our interfaces smooth and interactive. Before getting into the actual process, let’s first learn a little about Tinker.
Introduction and Installation of Tkinter
Tkinter is a Python library designed for creating graphical user interfaces (GUIs), allowing users to interact visually with programs through buttons, text boxes, and more. It provides pre-built “widgets” or building blocks to construct and arrange elements like buttons and text boxes. Tkinter also facilitates event handling, letting you define functions triggered by user actions, and adding control and responsiveness to your Python programs.
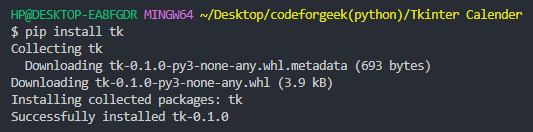
To Install the Tkinter library into your system, run the below command:
pip install tk
Now that we have Installed Tkinter, let’s see how we can design a simple text widget with a scrollbar.
Creating a Simple Text Widget with a Scrollbar
In Tkinter, a Text Widget with a Scrollbar is a user interface element that allows the display and manipulation of text, complemented by a scrollbar for easy navigation in Python GUI applications. Let’s see how we can create them by following the given steps:
Step 1: Importing Modules
Firstly we will create a Python file. Then we will write the following code to import Tkinter:
import tkinter as tk
from tkinter import scrolledtext
This code imports the essential modules to build a graphical user interface using Tkinter, featuring a scrolled text widget.
Step 2: Creating Main Window
Then we will create the application window and provide it with a title:
app = tk.Tk()
app.title("Text Widget with Scrollbar")
Step 3: Creating Text Widget
TextWidget = scrolledtext.ScrolledText(app, wrap=tk.WORD, width=40, height=10)
TextWidget.pack(pady=10, padx=10)
This code makes a scrolling Text widget and places it in the main window with added padding.
Step 4: Binding Function
Now we will bind the “update” function to the Text widget’s <Configure>. The definition for the update function is:
def update(event):
    TextWidget.configure(scrollregion=TextWidget.bbox("all"))
And after it, we bind it:
TextWidget.bind("<Configure>", update)
This connects the “update” function to the Text widget’s event, ensuring the scroll region updates when the widget is resized.
Step 5: Inserting Sample Text
Now we will add some sample text to the Text Widget that we have created:
sample_text = """ Python, a language sleek and neat,
With indentation that can't be beat.
Easy for beginners, a coder's friend,
Libraries galore, on which to depend.

From web apps to data science's call,
Python stands tall, beloved by all.
Clear syntax, a breeze to write,
In the coding world, a radiant light.
"""
TextWidget.insert(tk.END, sample_text)
Step 6: Starting Event Loop
Lastly, we will start the event loop for our application window:
app.mainloop()
Complete Code for a Text Widget with a Scrollbar
import tkinter as tk
from tkinter import scrolledtext

def update(event):
    TextWidget.configure(scrollregion=TextWidget.bbox("all"))

app = tk.Tk()
app.title("Text Widget with Scrollbar")

TextWidget = scrolledtext.ScrolledText(app, wrap=tk.WORD, width=40, height=10)
TextWidget.pack(pady=10, padx=10)

TextWidget.bind("<Configure>", update)

sample_text = """ Python, a language sleek and neat,
With indentation that can't be beat.
Easy for beginners, a coder's friend,
Libraries galore, on which to depend.

From web apps to data science's call,
Python stands tall, beloved by all.
Clear syntax, a breeze to write,
In the coding world, a radiant light.
"""
TextWidget.insert(tk.END, sample_text)

app.mainloop()
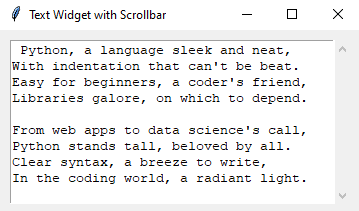
Output:
On running the above Python application, we will see a widget window like this:
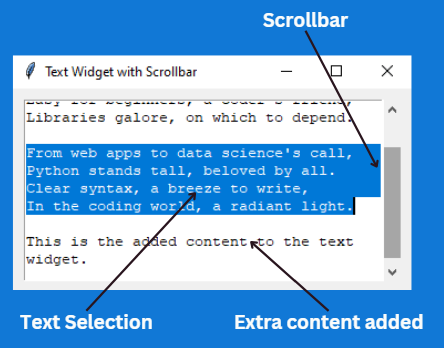
We can also add content from our side and select a given piece of text:
Customization of the Text Widget
Now that we have created a simple-looking Text widget, let’s learn how to add customizations like font style and background color to make it more visually appealing. Let’s take an example and see if we can create a Text widget with a hacking theme, featuring a black background and a coding-style font.
We will write some additional blocks of codes about customization to the original construction code, so let’s discuss.
Customizing the Theme
Observe the given block of code:
app.tk_setPalette(background='#000000', foreground='#00a000', activeBackground='#003030', activeForeground='#00c0c0')
Here we use the tk_setPalette method to set various color properties. These changes are made to the main window of the Tkinter app. The color values given in the format ‘#RRGGBB’ represent red, green, and blue components using hexadecimal values.
- background=’#000000′: It sets the background color to black (#000000).
- foreground=’#00a000′: It sets the text (foreground) color to a shade of green (#00a000).
- activeBackground=’#003030′: It specifies the background color when a widget is in an active or pressed state, here set to a dark greenish color (#003030).
- activeForeground=’#00c0c0′: It sets the text color in the active state to a lighter shade of green (#00c0c0).
Customizing the Font
Look upon the given code:
font = ("Courier New", 12, 'bold')
This line creates a font tuple named font. The tuple consists of three elements:
- “Courier New”: Specifies the font family, in this case, “Courier New,” which is a monospaced font often used for code.
- 12: Indicates the font size, set to 12 points.
- bold: Specifies that the font should be bold.
Complete Code for Customization of the Text Widget
import tkinter as tk
from tkinter import scrolledtext

def update(event):
    TextWidget.configure(scrollregion=TextWidget.bbox("all"))

app = tk.Tk()
app.title("Customized Text Widget")

app.tk_setPalette(background='#000000', foreground='#00a000', activeBackground='#003030', activeForeground='#00c0c0')

font = ("Courier New", 12, 'bold')  # Monospaced code font, bold

TextWidget = scrolledtext.ScrolledText(app, wrap=tk.WORD, width=40, height=10, font=font, bg='#000000', fg='#00a000')
TextWidget.pack(pady=10, padx=10)

TextWidget.bind("<Configure>", update)

sample_code = """def hello_world():
    print("Hello, World!")

for i in range(5):
    print("This is line", i)
"""

TextWidget.insert(tk.END, sample_code)

app.mainloop()
Output:

Summary
In this article, we have learned how to build a text widget with a scrollbar along with a basic understanding of Tkinter and its installation. We have also seen how to add customizations to the text widget, such as customizing the theme, color, and font of the application. I hope you now have a clear understanding of the concepts mentioned above.
If you found this article helpful, do check out the following articles –
Reference
https://stackoverflow.com/questions/13832720/how-to-attach-a-scrollbar-to-a-text-widget