Data is crucial when building any modern mobile web application. There are multiple ways we can access data in our Flutter application such as Reading from a file, Reading from a database and APIs, Reading static data, etc.
Among these, APIs are the most popularly used methods when building scalable applications. In this tutorial, we’ll be understanding what APIs are and how we can integrate them into our flutter project by building a simple demo application.
Introduction to API (Application Programming Interface)
API stands for Application Programming Interface. It provides a set of rules and protocols for interaction between two computers. In simple words, an API helps you connect and communicate with a system with information so it can process and provide you with what you want.
An API is generally made of a BaseURL and an API endpoint. Additionally, an API can have an API key which is a private key to determine access to the API endpoint.
REST APIs
REST stands for Representational State Transfer. REST lays down some architectural guidelines and constraints for APIs to follow. We have a separate article on REST APIs, click here to read it.
Steps to Fetch Data from REST APIs in Flutter App
We will be following some of these steps in order to fetch data from APIs into our Flutter application:
- Step 1: Find the relevant API URL and endpoint, and access it.
- Step 2: Implement a model class to parse the JSON received as a response.
- Step 3: Add necessary dependencies, such as http, chopper, dio, etc.
- Step 4: Create a dart file to make API calls, and parse the data response.
- Step 5: Use the parsed data in the application.
In this tutorial, we’ve used dummyjson.com to provide us with fake JSON for experimentation. Assuming you have a basic idea of Flutter widgets, dart, have the Flutter SDK installed, and have already created an empty Flutter project, we’ll get started with implementing API in our application.
However, in case you’re just starting with Flutter, I’d highly recommend you check these two articles.
Step 1: Find the relevant API URL and endpoint, and access it
We can access our API by visiting dummyjson.com/products.
Here the BaseURL is dummyjson.com and the API endpoint is /products.
If we access the API BaseURL with the endpoint in our browser, we will find a JSON array containing some dummy product details. We will be using these data in our application in the later stages.
Step 2: Implement a model class to parse the JSON response
We can simply access the JSON data from the key but it turns out to be inefficient as our data size and complexity increase. So, we need to create a model class, parse the JSON and create an object out of the JSON response.
We will need the entire JSON response to build a model. Visit the API endpoint using a browser and copy the response. Alternatively, you can also use rest clients like Postman, CURL, etc. to get the response. We will be using app.quicktype.io to save us from writing the model class manually. Visit app.quicktype.io, paste the JSON response on the left panel, select dart from the language drop-down, and name the class something like DataModel.
It is always a good practice to keep your model classes organized in one place so we create a models folder inside lib to store our model classes. Create a dart file inside the models’ folder and paste the output generated by app.quicktype.io.
Our model class will look something like this.
Step 3: Add necessary dependencies
There are multiple packages in the pub.dev that can be used to implement APIs in our Flutter application. Among them, http is the most commonly used and suited for the simple application that we are building. Copy the package name along with the version from pub.dev and add it to our pubspec.yaml file’s dependencies section.
Your pubspec.yaml file must look something like this:
name: rest_api_app
description: A new Flutter project.
publish_to: 'none'

version: 1.0.0+1

environment:
  sdk: '>=2.19.2 <3.0.0'

dependencies:
  flutter:
    sdk: flutter
  http: ^0.13.5
  cupertino_icons: ^1.0.2

dev_dependencies:
  flutter_test:
    sdk: flutter
  flutter_lints: ^2.0.0

flutter:
  uses-material-design: true
Step 4: Create a Dart file to make API calls, and parse the data response
Now as we have our dependencies installed and the model class defined, we can start building our actual application. We will be creating a Home screen for your application where we will call the API and parse the response.
import 'dart:convert';
import 'package:flutter/material.dart';
import 'package:http/http.dart' as http;
import 'package:rest_api_app/model/data_model.dart';

class Home extends StatefulWidget {
  const Home({Key? key}) : super(key: key);

  @override
  State<Home> createState() => _HomeState();
}

class _HomeState extends State<Home> {
  bool _isLoading = true;

  @override
  void initState() {
    super.initState();
    _getData();
  }

  DataModel? dataFromAPI;
  _getData() async {
    try {
      String url = "https://dummyjson.com/products";
      http.Response res = await http.get(Uri.parse(url));
      if (res.statusCode == 200) {
        dataFromAPI = DataModel.fromJson(json.decode(res.body));
        _isLoading = false;
        setState(() {});
      }
    } catch (e) {
      debugPrint(e.toString());
    }
  }

/* Widget build goes after this */
}
Here we have imported the http and convert packages. Http package will help us make API calls while the convert package provides encoders and decoders for converting between different data representations. Additionally, we have imported our DataModel class from data_model.dart which we will be using to get object data from the API.
Our Home screen is a stateful widget as we are making an external API call bound to change the user interface. We have created a state object named _homeState which will call the function _getData() exactly once every time the state object is created. This is ensured by the initState() function. We have also initialized an _isLoading boolean which we will determine whether our API has produced a response or not.
Now moving to the _getData() function. This function implements the http package and requests an HTTP GET to fetch the JSON from the API. If the request is made successfully and there is no error, we receive a status code of 200. On receiving the status code of 200 we decode the JSON from the response body using the convert package and change _isLoading to false and the setState() notifies the framework that the internal state of the state object has changed and a build needs to be scheduled for the state object.
Step 5: Use the parsed data in the application
Now we can start building the layout of your application so we can display the received data in a more meaningful way. Add the following after we’ve defined our _getData() function:
/* Widget build goes after this */
@override
  Widget build(BuildContext context) {
    return Scaffold(
      appBar: AppBar(
        title: const Text("REST API Example"),
      ),
      body: _isLoading
          ? const Center(
              child: CircularProgressIndicator(),
            )
          : ListView.builder(
              scrollDirection: Axis.vertical,
              itemBuilder: (context, index) {
                return Padding(
                  padding: const EdgeInsets.all(8.0),
                  child: Row(
                    mainAxisAlignment: MainAxisAlignment.spaceBetween,
                    children: [
                      Image.network(
                        dataFromAPI!.products[index].thumbnail,
                        width: 100,
                      ),
                      Text(dataFromAPI!.products[index].title.toString()),
                      Text("\$${dataFromAPI!.products[index].price.toString()}"),
                    ],
                  ),
                );
              },
              itemCount: dataFromAPI!.products.length,
            ),
    );
  }
The response may take some time to load as we make an external API call. We have used the ternary operator to display a loading indicator till we get a response. When we get the response our _isLoading variable’s value changes to false and we are able to get the image, name, and price of the product from the API and display it using the ListView and ItemView builder widgets.
Output:
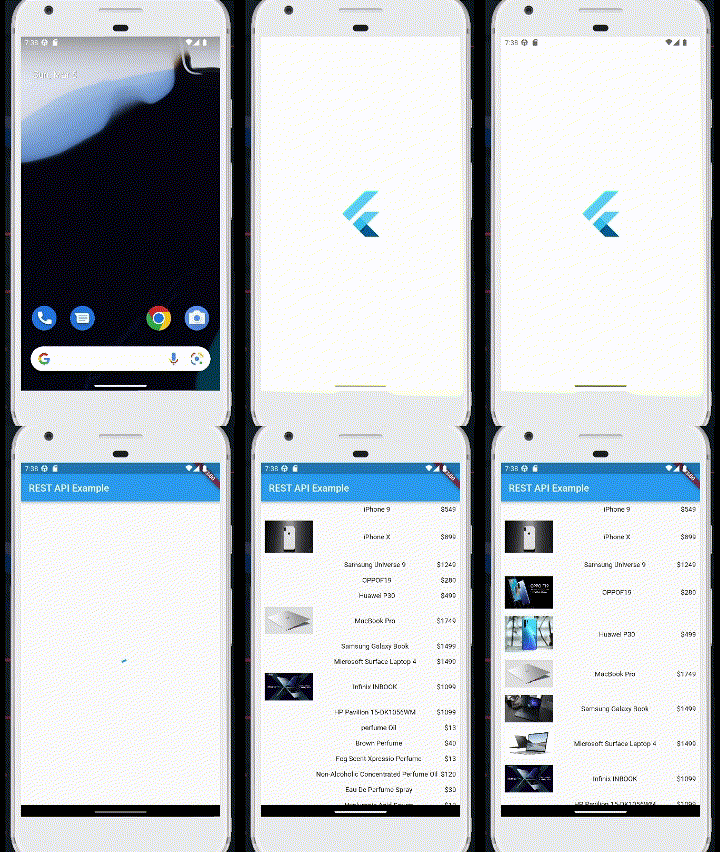
Clone the GitHub repository and try it on your own here.
Conclusion
Accessing data is important for any mobile web application. In this tutorial, we’ve seen how to use the http package to make HTTP requests for fetching data from a REST API. We’ve built a simple application using a dummy API to see the working of the Flutter http package in general.
Reference
https://docs.flutter.dev/cookbook/networking/fetch-data

