New to Rust? Grab our free Rust for Beginners eBook Get it free →
RESTful API Using Node.js and Express.js
REST stands for REpresentational State Transfer. REST is a web standards-based architecture and uses HTTP Protocol. REST services address components as resources and are accessed by a common interface using HTTP standard methods. RESTful is the web service implementation of REST software architecture.
In this tutorial, I am going to explain how to build RESTful API using Node.js and Express.js using MongoDB as a database.
Prerequistics
I would request you all to install this software on your machine before proceeding ahead. I highly recommend installing Docker. If you install Docker, you would not need all of the software listed below.
- Node.js version 12 and above.
- MongoDB.
- Postman or similar API testing software
Let me in the comments, if you face any issues with the installation.
Setting up project
Let’s set up a new Node project and create our RESTful API server.
Run this command in your terminal to create a new Node project.
mkdir restfuldemo && cd restfuldemo && npm init --y
Then, run this command to install the dependencies.
npm install --save express mongoose nconf uuidv4 body-parser
I will explain these node modules as we proceed further.
Open the project in your favorite editor. I recommend visual studio code.
Let’s code our project.
Building RESTful API Using Node.js and MongoDB
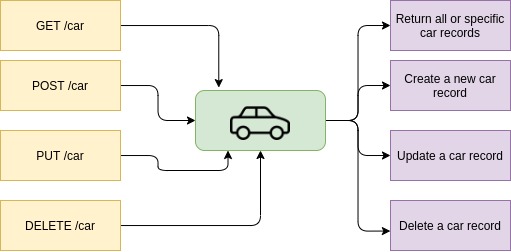
RESTful APIs are built around resources and you can perform operations on those resources using standard HTTP methods such as GET, POST, PUT, and DELETE. For our demonstration purpose, let’s take cars as an example resource and code a RESTful API server to perform operations on our resource.
Let’s create a new file and name it config.json. This file will keep all of our configuration variables.
{

    "mongoURL": "mongodb://localhost:27017/restDemo",

    "port": 3005

}
Next, we are going to create an application file which is also an entry point of our system. Create a new file and name it app.js.
const express = require("express");

const nconf = require("nconf");

const bodyparser = require("body-parser");

const app = express();
app.use(bodyparser.json());
// load the config file
nconf
.argv()
.env()
.file({
file: __dirname + "/config.json",
});
app.disable("etag");
app.disable("x-powered-by");
app.use("/api", require("./routes"));
app.listen(nconf.get("port") || 3000);
console.log("Server is running at", nconf.get("port") || 3000);
In the code shown above, we are loading the modules that we installed earlier. nconf is a configuration module and we are using it to access configuration variables across our application. Then, we are creating a new and registering on the /api endpoint.
Routers in the express.js framework are an inbuilt routing mechanism that helps us to create multiple HTTP endpoints and expose them to the front-end or browser.
Let’s create a new routes folder and create an index.js file in it. You can run this command to perform this operation or do it manually.
mkdir routes && cd routes && touch index.js
In index.js , add the following code.
const express = require("express");

const router = express.Router();
router.use('/cars', require('./cars'));
module.exports = router;
It’s always better to separate your codebase into multiple modules or files. Here in our case, we are using the index.js as an entry routes file that contains a list of all the other routes with specific endpoints. For our tutorial, we just have a /cars endpoint.
Let’s create the cars.js file inside the routes folder. Place the following code inside the cars.js.
const express = require("express");

const router = express.Router();

const models = require('../models/cars');
router.get('/', async (req, res) => {
try {
const carData = await models.getAllCars();
return res.json({error: false, data: carData});
}
catch(e) {
res.status(500).json({error: true, data: []});
}
});
router.get('/:id', async (req, res) => {
try {
const carData = await models.getSpecificCar(req.params.id);
res.json({error: false, data: carData});
}
catch(e) {
res.status(500).json({error: true, data: []});
}
});
router.post('/', async (req, res) => {
try {
const carData = await models.createNewCar(req.body);
res.status(201).json({error: false, data: carData});
}
catch(e) {
res.status(500).json({error: true, data: []});
}
});
router.put('/:id', async (req, res) => {
try {
const carBody = req.body;
carBody._id = req.params.id;
const carData = await models.updateCar(carBody);
res.status(201).json({error: false, data: carData});
}
catch(e) {
res.status(500).json({error: true, data: []});
}
});
router.delete('/:id', async (req, res) => {
try {
const carData = await models.deleteCar(req.params.id);
res.status(410).json({error: false, data: carData});
}
catch(e) {
res.status(500).json({error: true, data: []});
}
});
module.exports = router;
The code shown above defines the routes of the application. We can define various HTTP operations such as GET, POST, etc and we have defined them in each route.
Each route also calls the model function that handles the database-related operations such as adding an entry in the collections, fetching records from the collection, and so on.
Create a new folder naming models and inside the folder create a new file naming connection.js.
const mongoose = require("mongoose");

const schema = mongoose.Schema;

const nconf = require("nconf");
mongoose.connect(nconf.get("mongoURL"), {
useNewUrlParser: true,
useUnifiedTopology: true,
});
// validate MongoDB connection
const db = mongoose.connection;
// events
db.on("error", () => {
console.log("MongoDB connection error");
process.exit(0);
});
db.once("open", () => {
console.log(
'Connected to MongoDB Database engine'
);
});
mongoose.set('useFindAndModify', false);
const carSchema = new schema({
name: String,
model: Date
});
module.exports = {
carSchema: mongoose.model("cars", carSchema),
};
We are first making a connection to our MongoDB database. If the connection is successful, we are creating a new schema that defines how we want to store our records in the database.
Finally, we are exporting our schema so that we can use it in a different file.
Create a new file naming cars.js and place the following code in it.
const { carSchema } = require("./connection");
function getAllCars() {
return new Promise(async (resolve, reject) => {
try {
let results = await carSchema.find({});
resolve(results);
}
catch(e) {
console.log(e)
reject(e);
}
});
}
function getSpecificCar(carId) {
return new Promise(async (resolve, reject) => {
try {
let results = await carSchema.findById(carId);
resolve(results);
}
catch(e) {
reject(e);
}
});
}
function createNewCar(carData) {
return new Promise(async (resolve, reject) => {
try {
let record = new carSchema(carData);
let results = await record.save(carData);
resolve(results);
}
catch(e) {
console.log(e);
reject(e);
}
});
}
function updateCar(carData) {
return new Promise(async (resolve, reject) => {
try {
let results = await carSchema.findOneAndUpdate({
_id: carData._id
}, carData, {
new: true,
});
resolve(results);
}
catch(e) {
reject(e);
}
});
}
function deleteCar(carId) {
return new Promise(async (resolve, reject) => {
try {
let results = await carSchema.findOneAndRemove({
_id: carId
});
resolve(results);
}
catch(e) {
reject(e);
}
});
}
module.exports = {
getAllCars: getAllCars,
getSpecificCar: getSpecificCar,
createNewCar: createNewCar,
updateCar: updateCar,
deleteCar: deleteCar,
};
The code shown above contains multiple functions that help us to interact with the database. For example, the getAllCars() function returns all the cars present in the database collections while the getSpecificCar() function returns only the car you are looking for. The code is straightforward and simple, let me know in the comments if you have any doubts.
Let’s run the code and check out how it works.
Running the application
Run the code using the following command.
node app.js
You should see the following response in the terminal if everything is good.
Server is running at 3005

Connected to MongoDB Database engine
Now, let’s call the APIs and check the response.
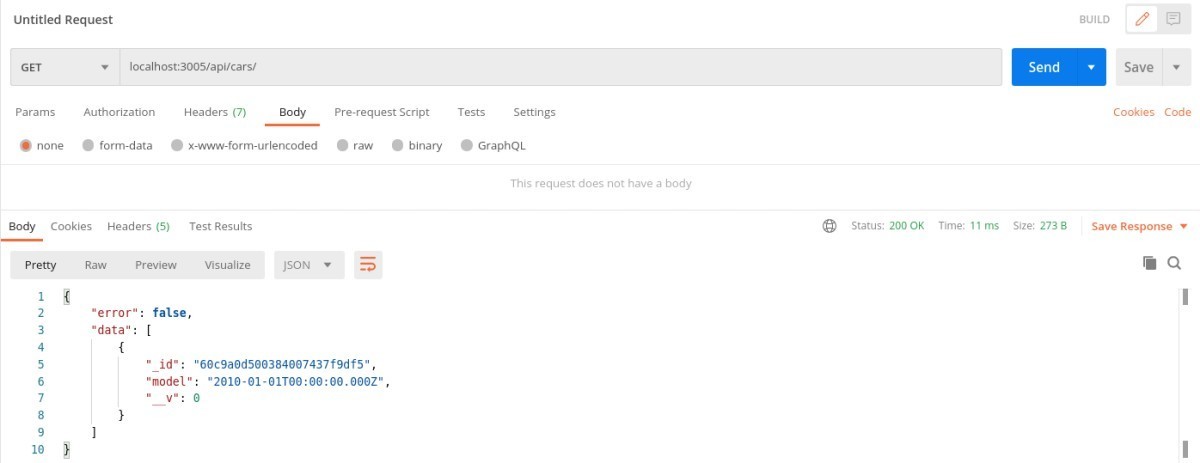
First, call the GET API to get all the cars.
The URL would be localhost:3005/api/cars.
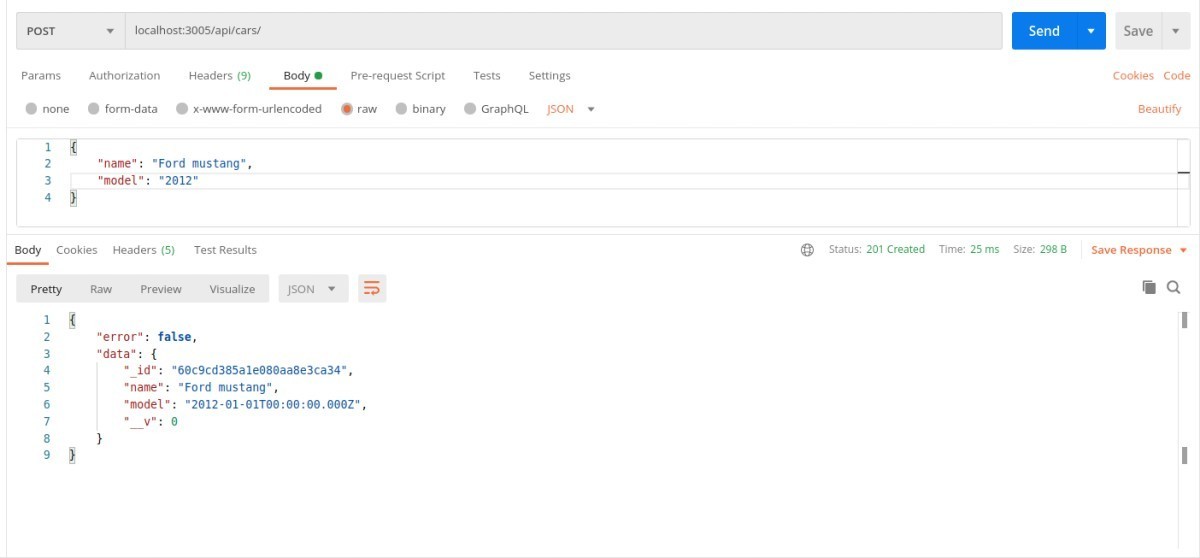
Let’s create a new car entry.
Change the HTTP type to POST and put the following JSON data.
You can similarly call rest of the API’s and
Further Study:
Node.js MySQL Tutorial
Build a RESTful API using Node and MongoDB
HTML5 Push Notification System Using Nodejs MySQL Socket.io
Voice Controlled Drone Built Using Node and ARDrone