New to Rust? Grab our free Rust for Beginners eBook Get it free →
Render HTML file in Node.js and Express.js framework

ExpressJS is a popular NodeJS web framework. ExpressJS allows you to develop a custom web server according to your project requirement. The Express project can be extended by installing various node modules. However, you don’t need to install multiple packages to handle HTML files and render them in the response.
This tutorial will teach you how to render HTML files in a custom NodeJS and ExpressJS Server. You don’t need to install extra modules to render an HTML file in Express. Just install express and you are good to go.
Step 1: Install Express
Create a new folder and initialize a new Node project using the following command.
npm init --y
Let’s install Express.
npm install express
Great. let’s move forward and learn about the function we will use to render HTML files in Express.
Step 2: Using sendFile() function
ExpressJS provides the sendFile() function, which can send HTML files to the browser and is then automatically interpreted by the browser. All we need to do is deliver an appropriate HTML file in every route.
For Example: When the user hits the main URL delivers index.html :
 //assuming app is express Object.
 app.get('/',function(req,res) {
   res.sendFile('index.html');
 });
Note: This code is for example purposes. It will cause a directory resolution error.
Step 3: Render HTML in Express
Let’s create a simple website consisting of a Home page. We will be using Bootstrap for designing and jQuery for event handling.
Directory Structure:
 ----- node_modules
 |--+express
 ---+ index.html
 ---+ about.html
 ---+ index.html
 --- app.js
 ----package.json
package.json
 {
     "name": "htmlRender",
     "version": "1.0.0",
     "description": "",
     "main": "index.js",
     "scripts": {
         "test": ""
     },
     "keywords": [],
     "author": "",
     "license": "ISC",
     "dependencies": {
         "express": "^4.16.4"
     }
 }
Below is our express server code.
app.js
app.js
const express = require('express');
const app = express();
const path = require('path');
const router = express.Router();

router.get('/',function(req,res){
  res.sendFile(path.join(__dirname+'/index.html'));
  //__dirname : It will resolve to your project folder.
});

router.get('/about',function(req,res){
  res.sendFile(path.join(__dirname+'/about.html'));
});

router.get('/sitemap',function(req,res){
  res.sendFile(path.join(__dirname+'/sitemap.html'));
});

//add the router
app.use('/', router);
app.listen(process.env.port || 3000);

console.log('Running at Port 3000');
Below is our “index.html” file.
index.html
<div style="margin: 100px;"><nav class="navbar navbar-inverse navbar-static-top">
<div class="container"><a class="navbar-brand" href="/">Express HTML</a>
<p> </p>
<ul class="nav navbar-nav">
<li class="active"><a href="/">Home</a></li>
<li><a href="/about">About</a></li>
<li><a href="/sitemap">Sitemap</a></li>
</ul>
</div>
</nav>
<div class="jumbotron" style="padding: 40px;">
<h1>Hello, world!</h1>
<p>This is a simple hero unit, a simple jumbotron-style component for calling extra attention to featured content or information.</p>
<p><a class="btn btn-primary btn-lg" role="button" href="#">Learn more</a></p>
<p> </p>
</div>
<p> </p>
</div>
Output:
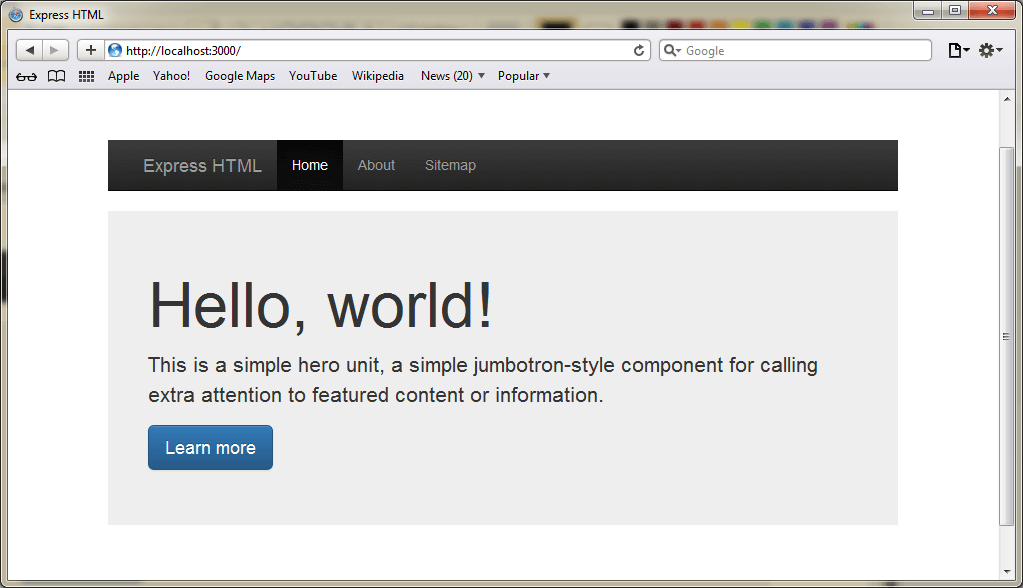
Here is the output.
Step 4: Render Dynamic HTML using templating engine
In the code shown above, we render static HTML files. However, there are scenarios where we need to render dynamic HTML templates. Before you get confused between static and dynamic templates, let me explain the difference quickly.
In static templates, we cannot pass custom variables and customize the template based on our needs. In dynamic templates, we can pass dynamic variables and render HTML files with different values.
Let’s build a simple project to understand the templating in Express. We will use the pug templating engine which is very popular and recommended by Express as well. We have used Pug for this website as well, in fact, this page is rendered using Pug templates.
Let’s install our dependencies.
npm i --S express pug
Below is our Express server code.
app.js
const express = require("express");
 const app = express();
 const path = require("path");
 const router = express.Router();

app.set("view engine", "pug");
app.set("views", path.join(__dirname, "views"));

router.get("/", (req, res) => {
res.render("index");
});

router.get("/about", (req, res) => {
res.render("about", { title: "Hey", message: "Hello there!" });
});

app.use("/", router);
app.listen(process.env.port || 3000);

console.log("Running at Port 3000");
Observe in routers, we are passing dynamic values to Pug templates. Here is the code of Pug templates residing in the views directory.
index.pug
 html
   head
     title Render HTML using PUG
   body
     h1 Welcome
about.pug
 html
   head
     title= title
   body
     h1= message
After running this code, navigate your browser to localhost:3000/about, you should see an HTML output rendered using Pug templates.

Awesome. These values can be fetched from a database or any other source and rendered using Pug templates.
Related articles about Databases: Database Tutorials
Further reading
Please read some of our best tutorials.
- How to detect device type in Express
- Error handling in Express using Middleware
- Express Complete tutorial: Part 1
- Node js Tutorial for Beginners Step by Step With Examples
Conclusion
There are scenarios where you need to develop a web server that delivers HTML files like how your apache does. This can be done in Node.js using the sendFile() method and templating can be done using Pug module. However, this is not the optimal use of Node.js but you can use such a feature to achieve a custom web server for your own application.
Reference
https://www.npmjs.com/package/pug