New to Rust? Grab our free Rust for Beginners eBook Get it free →
Create a Basic Calendar Application with Python Tkinter
Ever wondered how computer programs make those clickable buttons and user-friendly interfaces? Well, it’s all thanks to something called a graphical user interface or GUI. In Python, Tkinter is the go-to toolkit for creating stylish interfaces with ease. This article gives you a brief overview of Tkinter, explaining its significance in Python and why GUIs are important. Moreover, we won’t just discuss theory, we will actually create a basic calendar using Tkinter.
Introduction to Tkinter Module in Python
Tkinter is a Python library for making graphical user interfaces (GUIs). A GUI is what you see when you interact with a program using a mouse, keyboard, or touch inputs. Instead of just typing commands, you get to click buttons, fill in forms, and see things visually. Tkinter helps you build these graphical interfaces for your Python programs. Tkinter is short for “Tk Interface” with “Tk” referring to “Toolkit.”
Tkinter offers built-in “widgets,” which are like building blocks for constructing your GUI. These widgets, such as buttons, text boxes, labels, and frames, can be arranged and combined to form the visual elements of your program. It also allows you to enable event handling such as button clicks or key presses and also to define functions (event handlers) that get triggered when these events occur, allowing you to control what happens in response.
Installing Tkinter in Python
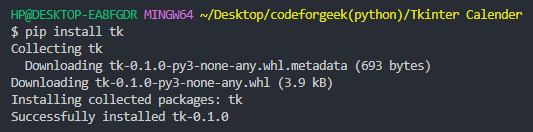
To see the basic structure and usage of Tkinter, we need to first install it. Tkinter is usually pre-installed in most systems. If it’s not, you can install it using the following command:
pip install tk
Creating a GUI Calendar Using Tkinter in Python
Now that we have installed Tkinter, let’s see the setup, import and usage along with creating a simple calendar using it.
Step 1: Environment Setup
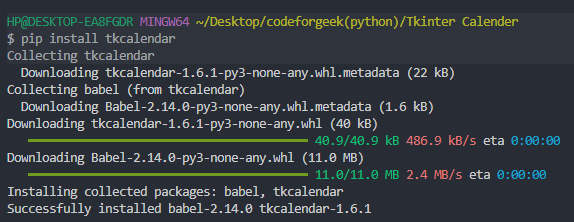
Since we are working with Python, let’s create a Python file named “Calender.py“. Also if we are working with calendars, we need to install the “tkcalendar” which is a Python module for creating calendar widgets in tkinter.
pip install tkcalendar
Step 2: Importing Modules
To use Tkinter in our project we need to import the module in our Python file like:
import tkinter as tk
Along with the Calendar widget from the tkcalendar module:
from tkcalendar import Calendar
Step 3: Creating Main Window
Next, we create the main window of our application using the Tk class:
app = tk.Tk()
app.title("Simple Calendar")
The first line initializes a Tkinter application object and assigns it to the variable “app“. The second line sets the title of the application window to “Simple Calendar“.
Step 4: Creating Calendar Widget
Next, we create the calendar widget for our application:
calendar = Calendar(app)
calendar.pack(padx=10, pady=10)
A calendar widget is created, and it is assigned to the variable “calendar.” This widget is designed to display a calendar interface. The pack() method is used to organize and display the calendar widget within the Tkinter window (app). The padx and pady parameters add horizontal and vertical padding respectively around the widget, ensuring some space between the calendar and the edges of the window.
Step 5: Executing Tkinter Main Loop
Now it’s time to write a code that will run our application. We create a Tkinter main loop to display the application window.
app.mainloop()
Complete Code:
import tkinter as tk
from tkcalendar import Calendar
app = tk.Tk()
app.title("Simple Calendar")
calendar = Calendar(app)
calendar.pack(padx=10, pady=10)
app.mainloop()
Output:
When we run the above written code, an application window is created with a calendar widget.
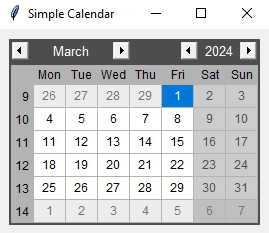
And here we go! We have created a simple calendar using Tkinter in Python. But wait, don’t you think these shades of grey bore you a little, no need to worry as we have got a solution to this. Now let’s learn how to customize colors in our widget and add event listeners to make it more attractive and interactive.
Customizing the Tkinter Calendar
It is possible to add customization to your Calendar to present it more beautifully like changing the colors of blocks and fonts.
If you see the code mentioned in Step 4 for widget creation:
calendar = Calendar(app)
Here we can add the customization code next to app inside the open braces. Let’s see the format:
calendar = Calendar(
    app,
    selectmode="day",
    date_pattern="yyyy-mm-dd",
    font="Arial 12",
    foreground="black",
    background="#FFB6C1",
    headersbackground="#FF69B4",
    headersforeground="white",
    selectforeground="white",
    selectbackground="#FF1493",
    weekendforeground="#FF1493",
    weekendbackground="#FFB6C1",
    othermonthforeground="#DC143C",
    othermonthbackground="#FFB6C1",
    disabledforeground="#FFA07A",
    command=on_date_selected
)
Now we will define a function called on_date_selected. This function retrieves the selected date from a calendar widget and prints it out in a specific format.
#defination for on_date_selected

def on_date_selected():
    selected_date = calendar.get_date()
    print(f"Selected date: {selected_date}")
Here,
- app: This specifies the parent widget (in this case the main application window) to which the Calendar widget belongs.
- selectmode=”day”: It sets the selection mode of the calendar. “day” allows the selection of individual days and other options include “month” and “year”.
- date_pattern=”yyyy-mm-dd”: It sets the format in which the selected date will be displayed. In this case, it’s set to the standard year-month-day format.
- font=”Arial 12″: It specifies the font style and size for the text within the calendar.
- foreground=”black”: It sets the foreground color for regular text.
- background=”#FFB6C1″: It sets the background color to a shade of pink.
- headersbackground=”#FF69B4″: It sets the background color for headers.
- headersforeground=”white”: It sets the foreground color for the headers.
- selectforeground=”white”: It sets the text color for the selected date.
- selectbackground=”#FF1493″: It sets the background color for the selected date.
- weekendforeground=”#FF1493″: It sets the text color for weekend dates.
- weekendbackground=”#FFB6C1″: It sets the background color for weekend dates.
- othermonthforeground=”#DC143C”: It sets the text color for dates from other months (not in the current month).
- othermonthbackground=”#FFB6C1″: It sets the background color for dates from other months.
- disabledforeground=”#FFA07A”: It sets the text color for disabled dates (dates that are not selectable).
- command=on_date_selected: It specifies a callback function (on_date_selected) to be executed when a date is selected in the calendar.
You can customize these settings to match your preferences and the theme you want for your application.
Complete Code:
import tkinter as tk
from tkcalendar import Calendar


def on_date_selected():
    selected_date = calendar.get_date()
    print(f"Selected date: {selected_date}")


app = tk.Tk()
app.title("Pink Themed Calendar")
calendar = Calendar(
    app,
    selectmode="day",
    date_pattern="yyyy-mm-dd",
    font="Arial 12",
    foreground="black",
    background="#FFB6C1",
    headersbackground="#FF69B4",
    headersforeground="white",
    selectforeground="white",
    selectbackground="#FF1493",
    weekendforeground="#FF1493",
    weekendbackground="#FFB6C1",
    othermonthforeground="#DC143C",
    othermonthbackground="#FFB6C1",
    disabledforeground="#FFA07A",
    command=on_date_selected
)
calendar.pack(padx=10, pady=10)
app.mainloop()
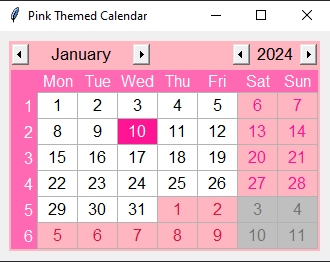
Output:
Event Handling in the Tkinter Calendar
It is possible to add Event Handling like mouse clicks in the calendar. Let’s take an example where we can display events using mouse clicks.
Firstly we need to create a dictionary to store events for specific dates:
events = {
    "2024-12-25": "Christmas",
    "2024-12-31": "New year's Eve",
}
Then we need to add event handling for specific dates:
def on_specific_date_selected(event):

    # Ignore the event parameter,but keep it since it's expected by the event binding mechanism.
    date = calendar.get_date()
    if date in events:
        event_label.config(text=f"Event: {events[date]}", fg="#008000")
    else:
        event_label.config(text="No event for this date", fg="black")
        pass
Then we will create a label for displaying events:
event_label = tk.Label(app, text="", font=("Arial", 12), pady=10)
event_label.pack()
Now we will bind the event handling function to the <<CalendarSelected>> event:
calendar.bind("<<CalendarSelected>>", on_specific_date_selected)
Complete Code:
import tkinter as tk
from tkcalendar import Calendar


def on_date_selected():
    selected_date = calendar.get_date()
    print(f"Selected date: {selected_date}")


app = tk.Tk()
app.title("The Event Handling Calendar")
calendar = Calendar(
    app,
    selectmode="day",
    date_pattern="yyyy-mm-dd",
    font="Arial 12",
    foreground="black",
    background="#7FFF00",
    headersbackground="#32CD32",
    headersforeground="white",
    selectforeground="white",
    selectbackground="#008000",
    weekendforeground="#008000",
    weekendbackground="#7FFF00",
    othermonthforeground="#008000",
    othermonthbackground="#7FFF00",
    disabledforeground="#00FF00",
    command=on_date_selected
)
calendar.pack(padx=10, pady=10)
events = {
    "2024-12-25": "Christmas",
    "2024-12-31": "New year's Eve",
}


def on_specific_date_selected(event):

    # Ignore the event parameter,since it's expected by the event binding mechanism.
    date = calendar.get_date()
    if date in events:
        event_label.config(text=f"Event: {events[date]}", fg="#008000")
    else:
        event_label.config(text="No event for this date", fg="black")
        pass


event_label = tk.Label(app, text="", font=("Arial", 12), pady=10)
event_label.pack()
calendar.bind("<<CalendarSelected>>", on_specific_date_selected)
app.mainloop()
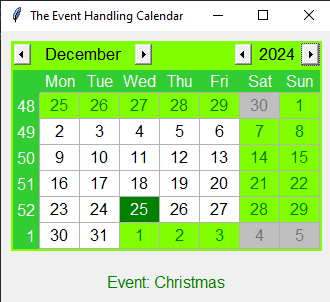
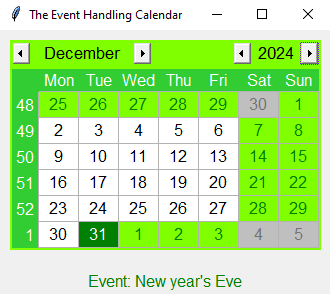
Output:
On doing a mouse click on a specific date, the event defined on that date is displayed on the label.
Summary
So that’s it for this article. In this lengthy session, we discussed how to create a calendar widget using the Tkinter library. This library is so versatile that it can also provide us with the means to customize our widgets and add event handlers to them, as demonstrated step by step. I hope the explanations are clear, and now you are able to create your own improved Tkinter calendar application.
Learning Tkinter for GUI development in Python is valuable, letting developers build user-friendly interfaces, and improving the overall experience in Python applications.
If you found this helpful, you can explore more Tkinter articles –
Reference
https://stackoverflow.com/questions/47954439/make-a-calendar-view-for-events-in-python-tkinter