New to Rust? Grab our free Rust for Beginners eBook Get it free →
What’s New in Deno 2: Easily Explained

Since October 2024, Deno 2 has introduced significant improvements to this modern JavaScript and TypeScript runtime. Deno, created by the original author of Node.js, continues to simplify the development process, enhance compatibility with legacy tools, and improve performance.
In this article, we take a look at what’s new with the latest releases of Deno 2 and give you some simple examples to get your working with Deno started.
Installation
Deno 2 is a modern JavaScript runtime that combines security with a great developer experience. To install Deno 2 on your Windows system, follow these steps:
Open PowerShell and run:
iwr https://deno.land/install.ps1 -useb | iex
This command downloads and installs Deno. Ensure that the Deno binary is added to your system’s PATH.
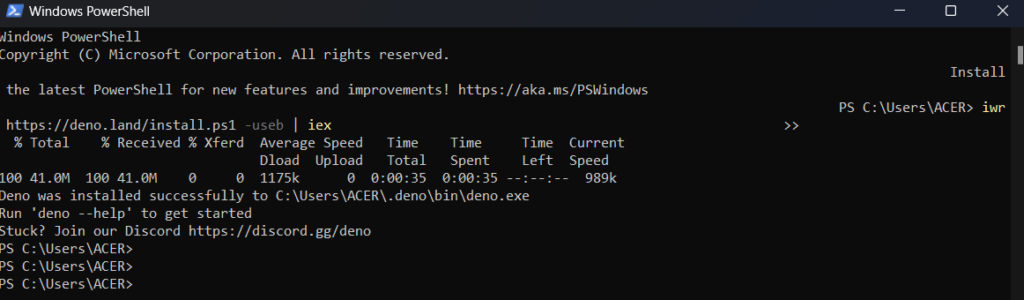
To check if Deno is installed, you can do a quick version check:

Key Features of Deno 2.0 You Should Know About
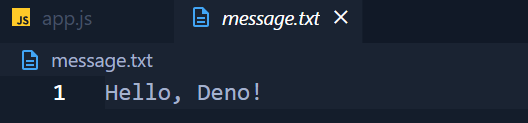
1. Basic File Operations
Deno enables us to perform basic read and write operations on files, among other things. It allows us to use any module of our choice. Although basic file operations have been available since Deno’s early versions, Deno 2.0 continues to ensure that these operations are performed with security and efficiency in mind.
Example:
import * as fs from "https://deno.land/[email protected]/node/fs.ts";
fs.writeFileSync('message.txt', 'Hello, Deno!');
console.log('File written successfully.');
Output:

2. Compatibility with ES Modules and CommonJS
- ES Modules (import/export) are preferred for Deno 2.
- On the CommonJS side, we can use .cjs or force package.json to specify CommonJS (require) compatibility.
- Running CommonJS files can be simplified via –unstable-detect-cjs flag, but it’s not as stable.
- It is recommended to refactor to ES Modules because ES Modules are better compatible with Deno’s ecosystem.
If you are new to JavaScript module types, such as the difference between CommonJS and ESM, click here to learn more about them in detail.
3. Improved Package Management
Deno 2 introduces new commands to manage dependencies effectively:
- deno add – Adds a new dependency.
- deno remove – Removes an existing dependency.
- deno install – Installs a command-line tool globally.
Deno 2 supports npm packages, but it encourages a more self-contained package management experience by allowing you to install npm packages directly through deno add commands (e.g., deno add npm:lodash).
While this is possible, the big difference is that Deno creates its own runtime and provides a native package registry, meaning that regular dependency management by an external package manager like npm isn’t necessary in everyday circumstances. As a result, they have a simpler workflow where Deno takes care of both package install and execution, remaining inside its ecosystem.
Example:
Let’s see how to add a dependency, such as Lodash.

This command downloads the library and adds it to deno.lock. We can then use it in our project:
import _ from 'lodash';

const numbers = [1, 2, 3, 4, 5];
const sum = _.sum(numbers);
console.log(`Sum: ${sum}`);
Output:

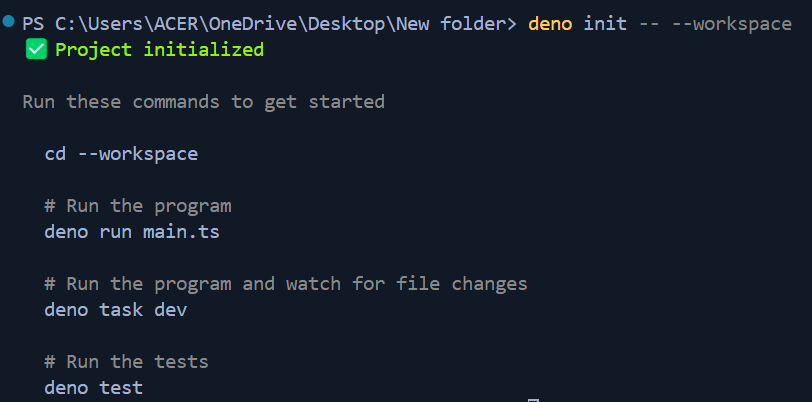
4. Workspaces and Monorepo Support
Working monorepos has become easier in Deno 2 through the introduction of workspaces. If you’re working on lots of different projects but don’t want to work in many different repositories, a workspace provides a shared dependency and tool space.
Example:
deno init -- --workspace
Output: This command creates a deno.json that defines workspace configuration. Under the workspace, you can define multiple projects, and they can share dependencies between them.
5. Support for Private npm Registries
Private npm registries are now supported in Deno 2, enabling secure access to private packages for people and organisations managing secure package registries.
Example:
To configure a private registry, update your deno.json file:
jsonCopy code{
  "imports": {
    "npm:": "https://my-private-registry.com/"
  }
}
This can be used to use private deno packages in your deno project in a secure manner.
6. New JavaScript Registry (JSR)
The JavaScript Registry (JSR) is new to Deno 2, and is a platform for sharing JavaScript libraries between different runtimes. It’s all TypeScript, so you can publish modules as TypeScript source code.
Example:
Here is how we publish a module:
- Create a module:
export function greet(name: string): string {
    return `Hello, ${name}!`;
  }
- Create and configure deno.json:
{
  "name": "@myorg/greet-module",
  "version": "0.0.1",
  "exports": {
    ".": "./hello.ts"
  },
  "license": "MIT"
}
- Publish it to JSR:
deno publish --allow-dirty
This command will send a publishing request to JSR, and the JSR page will pop up automatically.
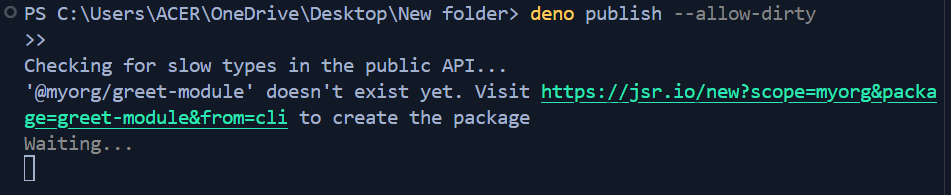
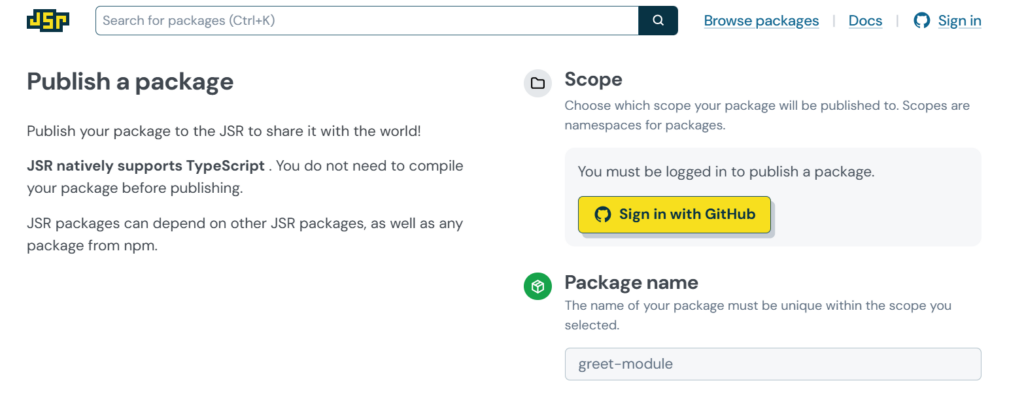
Then, we sign in to our GitHub account to publish the package. Once it’s done, a success message is displayed on the terminal.
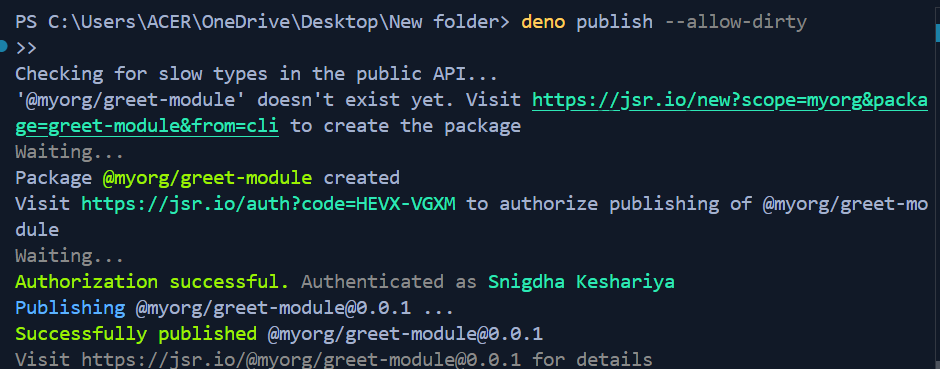
To use the published package, the site will display import code snippets.

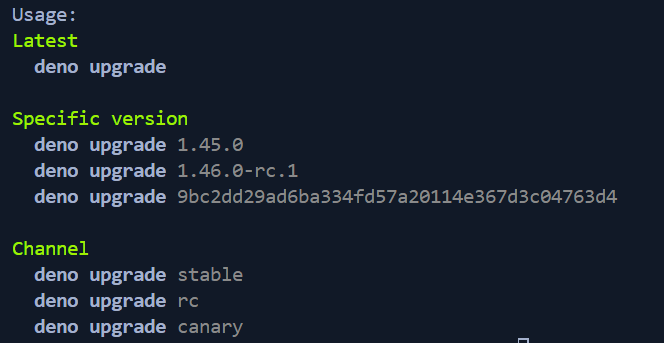
7. Long-Term Support (LTS) Releases
LTS releases are introduced to Deno 2 to bring stability to the production environment. LTS versions can also be used by developers who need consistent performance, and updates.
Here are some deno version control commands:
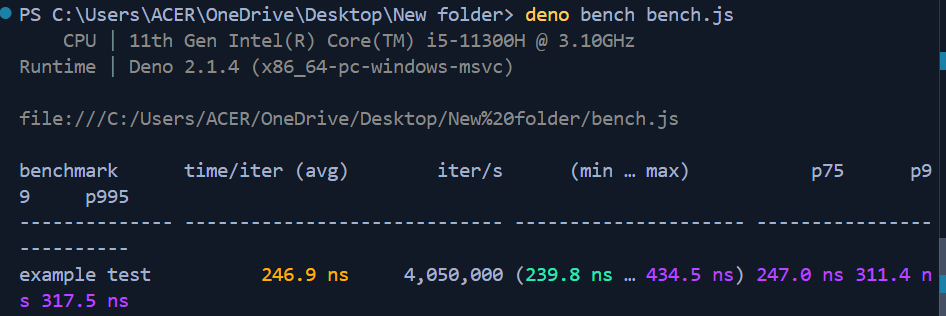
8. Faster Performance
Deno 2 focuses on speed. It uses a more optimised V8 JavaScript engine and also enhances caching mechanism better. It makes the scripts startup faster and run faster.
Example:
Let us test its speed using a simple program.
Deno.bench('example test', () => {
    for (let i = 0; i < 1000; i++) {
      Math.sqrt(i);
    }
  });
We use the following command to check the benchmark:
Conclusion
This runtime is a big step ahead with Deno 2. Deno 2 is a powerful environment for modern JavaScript and TypeScript development with improved Node.js compatibility, stable standard libraries, new and improved building features (e.g. workspaces, private npm registry support), and integrated support for npm-like package management. From the beginning of a new project to moving from Node.js, with Deno 2 you have tools and features to make your development experience simpler and more enjoyable.
Reference