New to Rust? Grab our free Rust for Beginners eBook Get it free →
Creating a Temperature Converter in Python Using Tkinter

Welcome to another tutorial of our Tkinter series, where we will discover how we can create a temperature converter using the Tkinter library. Tkinter is a very versatile and helpful library that we can use to create GUI applications. In this article, let’s discuss the installation and its use in making a Celsius to Fahrenheit and Fahrenheit to Celsius converter. So let’s start.
Basic Concepts About Temperature
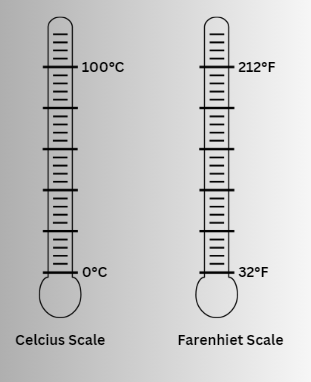
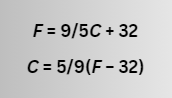
Temperature measures hotness or coldness. Celsius scale sets freezing and boiling points of water at 0°C and 100°C respectively. Fahrenheit scale sets these points at 32°F and 212°F. Celsius is widely used globally, while Fahrenheit is common in the United States. To convert Celsius to Fahrenheit, use ![]() ; and to convert Fahrenheit to Celsius, use
; and to convert Fahrenheit to Celsius, use ![]() . Understanding these scales is vital for daily tasks like cooking and weather forecasting, as well as scientific endeavours.
. Understanding these scales is vital for daily tasks like cooking and weather forecasting, as well as scientific endeavours.
Creating a Celsius to Fahrenheit Converter
Now that we know temperature conversion, let’s try to implement the logic into our Python code to make an application out of it. Let’s see how we can create a Celsius to Fahrenheit converter step by step.
Step 1: Import Tkinter
Tkinter is a Python library used for creating graphical user interfaces. If you don’t have Tkinter preinstalled, you can install it on your system by running the following command:
pip install tk
Let’s start by importing the Tkinter library as ‘tk‘ for ease of use.
import tkinter as tk
Step 2: Define Conversion Function
First, we will create a function called celsius_to_fahrenheit() to convert Celsius to Fahrenheit. This function will retrieve the Celsius value from an entry widget, then convert it to Fahrenheit using the formula (Celsius × 9/5) + 32, and finally display the result.
def celsius_to_fahrenheit():
    try:
        celsius = float(celsius_entry.get())
        fahrenheit = (celsius * 9/5) + 32
        fahrenheit_label.config(text=f"{fahrenheit:.2f}°F", fg="#F1F1F2")
    except ValueError:
        fahrenheit_label.config(text="")
Step 3: Create Main Window
Then, we will initialize the main window (root) for the application and set its title to ‘Celsius to Fahrenheit Converter’. We’ll also configure the background color.
root = tk.Tk()
root.title("Celsius to Fahrenheit Converter")
root.configure(background="#A1D6E2")
Step 4: Create Label and Entry Widget
After that, we will create a label prompting the user to enter the temperature in Celsius. Additionally, we’ll create an entry widget for the user to input the Celsius value.
input_label = tk.Label(root, text="Enter the temperature in Celsius",
                       bg="#1995AD", fg="#F1F1F2", font=("Arial", 14, "bold"))
input_label.grid(row=0, column=0, padx=10, pady=10)

celsius_entry = tk.Entry(root)
celsius_entry.grid(row=1, column=0, padx=10, pady=10)
Step 5: Create Convert Button
Now we will create a button labeled ‘Convert’ that, when clicked, triggers the celsius_to_fahrenheit() function.
convert_button = tk.Button(root, text="Convert", command=celsius_to_fahrenheit,
                           bg="#1995AD", fg="#F1F1F2", font=("Arial", 14, "bold"))
convert_button.grid(row=2, column=0, padx=10, pady=10)
Step 6: Create Output Label
Then we will create a label to display the converted temperature in Fahrenheit.
output_label = tk.Label(root, text="Temperature in Fahrenheit", bg="#1995AD", fg="#F1F1F2", font=("Arial", 14, "bold"))
output_label.grid(row=3, column=0, padx=10, pady=10)

fahrenheit_label = tk.Label(root, text="", bg="#1995AD", fg="#F1F1F2", font=("Arial", 14, "bold"))
fahrenheit_label.grid(row=4, column=0, padx=10, pady=10)
Step 7: Start Event Loop
Finally, we’ll start the Tkinter event loop to handle user interactions and keep the GUI responsive.
root.mainloop()
Complete Code
import tkinter as tk


def celsius_to_fahrenheit():
    try:
        celsius = float(celsius_entry.get())
        fahrenheit = (celsius * 9/5) + 32
        fahrenheit_label.config(text=f"{fahrenheit:.2f}°F", fg="#F1F1F2")
    except ValueError:
        fahrenheit_label.config(text="")


# Create the main window
root = tk.Tk()
root.title("Celsius to Fahrenheit Converter")
root.configure(background="#A1D6E2")

# Create labels and entry widgets
input_label = tk.Label(root, text="Enter the temperature in Celsius",
                       bg="#1995AD", fg="#F1F1F2", font=("Arial", 14, "bold"))
input_label.grid(row=0, column=0, padx=10, pady=10)

celsius_entry = tk.Entry(root)
celsius_entry.grid(row=1, column=0, padx=10, pady=10)

convert_button = tk.Button(root, text="Convert", command=celsius_to_fahrenheit,
                           bg="#1995AD", fg="#F1F1F2", font=("Arial", 14, "bold"))
convert_button.grid(row=2, column=0, padx=10, pady=10)

output_label = tk.Label(root, text="Temperature in Fahrenheit", bg="#1995AD", fg="#F1F1F2", font=("Arial", 14, "bold"))
output_label.grid(row=3, column=0, padx=10, pady=10)

fahrenheit_label = tk.Label(root, text="", bg="#1995AD", fg="#F1F1F2", font=("Arial", 14, "bold"))
fahrenheit_label.grid(row=4, column=0, padx=10, pady=10)

# Start the main event loop
root.mainloop()
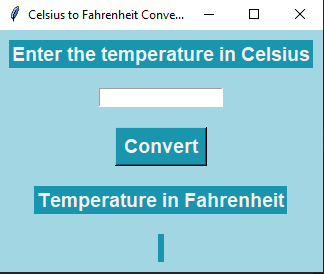
Output
When running the above, we will see an application window with an input section that takes temperature in Celsius and a ‘Convert’ button.
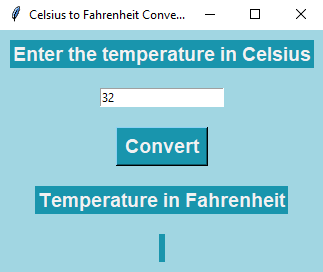
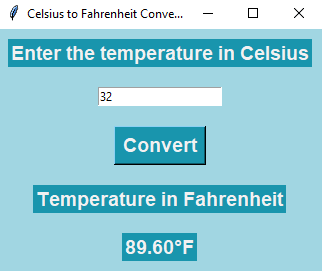
We provide ‘32‘ as an input, and as we click on the convert button, the temperature is converted into Fahrenheit, and ‘89.60‘ is displayed.
Creating a Fahrenheit to Celsius Converter
See, it was pretty easy to create a Celsius to Fahrenheit converter. Similarly, we can create a Fahrenheit to Celsius converter, the steps will be the same most of the time, with the only change in the definition of the function. Closely observe the given code.
def fahrenheit_to_celsius():
    try:
        fahrenheit = float(fahrenheit_entry.get())
        celsius = (fahrenheit - 32) * 5/9
        celsius_label.config(text=f"{celsius:.2f}°C", fg="#330000")
    except ValueError:
        celsius_label.config(text="")
This code defines a function fahrenheit_to_celsius() to convert Fahrenheit to Celsius. It retrieves the Fahrenheit value from an entry widget, converts it to Celsius using the formula and displays the result. If the input is not a valid number, it clears the displayed Celsius value.
A few more changes have been made to the code, which is self-explanatory. Here is the complete code.
Complete Code
import tkinter as tk


def fahrenheit_to_celsius():
    try:
        fahrenheit = float(fahrenheit_entry.get())
        celsius = (fahrenheit - 32) * 5/9
        celsius_label.config(text=f"{celsius:.2f}°C", fg="#330000")
    except ValueError:
        celsius_label.config(text="")


# Create the main window
root = tk.Tk()
root.title("Fahrenheit to Celsius Converter")
root.configure(background="#990011")

# Define the Arial font
font_style = ("Arial", 14, "bold")

# Create labels and entry widgets
input_label = tk.Label(root, text="Enter the temperature in Fahrenheit", bg="#FCF6F5", fg="#330000", font=font_style)
input_label.grid(row=0, column=0, padx=10, pady=10)

fahrenheit_entry = tk.Entry(root)
fahrenheit_entry.grid(row=1, column=0, padx=10, pady=10)

convert_button = tk.Button(root, text="Convert", command=fahrenheit_to_celsius,
                           bg="#FCF6F5", fg="#330000", font=font_style)
convert_button.grid(row=2, column=0, padx=10, pady=10)

output_label = tk.Label(root, text="Temperature in Celsius", bg="#FCF6F5", fg="#330000", font=font_style)
output_label.grid(row=3, column=0, padx=10, pady=10)

celsius_label = tk.Label(root, text="", bg="#FCF6F5", fg="#330000", font=font_style)
celsius_label.grid(row=4, column=0, padx=10, pady=10)

# Start the main event loop
root.mainloop()
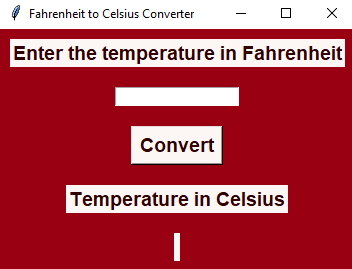
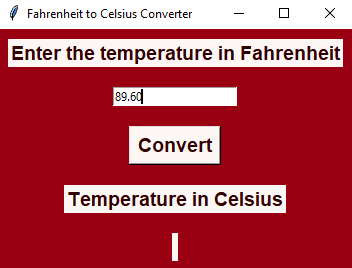
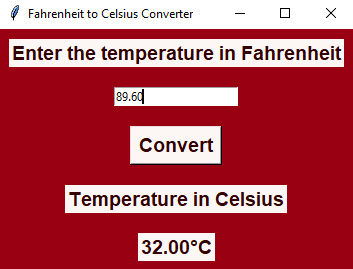
Output
When executing the above code, we get an output like the one given below:
Summary
In this Tkinter tutorial, we made a temperature converter app. Tkinter, a Python library, helps with user interfaces. We start by installing Tkinter, then focus on converting Celsius to Fahrenheit with simple code. Step by step, we create a converter where users enter Celsius temperature to get Fahrenheit equivalents. We also expand to a Fahrenheit to Celsius converter, using similar principles. With this easy project, this tutorial helps beginners make practical Python GUIs for everyday use.
If you enjoyed this Tkinter chapter, don’t forget to check out more similar specials –
Reference