
New to Rust? Grab our free Rust for Beginners eBook Get it free →
Node-gyp: What it is, How it works and How to fix common errors
If you have ever run npm install and watched it fail with a wall of red text mentioning Python, GCC or Visual Studio, you have met node-gyp. It is the build tool Node.js uses to compile native C and C++ addons, and it causes more install failures than almost any other tool you will encounter in Node.js development.
This guide covers what node-gyp actually does, how to install and use it, how to build your first native addon and how to fix the errors you will almost certainly hit along the way.
What is node-gyp?
node-gyp is a cross-platform command-line tool that compiles native addon modules for Node.js. The “gyp” part stands for Generate Your Projects, taken from Google’s GYP (Generate Your Projects) build system originally written for the Chromium browser. node-gyp wraps that build system and handles the differences between Windows, macOS and Linux so you can ship native code from a single binding.gyp config file.
It ships alongside npm, so if you have Node.js installed you already have node-gyp somewhere on your system. You just don’t have it exposed as a global command unless you install it explicitly.
What are native addons?
Native addons are Node.js modules written in C or C++ instead of JavaScript. Node.js loads them as .node files, which are regular shared libraries (.dll on Windows, .dylib on macOS, .so on Linux) renamed with the .node extension and loaded via process.dlopen().
You reach for a native addon when JavaScript alone is too slow or when you need access to something the JS runtime cannot reach: hardware interfaces, OS-level APIs, GPU compute, or an existing C library you don’t want to rewrite. Popular packages like bcrypt, sharp, canvas and sqlite3 all ship native addons, so even if you never write one yourself, node-gyp will compile one on your behalf the moment you npm install any of them. If you are unsure where npm installs these packages, that guide covers both local and global install paths.
How node-gyp works
When npm sees a package with a binding.gyp file in its root, it invokes node-gyp rebuild automatically during installation. You don’t need to set "gypfile": true in package.json. The presence of binding.gyp is enough to trigger the build.
The build has two phases:
Configure reads binding.gyp and generates build files for the current platform: a Makefile on Unix and a .vcxproj on Windows. These files live in the build/ directory.
Build invokes the platform compiler (GCC or Clang on Linux and macOS, MSBuild on Windows) to compile your C++ sources into a .node binary. The binary lands in build/Release/ by default or build/Debug/ when you pass --debug.
Prerequisites for node-gyp
node-gyp itself is just a coordinator. The actual compilation happens through tools it expects to find on your system. Missing any of them produces the errors most developers associate with node-gyp.
Python
node-gyp requires Python 3.6 or later. Python 2 is not supported. On many machines, especially Windows, Python is not installed, or the version on PATH is still Python 2. You can check what you have:
python3 --version
If the version is below 3.6, install a current Python release from python.org and make sure it is on your system PATH.
C++ compiler and build tools
The compiler requirement differs by operating system.
macOS: Install Xcode Command Line Tools. This gives you Clang and make:
xcode-select --install
Linux (Ubuntu/Debian): Install the build-essential package:
sudo apt-get update
sudo apt-get install -y build-essential python3
Windows: Install Visual Studio 2022 with the “Desktop development with C++” workload, or install just the build tools without the full IDE:
# Option 1: Install via Chocolatey
choco install python visualstudio2022-workload-vctools -y

# Option 2: Install windows-build-tools via npm (older Node versions)
npm install --global --production windows-build-tools
For ARM64 Windows you also need Visual Studio 2022 version 17.4 or later to get the native ARM64 C++ compiler.
You can verify your compiler toolchain:
gcc --version # Linux / macOS (shows Clang on macOS)
How to install node-gyp
For most users who only need node-gyp to run during npm install, you do not need to install it globally. npm handles it. If you are writing native addons yourself and need the node-gyp command directly:
npm install -g node-gyp

Confirm it installed:
node-gyp --version
You should see a version string. If you see an error, check that your Python and compiler prerequisites are in place first, since node-gyp validates them at startup.
node-gyp commands
Here is the full command set:
| Command | What it does |
|---|---|
node-gyp configure | Reads binding.gyp and generates build files for the current platform |
node-gyp build | Compiles the native addon using the generated build files |
node-gyp rebuild | Runs clean, configure and build in sequence |
node-gyp clean | Deletes the build/ directory |
node-gyp install | Downloads Node.js development headers for a given version |
node-gyp list | Lists installed Node.js development file versions |
node-gyp remove | Removes downloaded development headers for a given version |
In practice you will use rebuild most of the time, since it guarantees a clean state before each build. You can also pass the Node.js version you want to compile against:
node-gyp rebuild --target=20.0.0
This is useful when building an addon that targets a different Node version from the one currently installed on your machine. node-gyp downloads the matching development headers automatically.
Building a native addon: end-to-end example
Let’s build a native addon that adds two numbers, purely in C++, and call it from Node.js. This is the simplest real example that shows the full workflow.
Create the C++ source file
Create addon.cpp in your project root:
#include <node.h>

using namespace v8;

void Add(const FunctionCallbackInfo<Value>& args) {
  Isolate* isolate = args.GetIsolate();

  if (args.Length() < 2) {
    isolate->ThrowException(Exception::Error(
      String::NewFromUtf8(isolate, "Pass two numbers").ToLocalChecked()
    ));
    return;
  }

  v8::Local<v8::Context> context = isolate->GetCurrentContext();
  double value =
    args[0]->ToNumber(context).ToLocalChecked()->Value() +
    args[1]->ToNumber(context).ToLocalChecked()->Value();

  Local<Number> result = Number::New(isolate, value);
  args.GetReturnValue().Set(result);
}

void Initialize(Local<Object> exports) {
  NODE_SET_METHOD(exports, "add", Add);
}

NODE_MODULE(NODE_GYP_MODULE_NAME, Initialize)
Create the binding.gyp file
binding.gyp is a JSON-like config file that tells node-gyp what to compile:
{
  "targets": [
    {
      "target_name": "addon",
      "sources": [ "addon.cpp" ]
    }
  ]
}
target_name becomes the filename of the compiled .node binary. sources is the list of C++ files to compile.
Configure and build
node-gyp configure
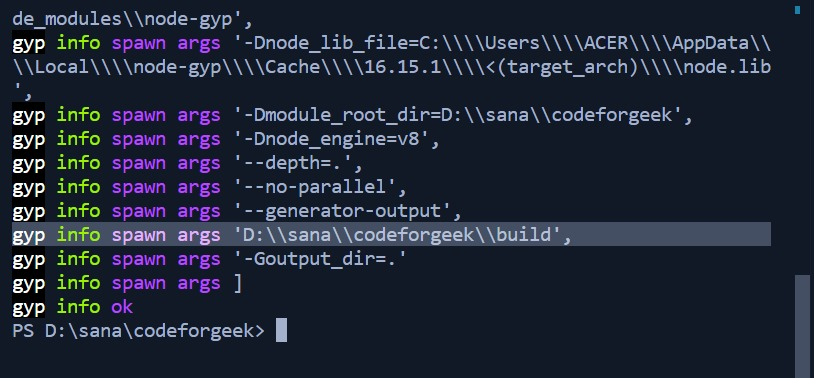
The run was successful as ok is printed on the last line.
Then:
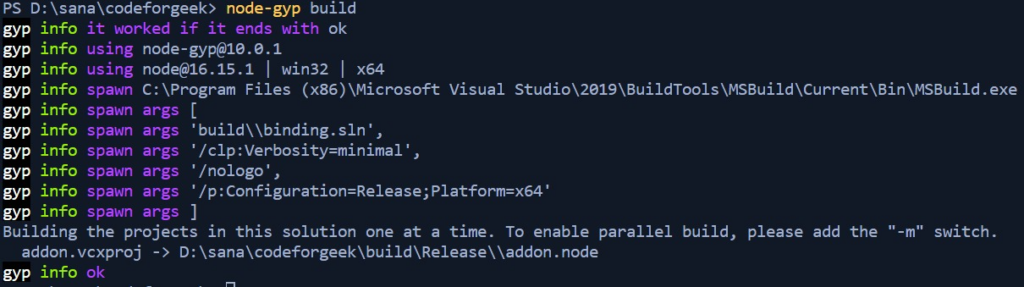
node-gyp build
Or in one step:
node-gyp rebuild
After a successful build, your binary sits at build/Release/addon.node.
Call the addon from Node.js
Create app.js:
const addon = require('./build/Release/addon');

const result = addon.add(5, 3);
console.log('Result:', result); // Result: 8
Run it:
node app.js
You should see Result: 8. The C++ function ran through node-gyp’s compiled binary, called from JavaScript.
Output example:

NAN vs Node-API: two ways to write addons
There are two main binding approaches, and knowing the difference matters when you are troubleshooting errors in third-party packages.
NAN (Native Abstractions for Node.js) wraps the V8 C++ API directly. Because V8 changes with every Node.js release, a NAN-based addon that compiled fine on Node 16 may fail on Node 20 without a recompile. You will see packages using NAN if their binding.gyp contains require("nan").
Node-API (N-API) is a stable C API built into Node.js itself, independent of the V8 version. An addon compiled against Node-API version 3 will run on any Node.js release that supports that API version without recompiling. This is the recommended approach for new addons. Packages using it include require("node-addon-api") in their binding.gyp.
If you are maintaining an older NAN-based addon, migrating to Node-API removes most version-compatibility headaches. The C++ wrapper package node-addon-api makes the migration straightforward.
Common node-gyp errors and how to fix them
Most node-gyp errors are not actually bugs in node-gyp. They are gaps in the build toolchain on your machine. Here is what you are likely to hit, by platform.
“Can’t find Python executable”
This fires when Python is missing or not on your PATH. Fix it by setting the path explicitly:
npm config set python /usr/bin/python3
On Windows:
npm config set python C:\Python312\python.exe
“gyp ERR! build error” on macOS
Usually means Xcode Command Line Tools are missing or outdated. Run:
xcode-select --install
If you recently upgraded macOS, you may need to reset the tools path:
sudo xcode-select --reset
Visual Studio not found on Windows
node-gyp needs a C++ compiler. If you see errors about MSBuild.exe or VCBuild.exe not being found:
- Install Visual Studio 2022 with the “Desktop development with C++” workload, or
- Install the standalone Build Tools for Visual Studio 2022
Then rebuild from a fresh terminal to pick up the new PATH.
Binding contract errors (NAN addons)
If an addon compiles but crashes at runtime, or if the linker step fails with undefined reference errors, the package probably uses NAN and was compiled against a different V8 version than you are running. Fix options:
- Upgrade or downgrade your Node.js version to match what the addon was built for. The Codeforgeek guide on how to downgrade Node version walks through this with nvm. If you need to manage multiple Node versions across projects, setting a default NVM version is the follow-up step.
- If you have access to the addon source, migrate it to Node-API.
Build fails only in CI
CI runners often have a minimal toolset. Build a Dockerfile that mirrors your runner to isolate which dependency is missing. A minimal Dockerfile for Alpine Linux:
FROM alpine:3.20
RUN apk add --no-cache build-base nodejs npm python3
WORKDIR /app
COPY package.json .
RUN npm install
Run docker build . to verify the toolchain produces a clean build. If it fails there too, you have a reproducible error you can fix. If it passes, the issue is in your CI image configuration.
How npm invokes node-gyp automatically
When you run npm install on a package that contains a binding.gyp file, npm invokes node-gyp rebuild on its own without needing a preinstall or postinstall entry in package.json. This matters for security reasons covered in the next section.
npm also downloads pre-built binaries if the package author published them via node-pre-gyp or a similar tool. If a matching binary exists for your platform and Node.js version, node-gyp does no compilation at all. That is why installing sharp on a common platform is fast while installing it on an unusual one can trigger a full compile.
The binding.gyp supply chain risk
In June 2026 Snyk disclosed a supply chain attack they tracked as “Node-gyp Supply Chain Compromise” that exploited exactly the automatic npm → node-gyp invocation path. The attack abused a binding.gyp feature: GYP’s build configuration syntax supports shell command expansion using <!(...). A malicious binding.gyp can run arbitrary code during node-gyp configure, before any compiler even starts.
The actual binding.gyp shipped in compromised packages was 157 bytes:
{
  "targets": [
    {
      "target_name": "Setup",
      "type": "none",
      "sources": ["<!(node index.js > /dev/null 2>&1 && echo stub.c)"]
    }
  ]
}
The <!(node index.js ...) expression runs node index.js at configure time. The package’s package.json contained no preinstall or postinstall entries, so script-focused security tooling saw nothing suspicious. The binding.gyp path runs even when you use npm install --ignore-scripts.
The payload harvested credentials from AWS, GCP, GitHub Actions, HashiCorp Vault and Kubernetes, then exfiltrated them through attacker-controlled GitHub repositories. 57 packages were compromised, including @vapi-ai/server-sdk.
How to detect it:
# Find binding.gyp files with command expansion
grep -rl '<!(' node_modules/*/binding.gyp node_modules/**/binding.gyp 2>/dev/null

# Find suspiciously large root-level index.js files
find node_modules -maxdepth 2 -name index.js -size +1M 2>/dev/null
How to harden against it:
- Pin all dependencies to exact versions with lockfile hashes
- Audit
binding.gypfiles in yournode_modulesas part of CI - Default to
npm install --ignore-scriptsin CI, then add a scanning gate for packages withbinding.gyp - Use Snyk or a similar tool to flag malicious package versions before they reach your build
This attack family continues to grow. Earlier waves used preinstall/postinstall hooks. This wave moved execution to the build configuration layer because most tooling does not look there.
Alternatives to node-gyp
node-gyp is the default and most widely supported tool, but it has known friction, particularly GYP’s verbose config syntax and the need to maintain Python and compiler toolchains. Two common alternatives:
CMake.js uses CMake instead of GYP as the build system. If you are already building C++ libraries with CMake, or if you find GYP’s config format hard to work with, CMake.js slots in as a direct replacement for node-gyp. The Node.js official docs mention it as a good alternative when node-gyp feels too constraining.
Pre-built binaries via node-pre-gyp or the newer prebuild let addon authors publish compiled binaries for every platform and Node.js version. Users then download the right binary at install time instead of compiling. This removes node-gyp from the install path entirely for end users, at the cost of extra publishing work for the addon author.
Key takeaways
- node-gyp compiles native C/C++ addons for Node.js using Google’s GYP build system
- It requires Python 3.6+, a C/C++ compiler and (on Windows) Visual Studio Build Tools
- npm invokes node-gyp automatically when a package contains
binding.gyp. No lifecycle script entry is needed - Most node-gyp errors are missing toolchain dependencies, not bugs in node-gyp itself
- NAN addons break across Node.js versions. Node-API addons are ABI-stable and the modern default
- A June 2026 supply chain attack weaponized
binding.gypshell expansion to run code at install time --ignore-scriptsdoes not blockbinding.gypexecution. The only reliable defence is not installing malicious versions- CMake.js and pre-built binaries are solid alternatives when node-gyp’s build chain is too much overhead
FAQ
What is node-gyp used for?
node-gyp compiles native C and C++ addons so Node.js can load them as .node binary modules. Popular packages like bcrypt and sharp rely on it.
Do I need to install node-gyp manually?
No. npm includes node-gyp and invokes it automatically when a package has a binding.gyp file. Install it globally only if you are writing native addons yourself.
Why does node-gyp need Python?
GYP’s build system is written in Python. node-gyp runs GYP scripts as part of the configure step, so Python 3.6 or later must be available on your PATH.
Does node-gyp work on Windows?
Yes, with Visual Studio Build Tools for the C++ compiler. Install the “Desktop development with C++” workload and Python 3, then node-gyp works the same as on macOS or Linux.
What is the difference between NAN and Node-API?
NAN binds directly to V8 and breaks when Node.js updates its engine. Node-API is a stable ABI layer maintained by the Node.js team that works across major Node versions without recompiling.
Can binding.gyp be used for malicious code execution?
Yes. GYP supports shell command expansion in binding.gyp, and a malicious package can run arbitrary code during npm install even without any lifecycle scripts. Pin your dependencies and audit binding.gyp files in CI.
How do I check if node-gyp installed correctly?
Run node-gyp --version. If you see a version number, the tool is installed. If you get a command not found error, run npm install -g node-gyp.
Summary
node-gyp has a reputation for being painful to set up and that reputation is mostly earned. But once you understand that the tool itself is fine and the errors come from missing system dependencies, the fixes become straightforward. Get Python 3, get a C++ compiler for your platform and you will clear the vast majority of install failures. For anything deeper, whether binding mismatches, supply chain risks or CI environments, the sections above give you a concrete checklist rather than guesswork. If you hit a cannot find module error after a successful build, that guide covers Node’s module resolution path in detail.


