New to Rust? Grab our free Rust for Beginners eBook Get it free →
MongoDB db.collection.findOneAndUpdate(): A Step-by-Step Guide for Node.js
It’s easy to find documents in a collection in the MongoDB database using methods like find() and findOne(), but when there is a need to find and in the meantime update a document, we have a special method findOneAndUpdate(). This method updates the first document that meets the selection criteria. Let’s learn about it in detail.
MongoDB findOneAndUpdate() Method
The findOneAndUpdate() method updates the first document that matches the given condition. Even if multiple documents satisfy the filter condition, only the first one is selected for the update operation.
Use this method only when you need to update a single document at a time, such as updating a particular post, updating a single user information, etc. In cases where you have to update all the documents based on some conditions, like where the age field is greater than 18 or something, this method is not applicable, instead, you can use updateMany().
Syntax:
The findOneAndUpdate() method requires two arguments, the first is the filter to find the documents and the second is the update to update the very first document.
db.collection.findOneAndUpdate(filter, update)
Return:
By default, it returns the original document. It only returns the updated document if the optional argument returnNewDocument is set to true or the returnDocument is set to after. If no document matches the query, it returns null.
Using findOneAndUpdate() in Node.js
Let us assume we are running a drone-selling platform where users can sell their drones. We will start off by creating this small application and then create an option to edit any of the drone info using the findOneAndUpdate() method.
Follow the steps below to learn how to implement findOneAndUpdate():
Make sure you have MongoDB installed on your system. If not, click here to learn how.
Step 1: Create a new project directory and initialise NPM:
npm init -y
Step 2: Create an entry point JavaScript file:
touch index.js
Step 3: Install express, ejs, mongoose and method-override:
npm i mongoose express method-override ejs
We have installed method-override API by Express to enable PUT or DELETE requests.
Step 4: Open a code editor and import all the installed packages inside the index.js with the help of the require() method:
const express = require('express');
const app = express();
const path = require('path');
const methodOverride = require('method-override');
const mongoose = require('mongoose');
const { urlencoded } = require('express');
We have also imported the path module to help us manage the file paths. This will also help us run our Node.js project from any directory.
Step 5: Set up a local port for the app server to listen:
app.listen(3000, () => {
    console.log('Connected to PORT 3000...');
})
Step 6: Set up MongoDB local database server connection using Mongoose. Then set up the EJS view engine and assign a folder to store our views. We also have to set up the method override middleware in our application.
mongoose.connect('mongodb://localhost:27017/droneStore', { useNewUrlParser: true, useUnifiedTopology: true })
    .then(() => {
        console.log(`CONNECTED TO MONGO!`);
    })
    .catch((err) => {
        console.log(`OH NO! MONGO CONNECTION ERROR!`);
        console.log(err);
    })

app.set('views', path.join(__dirname, '/views'))
app.set('view engine', 'ejs')

app.use(express.urlencoded({ extended: true }))
app.use(methodOverride('_method'))
Step 7: Create a models folder in the project directory and inside it create product.js. Here’s where our schema will reside and from where we will export our model:
const mongoose = require('mongoose');
const productSchema = new mongoose.Schema({
    name: {
        type: String,
        required: true
    },
    price: {
        type: Number,
        required: true,
        min: 0
    },
    utility: {
        type: [String],
        enum: ['Monitoring or Inspection', 'Security', 'Delivery', 'Photography', 'Recreation']
    },
    weight: {
        type: String,
        lowercase: true
    },
    onSale: {
        type: Boolean,
        default: false
    }
})
const Drone = mongoose.model('Drone', productSchema);
module.exports = Drone;
Step 8: Now import this exported model in index.js:
const Drone = require('./models/product.js')
Now, insert some documents in the database for demonstration.
Step 9: Create a basic GET route for the drone listing:
app.get('/drones/:id/edit', async (req, res) => {
    const { id } = req.params;
    const foundDrone = await Drone.findById(id);
    res.render('drones/edit.ejs', { foundDrone, utilities })
})
We can simply hit this route on our browser to visit the page.
Step 10: To be able to edit the “utility” feature of a drone in the next step, create an array before the edit GET route consisting of the options. We can iterate over this array in view to be able to change the utility option:
const utilities = ['Monitoring or Inspection', 'Security', 'Delivery', 'Photography', 'Recreation'];
Step 11: Create a views folder in the project directory and create an edit.ejs file in it. This is the HTML markup and it will consist of:
<!DOCTYPE html>
<html lang="en">

<head>
    <meta charset="UTF-8">
    <meta http-equiv="X-UA-Compatible" content="IE=edge">
    <meta name="viewport" content="width=device-width, initial-scale=1.0">
    <title>Edit Drone</title>
</head>

<body>
    <h1> Edit <%= foundDrone.name %> Drone</h1>
    <form action="/drones/<%= foundDrone.id %>?_method=PUT" method="POST">

        <label for="name">Add a Drone Name</label>
        <input type="text" name="name" id="name" value="<%= foundDrone.name %>">
        <hr>

        <label for="price">Add a Price</label>
        <input type="number" name="price" id="price" value="<%= foundDrone.price %>">
        <hr>

        <label for="utility">Add Utilities</label>
        <select name="utility" id="utility">
            <% for (let utility of utilities){ %>
                <option value="<%= utility %>" <%=foundDrone.utility==utility ? 'selected' : '' %>>
                    <%= utility %>
                </option>
                <% } %>
        </select>
        <hr>

        <label for="weight">Add a Weight in Grams or Kg</label>
        <input type="text" name="weight" id="weight" value="<%= foundDrone.weight %>"
            placeholder="'grams' or 'kilograms' in lowercase">
        <hr>

        <button type="submit">EDIT DRONE</button>

    </form>
</body>
</html>
Notice we have used the method override API to convert a POST request to PUT in Express. An HTML form only allows us to use two types of requests: GET or POST.
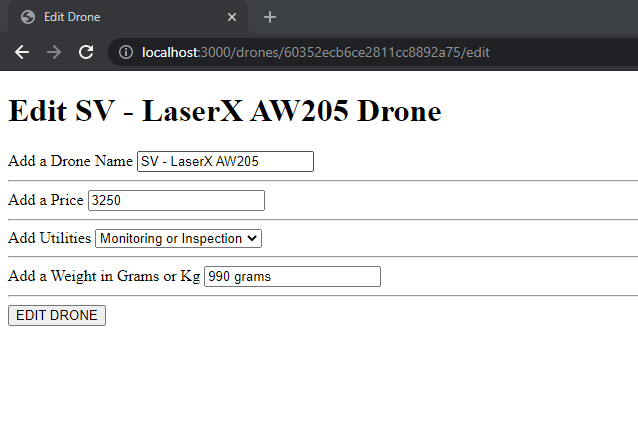
So, this is what our edit page looks like. You can simply copy and paste the ID field of a document into the URL.
Step 12: Finally create a PUT route to use the findOneAndUpdate method in the MongoDB database and update the values:
app.put('/drones/:id', async (req, res) => {
    const { id } = req.params;
    const updateDrone = await Drone.findOneAndUpdate(id, req.body, { runValidators: true });
    res.redirect(`/drones/${updateDrone.id}`)
})
Output:
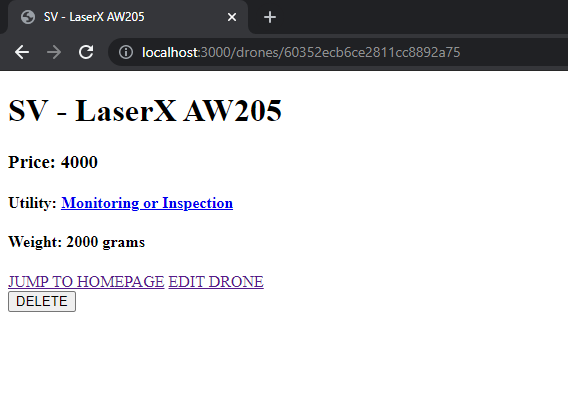
Let us edit some values on the SV – LaserX AW205 Drone. Once the document is updated it will redirect us to the view page of the document with the changes made.
Summary
In short, the findOneAndUpdate() method is used for the update operation. It can only update one document at a time selected according to the given filter argument. If many documents match the filter condition, still only the first one will be updated. So never use it for bulk document updating. We can also pass upsert: true as the optional argument to create a new document if no existing document matches the criteria.
Reference
https://www.mongodb.com/docs/manual/reference/method/db.collection.findOneAndUpdate/

