New to Rust? Grab our free Rust for Beginners eBook Get it free →
Install MongoDB on Windows (Step-by-Step Guide with Screenshots)
Getting MongoDB running on Windows takes about ten minutes once you know which options actually matter. This guide walks through the full install using the msi installer, adding MongoDB to your system PATH, running it as a Windows service and the unattended and no-admin-rights routes for when the default installer does not fit your setup.
Before we get into the install steps, let us understand in brief what MongoDB is.
What is MongoDB?
Being a document-oriented database management system, MongoDB enables developers to store gigantic amounts of data. This NoSQL database is efficient and does not store data inside tables but as documents inside collections.
MongoDB has a huge fanbase among developers today. It fits well with Node.js because of the scalability and convenience it offers, and it is popularly used in the MEAN (MongoDB, Express, Angular, Node.js) or MERN (MongoDB, Express, React, Node.js) stack. MongoDB Inc is the company behind the database, first launched in February 2009 and managed under SSPL (Server-Side Public License).
A few reasons MongoDB shows up so often in modern stacks:
- Driver support for Node.js, PHP, Java, Go, .Net, C, C++, Python, Ruby, Scala, C# and Swift.
- A flexible document model that maps naturally onto JSON, which is what most web APIs already speak.
- Firms like Meta, Google, Adobe and Nokia have all used MongoDB as their DBMS at some point.
Let us now get started on how to install MongoDB on Windows.
System requirements for installing MongoDB on Windows
Before you download anything, check that your machine actually meets what the current MongoDB release expects. MongoDB Community Edition only supports 64-bit Windows on x86_64 architecture. The supported platforms are Windows 11, Windows Server 2022 and Windows Server 2019. There is no support for 32-bit systems or for running MongoDB inside Windows Subsystem for Linux (WSL). If you need MongoDB on Linux, use a proper Linux install rather than WSL.
The steps in this guide apply to MongoDB 7.x and the newer 8.x releases. The installer wizard, file paths and mongod.cfg structure have stayed consistent across these versions, so the same walkthrough works whichever current release you pick from the download page.
A few other things worth knowing before you start:
- You need free disk space for the MongoDB binaries plus room for your data directory to grow.
- If the account running
mongodis not a Windows administrator, add it to the Performance Monitor Users and Performance Log Users groups so diagnostic data capture works correctly. - The
.msiinstaller does not includemongosh, the modern MongoDB shell. You install that separately and this guide covers it below.
How to install MongoDB on Windows using installer
Start following the steps below to install MongoDB on Windows using installer or msi.
- Open your browser and go to the MongoDB official download page. You can even land at this page manually by clicking the “Try Free” button in green on the top-left corner of MongoDB’s homepage. You should look for it in the top navigation bar.
- Now, you should see a download page where MongoDB allows users to install its different services for different platforms.
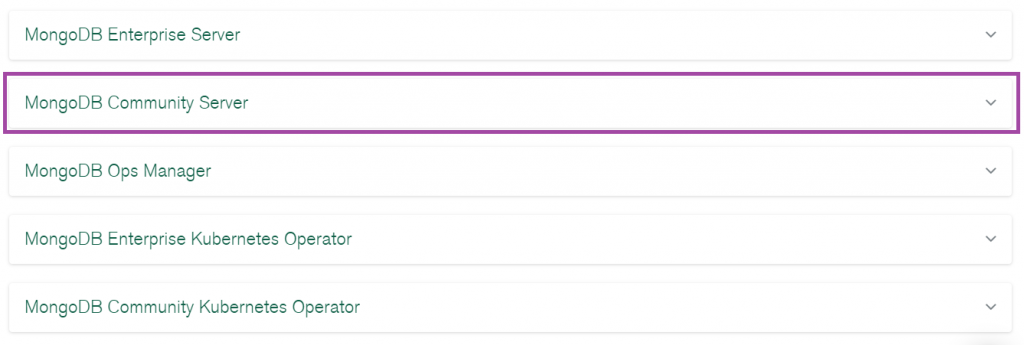
- Under the “Choose which type of deployment is best for you” heading, select On-premises (MongoDB Locally).

- Scroll a bit further to see the different servers available for download. Select MongoDB Community Server to pull open the Available Downloads menu.
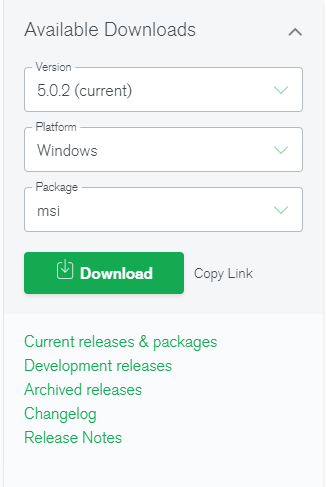
- Make sure the version is the quite latest and stable one. Select the platform as Windows and package as msi. Once you’re done, hit Download.
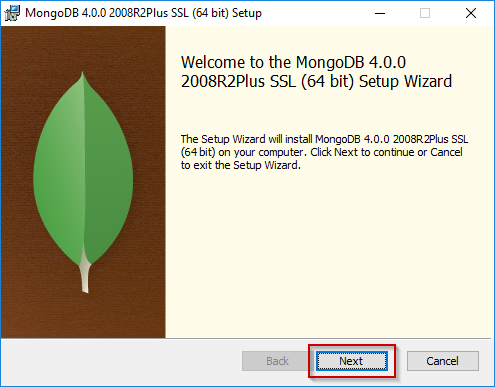
- Once your installer is downloaded, open it and click Next.
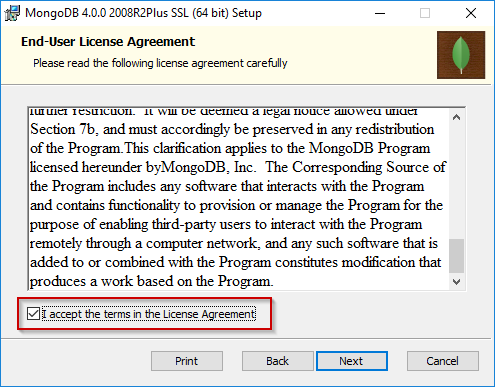
- Read the terms and conditions mentioned in the EULA (End-User License Agreement) and check the “I accept the terms in the License Agreement” box to accept it and click Next.
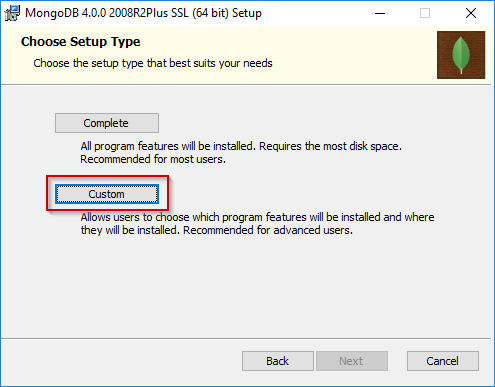
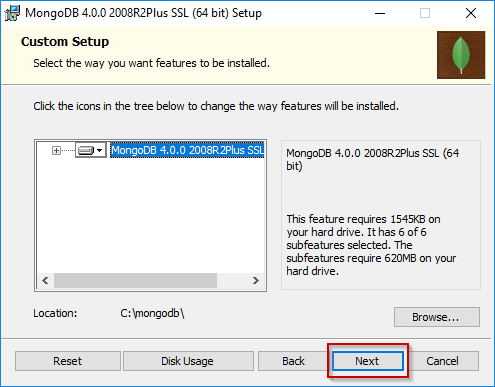
- Now, you are asked to choose the type of setup of MongoDB that you want. Click Custom here.
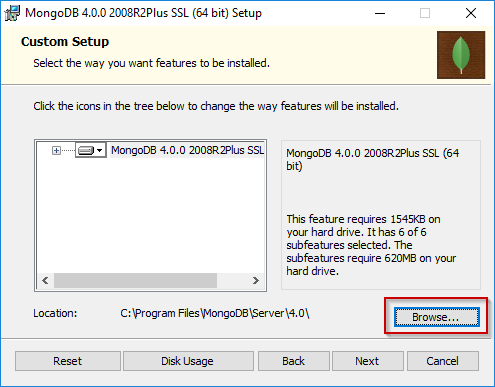
- Next, in the Custom Setup utility, choose where you want MongoDB to be installed on your PC and click Browse.
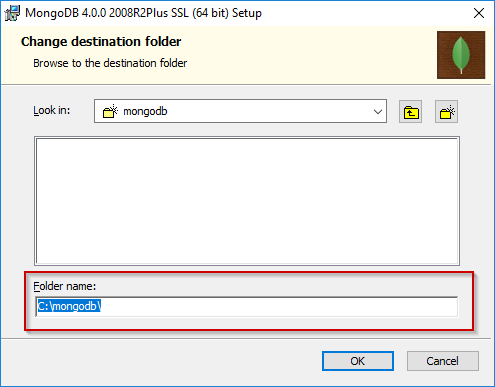
- Type C:\MongoDB in the folder name field and click OK. This will now install MongoDB in your C drive. You can provide a different path if you prefer.
- Now, check if everything looks fine and press Next.
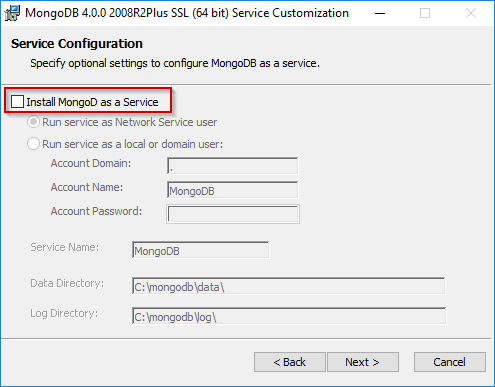
- In the Service Configuration setting, uncheck the “Install MongoDB as a service” option and click Next. We are doing this because we want to install our database manually.
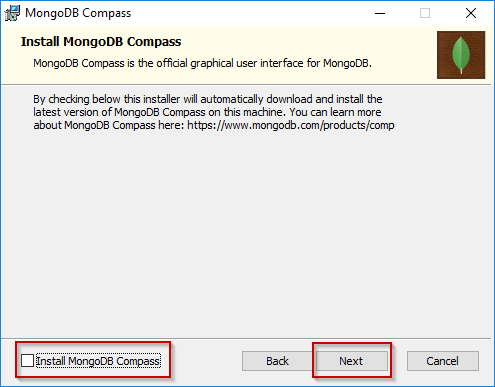
- Again, uncheck the “Install MongoDB Compass” option.
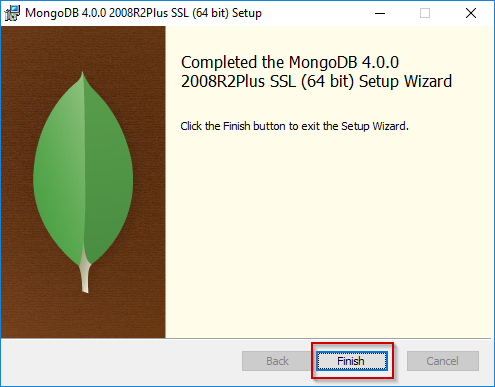
- Finally, click Finish.
Add MongoDB to your system PATH
Adding the MongoDB bin folder to your Windows PATH means you can type mongod or mongosh from any folder in the command prompt instead of typing the full install path every time. It is optional but saves real friction once you are running MongoDB daily. The process is nearly identical to adding Node.js to your system PATH, so if you have done that before this will feel familiar.
- Open File Explorer and go to the folder where MongoDB installed, typically
C:\Program Files\MongoDB\Server\<version>\bin. Copy that path. - Click the Start Menu, search for “env” and select “Edit the system environment variables.”
- In the System Properties window, click “Environment Variables.”
- Under “System variables,” find and select the Path variable, then click Edit.
- Click New, paste the bin path you copied and click OK on every open window to save.
Open a fresh command prompt window and run mongod --version. If the PATH is set correctly, you will see the installed MongoDB version printed instead of a “not recognized” error.
Setting up your MongoDB database and mongod server
Now that MongoDB is installed, you need a place for it to store data before it will run. By default MongoDB looks for a data directory at C:\data\db, so create that folder structure first through File Explorer or the command line.
mkdir C:\data\db
With the data directory ready, start the server by running mongod.exe with the path to your install:
"C:\Program Files\MongoDB\Server\7.0\bin\mongod.exe" --dbpath="C:\data\db"
If it starts correctly, the terminal shows a line like waiting for connections. Leave this window open since closing it stops the server.
MongoDB versions from 5.0 onward ship with mongosh as the primary shell, replacing the older mongo shell which is now deprecated. Open a second command prompt and run mongosh to connect to your running instance and start issuing commands like use mydb or db.testcollection.insertOne({name: "test"}).
If you want a shortcut to avoid retyping the full path every time, save a small batch file on your desktop:
@echo off
cd "C:\Program Files\MongoDB\Server\7.0\bin"
start mongod.exe --dbpath="C:\data\db"
timeout 4
start mongosh.exe
exit
Double-clicking this file starts both the server and the shell in one go, which is a handy shortcut while you are still getting comfortable with the two-window workflow.
Running MongoDB as a Windows service
Running mongod manually in a terminal window works for quick testing, but it means MongoDB stops the moment you close that window. For anything you use regularly, running MongoDB as a Windows service is the better option since it starts automatically and keeps running in the background.
If you selected “Install MongoDB as a Service” during setup instead of the manual configuration shown above, the service is already running under the name MongoDB. You can manage it from either the Services console or the command line.
Starting the service
Open the Services console (services.msc), locate MongoDB in the list, right-click it and select Start. From the command line, open an administrator command prompt and run net start MongoDB. Check your MongoDB log file for a line confirming it is waiting for connections on port 27017.
Stopping the service
From the Services console, right-click MongoDB and select Stop or Pause. From an administrator command prompt, run net stop MongoDB instead. Either method shuts the service down cleanly without losing data.
Removing the service
If you need to remove the service entirely, stop it first through the Services console, then run sc.exe delete MongoDB from an administrator command prompt. This removes the Windows service registration but does not delete your data files.
Installing MongoDB on Windows using msiexec for unattended installs
If you are provisioning MongoDB across several machines or baking it into a deployment script, clicking through the installer wizard every time does not scale. MongoDB supports a fully unattended install using msiexec.exe from the command line instead.
Open an administrator command prompt, navigate to the folder containing the downloaded .msi file and run:
msiexec.exe /l*v mdbinstall.log /qb /i mongodb-windows-x86_64-7.0-signed.msi
This installs the binaries to the default location. To install to a custom folder, add the INSTALLLOCATION argument:
msiexec.exe /l*v mdbinstall.log /qb /i mongodb-windows-x86_64-7.0-signed.msi INSTALLLOCATION="C:\MongoDB\Server\7.0\"
To skip installing MongoDB Compass during an unattended install, add SHOULD_INSTALL_COMPASS="0" to the command. You can also control exactly which components get installed using the ADDLOCAL argument, for example ADDLOCAL="ServerService" to install mongod.exe and register it as a Windows service in the same step.
Installing MongoDB on Windows without admin rights
Some corporate or shared machines will not let you run the .msi installer at all. In that case, download the MongoDB ZIP archive instead of the installer package from the same MongoDB Download Center, selecting zip under the package dropdown rather than msi.
- Extract the ZIP archive to a folder where you have write permissions, such as your user directory rather than
Program Files. - Open a command prompt and navigate to the
binfolder inside the extracted directory. - Run the server directly with a data path you have write access to:
mongod.exe --dbpath=C:\Users\yourname\mongodb-data. - Open a second command prompt in the same
binfolder and runmongosh.exeto connect.
This approach skips the Windows service and PATH setup entirely, which makes it a good fit for a locked-down laptop or a quick evaluation, but not for anything you plan to run long-term.
Installing MongoDB Compass
Earlier in the installer walkthrough we unchecked “Install MongoDB Compass” so the manual setup stayed simple, but Compass is worth installing once your server is running. It is MongoDB’s official GUI, and it gives you a visual way to browse databases, run queries and inspect indexes without typing raw shell commands.
To install it separately, go to the MongoDB Compass download page, select Windows and download the installer. Run the .exe file and follow the short setup wizard, there are no configuration choices to worry about here unlike the server installer.
Connect to your local server once Compass is open:
- Open Compass from the Start Menu.
- On the New Connection screen, enter the default local connection string
mongodb://localhost:27017ifmongodis already running. - Click Connect.
Compass then lists every database on that instance in the left sidebar, and you can click into any collection to browse, filter and edit documents directly.
Enabling authentication on MongoDB for Windows
By default, a fresh MongoDB install accepts any connection from localhost with no username or password, which is fine for local development but not something you want left on for anything reachable outside your machine. Turning on authentication takes two steps: create an admin user, then tell MongoDB to require login.
First, with mongod running unauthenticated, connect using mongosh and create an admin user in the admin database:
use admin
db.createUser({
  user: "admin",
  pwd: "choose-a-strong-password",
  roles: [{ role: "userAdminAnyDatabase", db: "admin" }, "readWriteAnyDatabase"]
})
Next, open the configuration file at <install directory>\bin\mongod.cfg and add or edit the security block:
security:
  authorization: enabled
Save the file, then restart the service with net stop MongoDB followed by net start MongoDB, or stop and restart mongod.exe manually if you are not running it as a service. From this point on, mongosh requires credentials to connect:
mongosh -u admin -p --authenticationDatabase admin
Skipping this step is fine for a local sandbox, but treat it as a required step the moment MongoDB binds to anything beyond 127.0.0.1.
Verifying your MongoDB installation
Before building anything on top of MongoDB, confirm the install actually works end to end. Open a command prompt and run mongod --version. You should see the exact build number and the current architecture printed back.
Next, with mongod running (either manually or as a service), open a new terminal and run mongosh. A successful connection drops you into the MongoDB shell prompt, usually showing test> by default. From there, run db.version() to double-check the server version matches what you expect, or show dbs to list the databases currently on the instance. If either command hangs or returns a connection error, mongod is most likely not running, or the port 27017 is blocked by your firewall.
Uninstalling MongoDB on Windows
If you need to remove MongoDB completely, start by stopping the service if one is running, using the steps in the section above. Then open Windows Settings, go to Apps, find MongoDB in the list and select Uninstall. This removes the program files but leaves your data directory untouched by design, so if you also want the actual database files gone, manually delete the data and log folders you configured during setup, commonly C:\data\db and C:\data\log.
If you added MongoDB to your system PATH earlier, remove that entry too through the same Environment Variables dialog, or it will keep pointing at a folder that no longer exists.
Frequently asked questions
How do I install MongoDB on Windows without admin rights?
Download the ZIP archive instead of the msi installer, extract it to a folder you own, then run mongod.exe --dbpath pointing at a data folder you have write access to.
Why is mongosh not working after I install MongoDB?
The msi installer does not include mongosh. You need to download and install it separately from MongoDB’s official mongosh installation page.
Do I need to run MongoDB as a Windows service?
No, running mongod manually in a terminal works fine for development. A service is only needed if you want MongoDB to start automatically and keep running in the background.
What is the difference between mongo and mongosh?
mongo is the legacy MongoDB shell, deprecated since version 5.0. mongosh is the current, actively maintained shell with color syntax and autocomplete built in.
Where does MongoDB store data by default on Windows?
MongoDB looks for C:\data\db by default unless you specify a different path using the --dbpath option when starting mongod.
Can I install multiple MongoDB versions on the same Windows machine?
Yes, install each version to a separate folder using the Custom setup option. Switch between them by pointing PATH or your startup command at the version you want.
Do I need MongoDB Compass to use MongoDB?
No, Compass is optional. It is a GUI for browsing and querying your data, but everything it does can also be done through mongosh on the command line.
Is authentication enabled by default in MongoDB on Windows?
No, a fresh install accepts unauthenticated local connections. You need to create an admin user and set authorization: enabled in mongod.cfg to require login.
Conclusion
That covers the full install, from the installer wizard through PATH setup, running as a service, Compass, authentication and the unattended and no-admin-rights routes. Once mongod is running, the next step is usually connecting to MongoDB from a Node.js application or working through basic queries with find and findOne in Node.js.