New to Rust? Grab our free Rust for Beginners eBook Get it free →
How to Create a Simple Discord Bot Using Node.js (Easy Steps)
A Discord bot is a tool that helps automate tasks in a Discord server. It can manage users, send alerts, and even offer fun activities like games. In short, a bot makes your server more useful by handling routine tasks, so you can focus on other things.
Why Use Node.js to Create a Discord Bot?
Node.js is a popular choice for building Discord bots for several reasons:
- JavaScript-based: As a JavaScript runtime, Node.js allows you to use the popular language that many web developers are familiar with.
- Asynchronous: It can handle multiple operations at the same time, making it efficient when dealing with bot commands and interactions.
- Well-supported libraries: The discord.js library simplifies bot creation, providing a wide range of tools for interacting with Discord’s API.
- Fast and scalable: Node.js has a non-blocking architecture that makes it great for handling large amounts of server requests.
Do you enjoy creating JS projects? Then you’ll love learning how to create games! Click here to see how we make a Snake game using JavaScript.
Steps to Create a Simple Discord Bot with Node.js
Step 1: Installing Node.js
Make sure Node.js is installed on your machine. You can download it from the official website: https://nodejs.org.
To check if Node.js is installed, run the following command in your terminal:
node -v
Step 2: Creating a Discord Account and Server
Go to https://discord.com and create an account. Create a new server where you will test your bot.
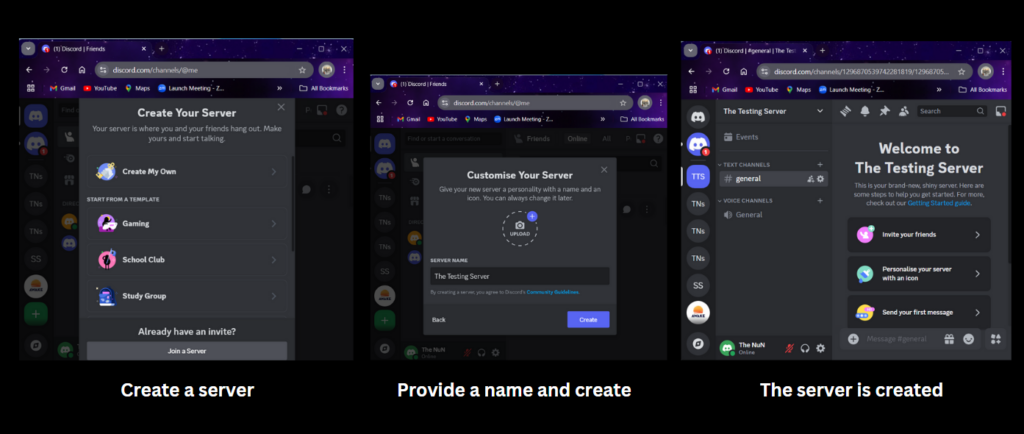
Step 3: Creating a Discord Application and Bot
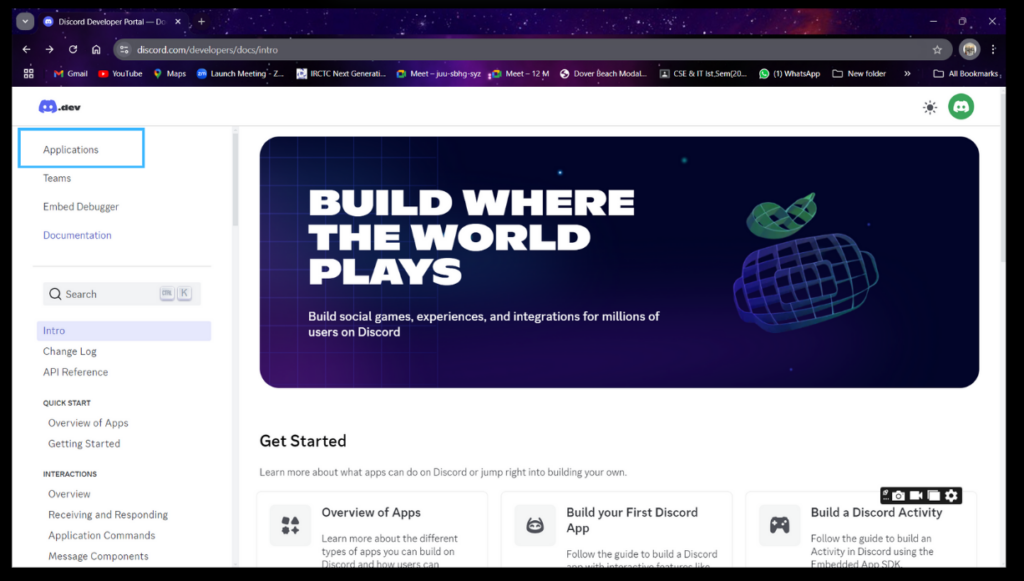
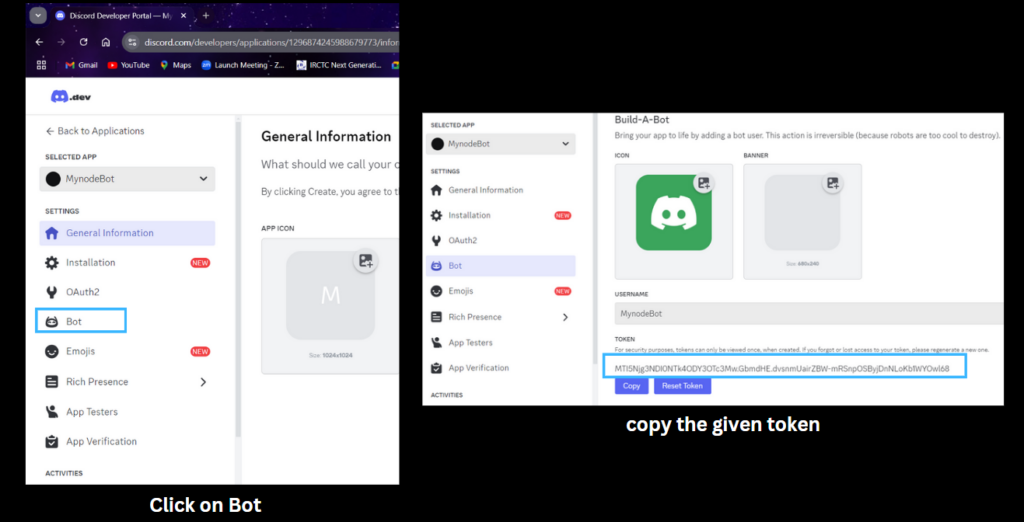
First, we go to the Discord Developer Portal. Then, we click on Applications, choose “New Application,” and give it a name. Next, we open the Bot tab and click “Add Bot” to turn it into a Discord bot. Finally, we copy the token, which we’ll need later to authenticate the bot.


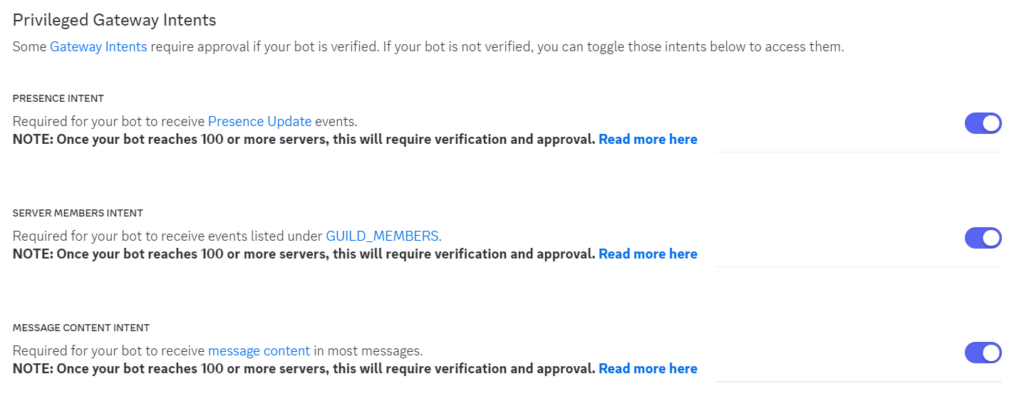
Also, enable the following intents:
- Message Content Intent (since we are trying to respond to messages).
- If you are handling other events like presence or member updates, enable Presence Intent and Server Members Intent.
Step 4: Setting Up Node.js Project
Create a new folder for your bot. Open a terminal inside this folder and run:
npm init -y
This command will generate a package.json file for your project.
Now install the discord.js library:
npm install discord.js

Step 5: Coding Discord Bot
We create a file called index.js inside our project folder and add the following code:
const { Client, GatewayIntentBits } = require('discord.js');

const client = new Client({
  intents: [
    GatewayIntentBits.Guilds,
    GatewayIntentBits.GuildMessages,
    GatewayIntentBits.MessageContent
  ]
});

client.once('ready', () => {
  console.log('Bot is online!');
});

client.on('messageCreate', message => {
  if (message.content === 'hello') {
    message.channel.send('Hello! How can I assist you?');
  }
});

client.on('messageCreate', message => {
    if (message.content === 'Which is the best website for Node.js learning?') {
      message.channel.send('Codeforgeek!');
    }
  });

client.login('MTI5Njg3NDI0NTk4ODY3OTc3Mw.GbmdHE.dvsnmUairZBW-mRSnpOSByjDnNLoKb1WYOwl68');//your created token
- It imports the necessary parts of the discord.js library to use in the bot.
- The bot is created with permissions (intents) to interact with servers and read messages.
- When the bot logs in successfully, it prints “Bot is online!” to the console.
- When someone sends the message “hello,” the bot replies with “Hello! How can I assist you?”
- If someone asks “Which is the best website for Node.js learning?”, the bot responds with “Codeforgeek!”
- The bot logs in using its token to connect to Discord.
Step 6: Adding Bot to Discord Server
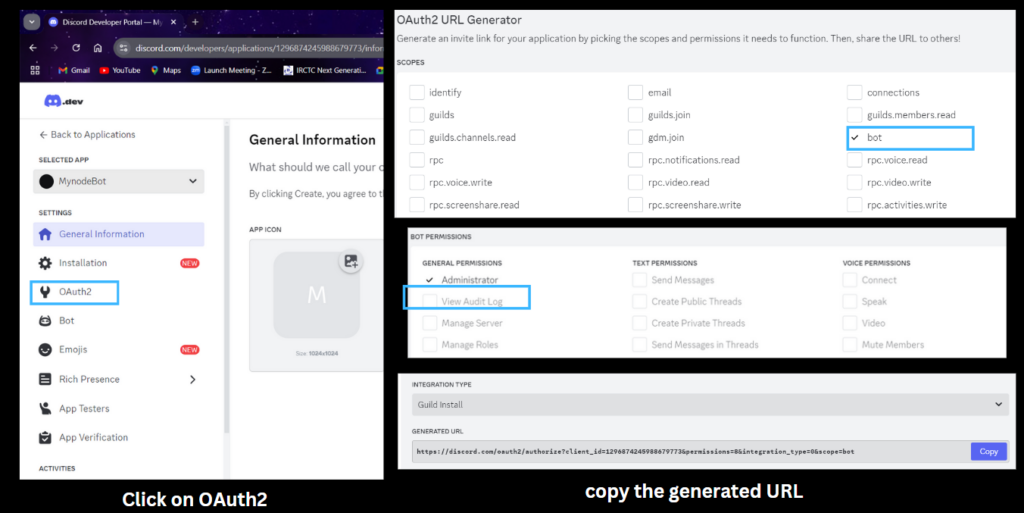
Next, we will: Go back to the Discord Developer Portal. Go to the OAuth2 tab. Under OAuth2 URL Generator, select the following:
- bot under scopes.
- Administrator under bot permissions (or whichever permissions you prefer).
Then we copy the generated URL and open it in a browser.
Select your server and invite the bot:

Step 7: Running the Bot
Lastly, we get back to our terminal and run the following command to start our bot:
node index.js

Once we see the message “Bot is online!” in our terminal, our bot is active. Now let’s test the bot.
If we open our server, we see that our bot has entered the chat.

Now let’s interact with our bot:
Conclusion
Congratulations! You have successfully created a simple Discord bot using Node.js. This is just the start—using Node.js and the discord.js library, you can build more complex bots that perform various tasks on your Discord server. You can customise the code according to your needs and play with your bot.
Did you know that you can create a discord bot using Python too? Click here to see how!

