
New to Rust? Grab our free Rust for Beginners eBook Get it free →
Configuring Nodemon with TypeScript: A Step-by-Step Guide
Automatically restarting the TypeScript server on any changes eliminates the need for manual stop-start, making the development faster. Also since TypeScript produce more errors while writing code, we have to make frequent changes to the code, so if we can get the server restarted automatically it will be a big help. Let’s learn how to do so.
Introduction to Nodemon
Nodemon is a tool that helps restart the server whenever changes in the JavaScript files are made. This can be of great use during development as it saves us from having to stop and start our server manually every time we change something.
When using Nodemon, we replace the “node” command with “nodemon” to automatically monitor changes in the files and restart the Node.js server.
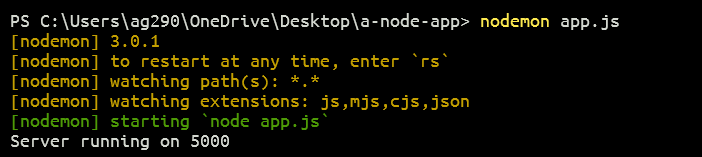
Starting the Server with Node.js:
node app.js

Starting the Server with Nodemon:
nodemon app.js
Learn More About Nodemon: Update Code Without Restarting Node Server
Why Configure with TypeScript?
JavaScript is a loosely typed language which means here we do not define the data type during variable initializing or for parameters, that’s why the type mismatch can lead to errors. So here comes TypeScript which requires specifying the data type and it also gives proper errors at compile-time when the types mismatch, so nothing unexpected during execution.
Now, if we want to run TypeScript in Node.js, we need to compile it to JavaScript first. This extra step can be overwhelming when we have to do this again and again for each change. Configuring Nodemon with TypeScript eliminates this by automatically handling the compilation and restarting the server on changes.
Learn More About TypeScript: What is TypeScript? An Overview
Configuring Nodemon with TypeScript
Let’s understand the step-by-step process of configuring Nodemon with TypeScript.
Step 1: Initialize a Node.js project
Execute the below command to initialize a Node.js project:
npm init -y
The -y flag skips the prompts for project information and creates a package.json file with default values for managing project dependencies and scripts.
Step 2: Install Dependencies
First, install Express to create a server:
npm install express
Then, install TypeScript-related dependencies as devDependencies:
npm install --save-dev typescript ts-node @types/node @types/express
- typescript: The TypeScript compiler.
- ts-node: ts-node is a typescript execution engine to runs TypeScript files directly without manual compilation.
- @types/node: Type definitions for Node.js to let TypeScript understand Node.js code.
- @types/express: Type definitions for Express to provide type support for Express functions.
- –save-dev ” flag: indicates that these packages are development dependencies.
Step 3: Install Nodemon
npm i -g nodemon
The -g flag is to install it globally so that we don’t have to manually install it in each Node.js project directory.
Step 4: Initialize TypeScript Configuration
To use TypeScript in our project, we need a configuration file called tsconfig.json. This file specifies compiler options and the project’s root directory.
tsc --init
This above command will generate a “tsconfig.json” file with default settings. We have to open this file and make the required changes for our server.
We can also create this file manually and copy-paste the following code snippets:
{
  "compilerOptions": {
    "target": "ES6",
    "module": "commonjs",
    "rootDir": "./src",
    "moduleResolution": "node",
    "outDir": "./dist",
    "esModuleInterop": true,
    "forceConsistentCasingInFileNames": true,
    "strict": true,
    "skipLibCheck": true
  },
  "include": ["./src/**/*"]
}
Step 5: Create a Server
Create an “src” folder in the project root directory with an “app.ts” file inside it:
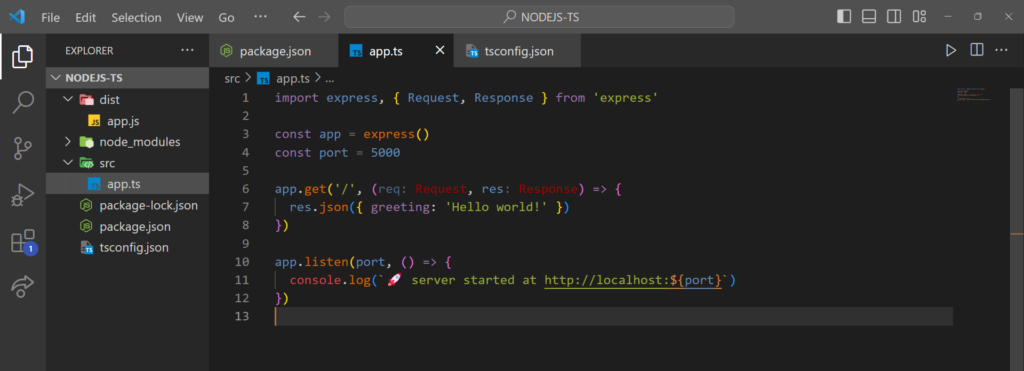
In the above example, we have created a simple server using Express.js.
- We created a basic route for the path (‘/’) using the “app.get” method for which the server responds with a JSON object.
- The server is set to listen on the specified port 5000.
- Once the server starts, a log message is printed to the console indicating that the server is running and accessible at “http://localhost:5000”.
Step 6: Update package.json
To automate running the TypeScript code with Nodemon, we have to add a script to our package.json file under the scripts section:
"scripts": {
  "start": "nodemon --exec ts-node src/app.ts"
}
The “–exec ts-node src/app.ts” instructs Nodemon to use the ts-node command to run our “src/app.ts” file.
With the help of ts-node, we can run TypeScript code straight away without having to manually convert it to JavaScript.
Step 7: Run the Project
Execute the following command to run the project:
npm run dev
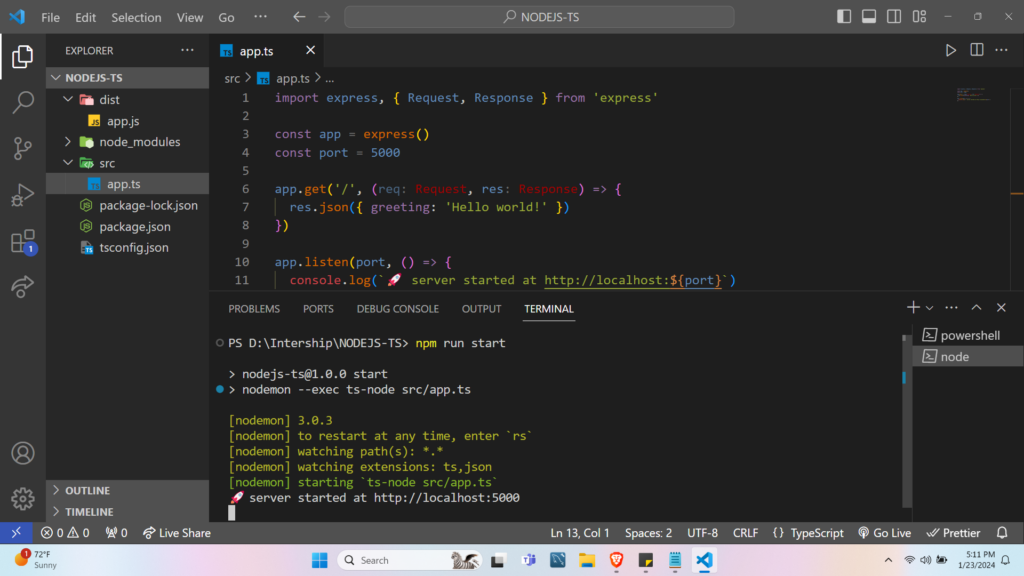
This command runs the start script we defined in package.json, which starts Nodemon, which then runs ts-node to execute the TypeScript code. Nodemon will keep checking for any changes in the file and restart the server if so.
Summary
In short, using TypeScript for Node.js applications provides type safety and helps catch errors before execution. But running TypeScript directly in Node.js is complex as it requires repeatedly compiling to JavaScript to reflect the changes made to the code. By configuring Nodemon with TypeScript, we can automate this process to automatically handle the compilation and restart the server whenever changes occur.
Reference


