
New to Rust? Grab our free Rust for Beginners eBook Get it free →
Building an API Rate Limiter in Node.js with Redis


I wrote this limiter twice in one sitting. The version I started with counted calls with a read followed by a write, which is the shape the shorter walkthroughs on this query still use, and twenty concurrent calls against a limit of three all came back as 200s. What follows counts each window in one atomic Redis transaction, answers with the 429 a client can act on, and names the two boundary decisions that decide whether the limiter protects anything.
What a rate limiter decides on every request
A rate limiter sits in front of your routes and answers one question per call, which is whether this client is inside its budget for the current window.
The counter belongs in Redis rather than in process memory. A second copy of your server would otherwise start with its own budget, and two copies let a client have twice what you configured.
The mechanism here is a fixed window, so each call increments a counter whose key carries the window number and the key expires when the window does. Fixed windows are cheap, and they carry one known boundary, which is that a client can spend a full budget at the end of one window and another at the start of the next.
Sliding window counters and token buckets smooth that edge, and both are built from the same counter you are about to write.
| Mechanism | What it counts | Where it fits |
|---|---|---|
| Fixed window | one counter per window key, cleared by expiry | the build in this article |
| Sliding window counter | the current window weighted against the previous one | when a boundary burst costs money |
| Token bucket | tokens refilled at a fixed rate and spent per call | clients that need unused allowance to carry over |
What you need before writing the limiter
The build needs Node.js, a Redis server you can reach, a terminal, and curl for the checks. I ran everything here on Node 26.7.0 against Redis 7.0.15, with express 5.2.1 and the redis client 6.2.1, and Step 1 installs both packages at whatever stable release they are on today.
- Node.js 20 or newer, which is the floor the current redis client declares in its package metadata
- A Redis server, 7.0 or newer, because the transaction in Step 3 uses the NX flag on EXPIRE
- express and redis installed without a version tag
- curl, or any client you can fire repeated calls from
Decide first what identifies a client, because that choice decides whose budget a call belongs to. Use an API key when you issue them, otherwise fall back to the request address, and remember that the address is only correct when Express knows how many proxies sit in front of it.
If you copied a rate limiter tutorial written before Node Redis 4, the first call dies with ClientClosedError, because the client no longer connects itself. Step 2 carries the line that prevents it.
Keep a scratch directory for the whole exercise. The burst script, the Redis data directory, and the terminal output all belong beside the code.
How to build the Redis rate limiter
Five steps take you from an empty directory to a server that rejects over-limit calls. Every command below ran on this machine, and each screenshot is the output that command produced.
Step 1: Create the project and install the current packages
Install both packages without a version tag so you get the current stable releases, then confirm what landed.
mkdir rate-limiter && cd rate-limiter
npm install express redis
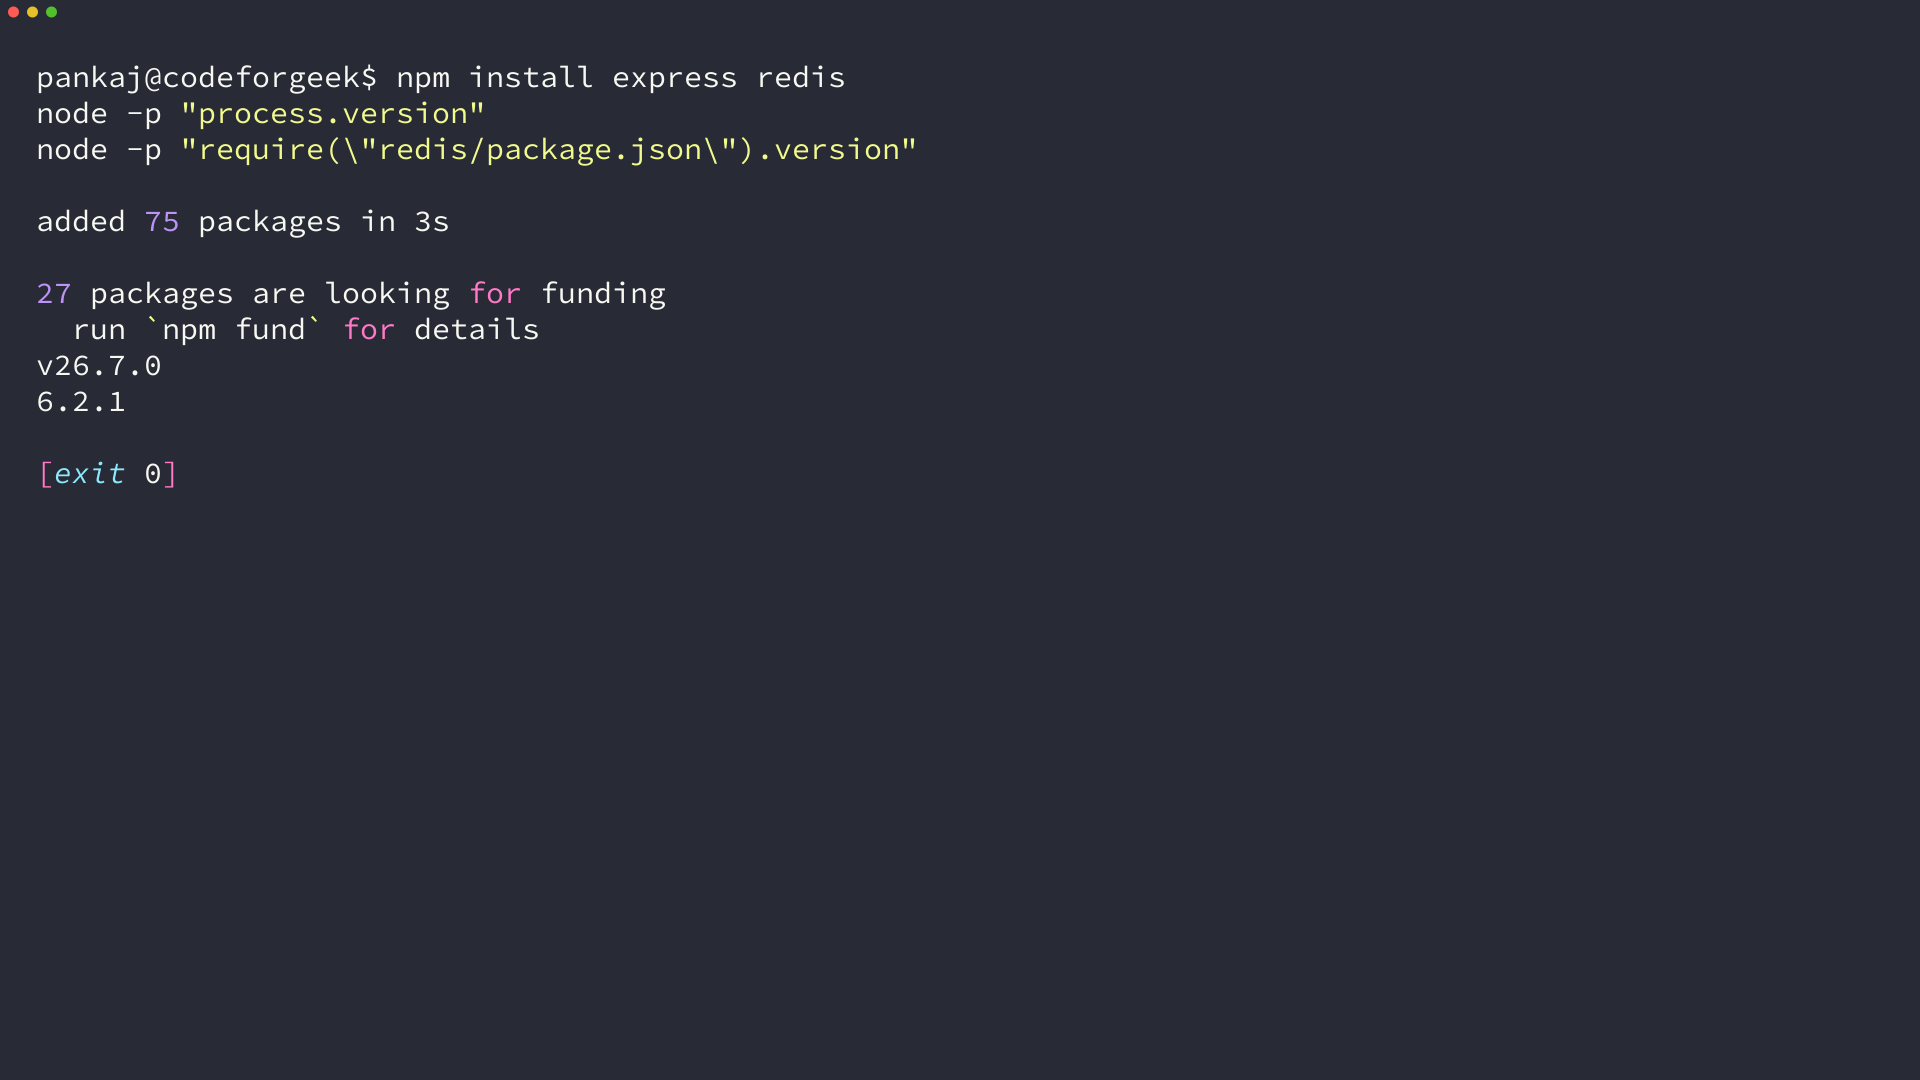
That install reported no vulnerabilities and resolved express 5.2.1 and redis 6.2.1. Those versions matter more than they look, because everything below is written against the promise based client and the callback API from Node Redis 3 is gone.
Step 2: Open the Redis client once
Put the client in its own module and connect it at startup, because Node Redis 4 removed auto connect and a client that is never opened rejects every command with ClientClosedError. That error is what readers keep posting about tutorials written against the older interface, and the migration guide is the page that explains it.
const { createClient } = require('redis');

const socket = {
  connectTimeout: Number(process.env.REDIS_CONNECT_TIMEOUT_MS ?? 5000),
};

const client = createClient({
  url: process.env.REDIS_URL ?? 'redis://127.0.0.1:6379',
  disableOfflineQueue: true,
  socket,
});

client.on('error', (err) => {
  console.error('redis client error:', err.message);
});

const ready = client.connect();
ready.catch(() => {});

module.exports = { client, ready };
Two settings in that file earn their place later. Disabling the offline queue makes a command fail instead of sitting in a queue behind a reconnect, and the socket connect timeout bounds how long opening a new connection can take.
The empty catch on the connect promise is there for a different reason. An unhandled rejection ends the process on current Node, and my first version of this file died the moment I pointed it at a port with no Redis behind it.
Step 3: Count the window in one atomic transaction
One transaction on the Redis side is what makes the count atomic.
Send the increment, the expiry, and the remaining time together, so the value that decides a call is the value your own call produced. Two round trips leave a window where another call can read the old count.
function withTimeout(work, ms) {
  let timer;
  const budget = new Promise((_, reject) => {
    timer = setTimeout(() => reject(new Error(`store did not answer within ${ms}ms`)), ms);
  });
  return Promise.race([work, budget]).finally(() => clearTimeout(timer));
}
The budget wrapper exists because a reachable Redis with a stalled connection is worse than a stopped one, since a call without it waits on the client instead of failing.
// ratelimit.js
const { client, ready } = require('./redis');

module.exports = (options = {}) => {
  const { limit = 5, windowSeconds = 60, prefix = 'rl' } = options;
  const timeoutMs = Number(process.env.REDIS_TIMEOUT_MS ?? 250);
  const failClosed = options.failClosed ?? false;

  return async function rateLimitMiddleware(req, res, next) {
    const identity = req.headers['x-api-key'] ?? req.ip;
    const windowStart = Math.floor(Date.now() / 1000 / windowSeconds) * windowSeconds;
    const key = `${prefix}:${identity}:${windowStart}`;

    let count;
    let ttl;
    try {
      const work = (async () => {
        await ready;
        return client.multi().incr(key).expire(key, windowSeconds, 'NX').ttl(key).exec();
      })();
      const replies = timeoutMs > 0 ? await withTimeout(work, timeoutMs) : await work;
      [count, , ttl] = replies;
    } catch (err) {
      console.error('rate limiter store unavailable:', err.message);
      if (failClosed) {
        return res.status(503).json({ error: 'Rate limiter unavailable' });
      }
      return next();
    }

    // the response half of this function appears in Step 4
  };
};
Read the key before the rest of the function. The prefix keeps routes apart, the identity decides whose budget this is, and the window start is the timestamp rounded down to the window, so every call inside the same minute lands on the same key.
Inside the transaction, INCR is the atomic piece, because Redis applies it to one key at a time regardless of how many clients are waiting. EXPIRE with the NX flag attaches the expiry only when the key has none, which keeps the window a fixed sixty seconds instead of sixty seconds counted from the last call.
The counter counts every attempt, including the calls you are about to reject.
When I sent twenty concurrent calls with a limit of three, the stored value finished at twenty while three were served. The increment runs before the comparison, and the comparison is what decides.
Step 4: Answer with 429 and the headers a client can act on
The second half of the middleware turns the count into a response. Set the limit fields on every response so a well behaved client can pace itself, and add Retry-After only on the rejection.
const remaining = Math.max(0, limit - count);
res.set('RateLimit-Limit', String(limit));
res.set('RateLimit-Remaining', String(remaining));
res.set('RateLimit-Reset', String(ttl));

if (count > limit) {
  res.set('Retry-After', String(ttl));
  return res.status(429).json({
    error: 'Too many requests',
    limit,
    windowSeconds,
    retryAfter: ttl,
  });
}

next();
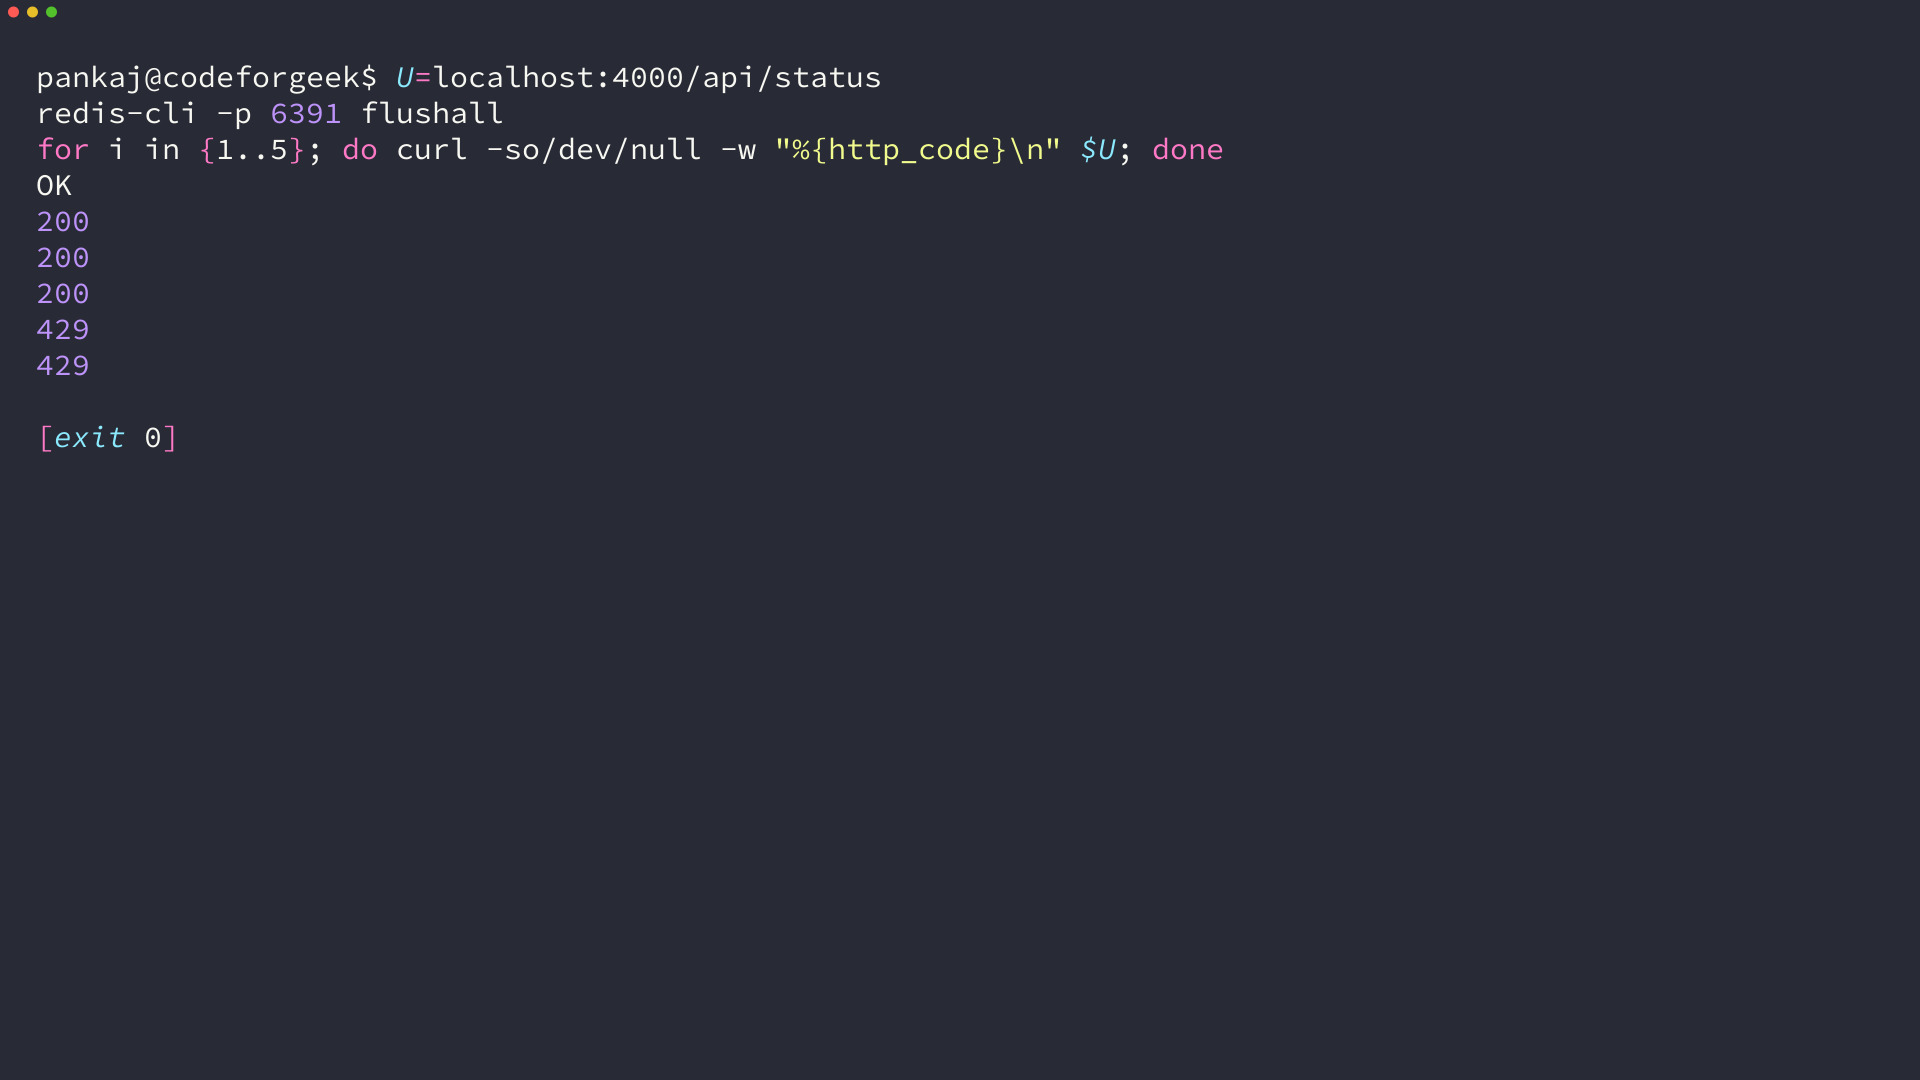
A limit of three on a sixty second window produced three 200 responses and then two 429 responses. The blocked response carried the whole header set, which is what a client needs to slow down without guessing.
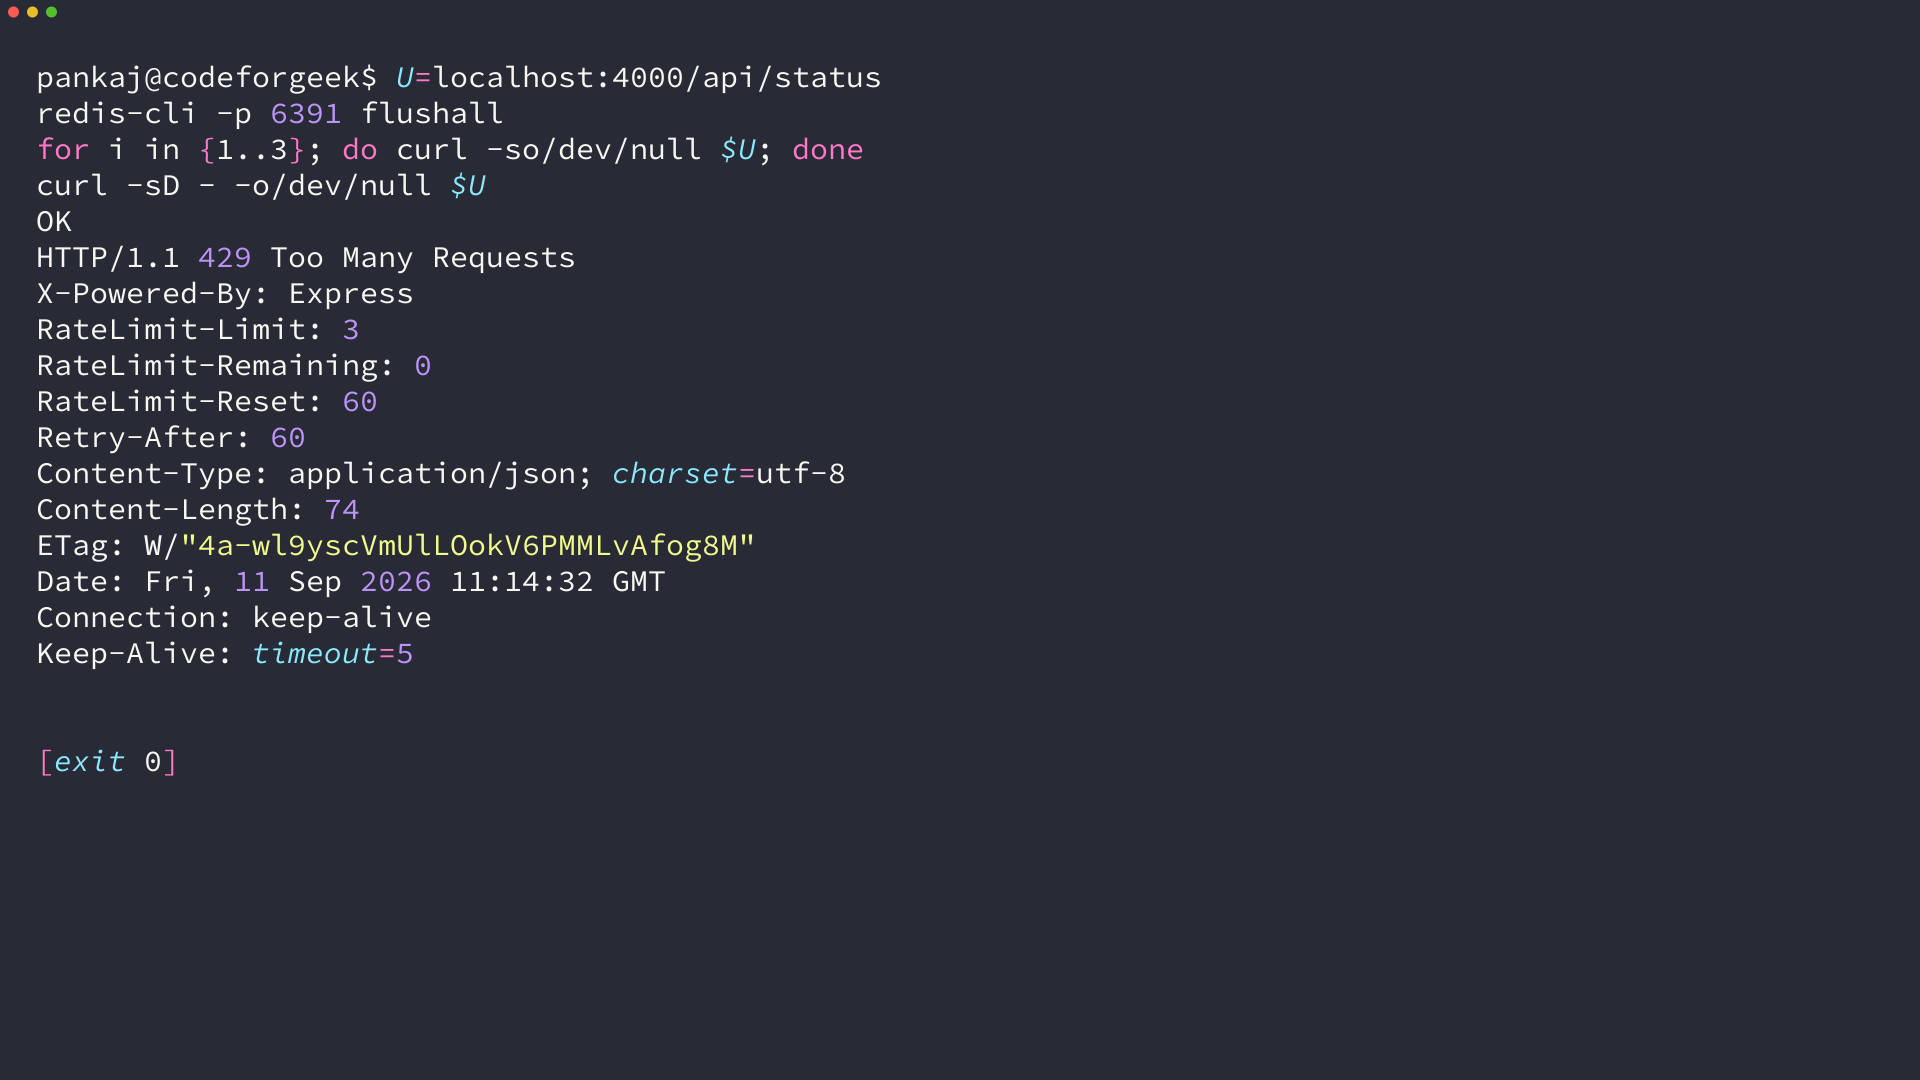
429 Too Many Requests is the piece a client can act on without parsing your JSON, and the two reset fields give it a number to work with. RateLimit-Reset and Retry-After both report the seconds left on the current window, so they match at sixty on the first rejection.
Step 5: Apply the middleware to the routes
Attach the middleware where you want the budget to apply. Giving each route its own prefix keeps budgets apart, and the trust proxy line is explained in the next section.
// app.js
const express = require('express');
const rateLimit = require('./ratelimit');

const app = express();
app.set('trust proxy', 1);

app.get('/api/status', rateLimit({ limit: 3, windowSeconds: 60 }), (req, res) => {
  res.json({ ok: true, servedAt: new Date().toISOString() });
});

app.get('/api/search', rateLimit({ limit: 20, windowSeconds: 60, prefix: 'rl-search' }), (req, res) => {
  res.json({ ok: true, results: [] });
});

app.listen(4000, () => console.log('listening on http://127.0.0.1:4000'));
Start the server with node app.js and the middleware runs before either handler. The route budget of twenty on the search route stayed separate from the budget of three on the status route, and Redis held one key per prefix instead of one shared counter.
- One route, by passing the middleware to that handler as in the status route above
- One group of routes, by mounting it on a router before the handlers
- Every request, by passing it to app.use ahead of your routes
The prefix is what keeps those budgets apart, which is why it belongs in the key rather than in the options alone. Separating them is also what stops a cheap route from spending the budget of an expensive one.
Why the read-then-write counter leaks
The counting shape used by the shorter walkthroughs on this query reads the record, decides, and writes it back, and nothing in that sequence is wrong on a single call. Under concurrency every call in the same millisecond reads the same value, so all of them decide the client is still inside its budget.
const record = await client.get(key);
const now = Math.floor(Date.now() / 1000);
const data = JSON.parse(record);

if (now - data.startTime >= windowSeconds) {
  await client.set(key, JSON.stringify({ count: 1, startTime: now }), { EX: windowSeconds });
  return next();
}
if (data.count > limit) {
  return res.status(429).json({ error: 'Too many requests', limit });
}
data.count += 1;
await client.set(key, JSON.stringify(data), { EX: windowSeconds });
next();
I ran both versions on the same workload. Twenty concurrent calls with a limit of three were served three times by the atomic limiter, and twenty times by the read-then-write version.
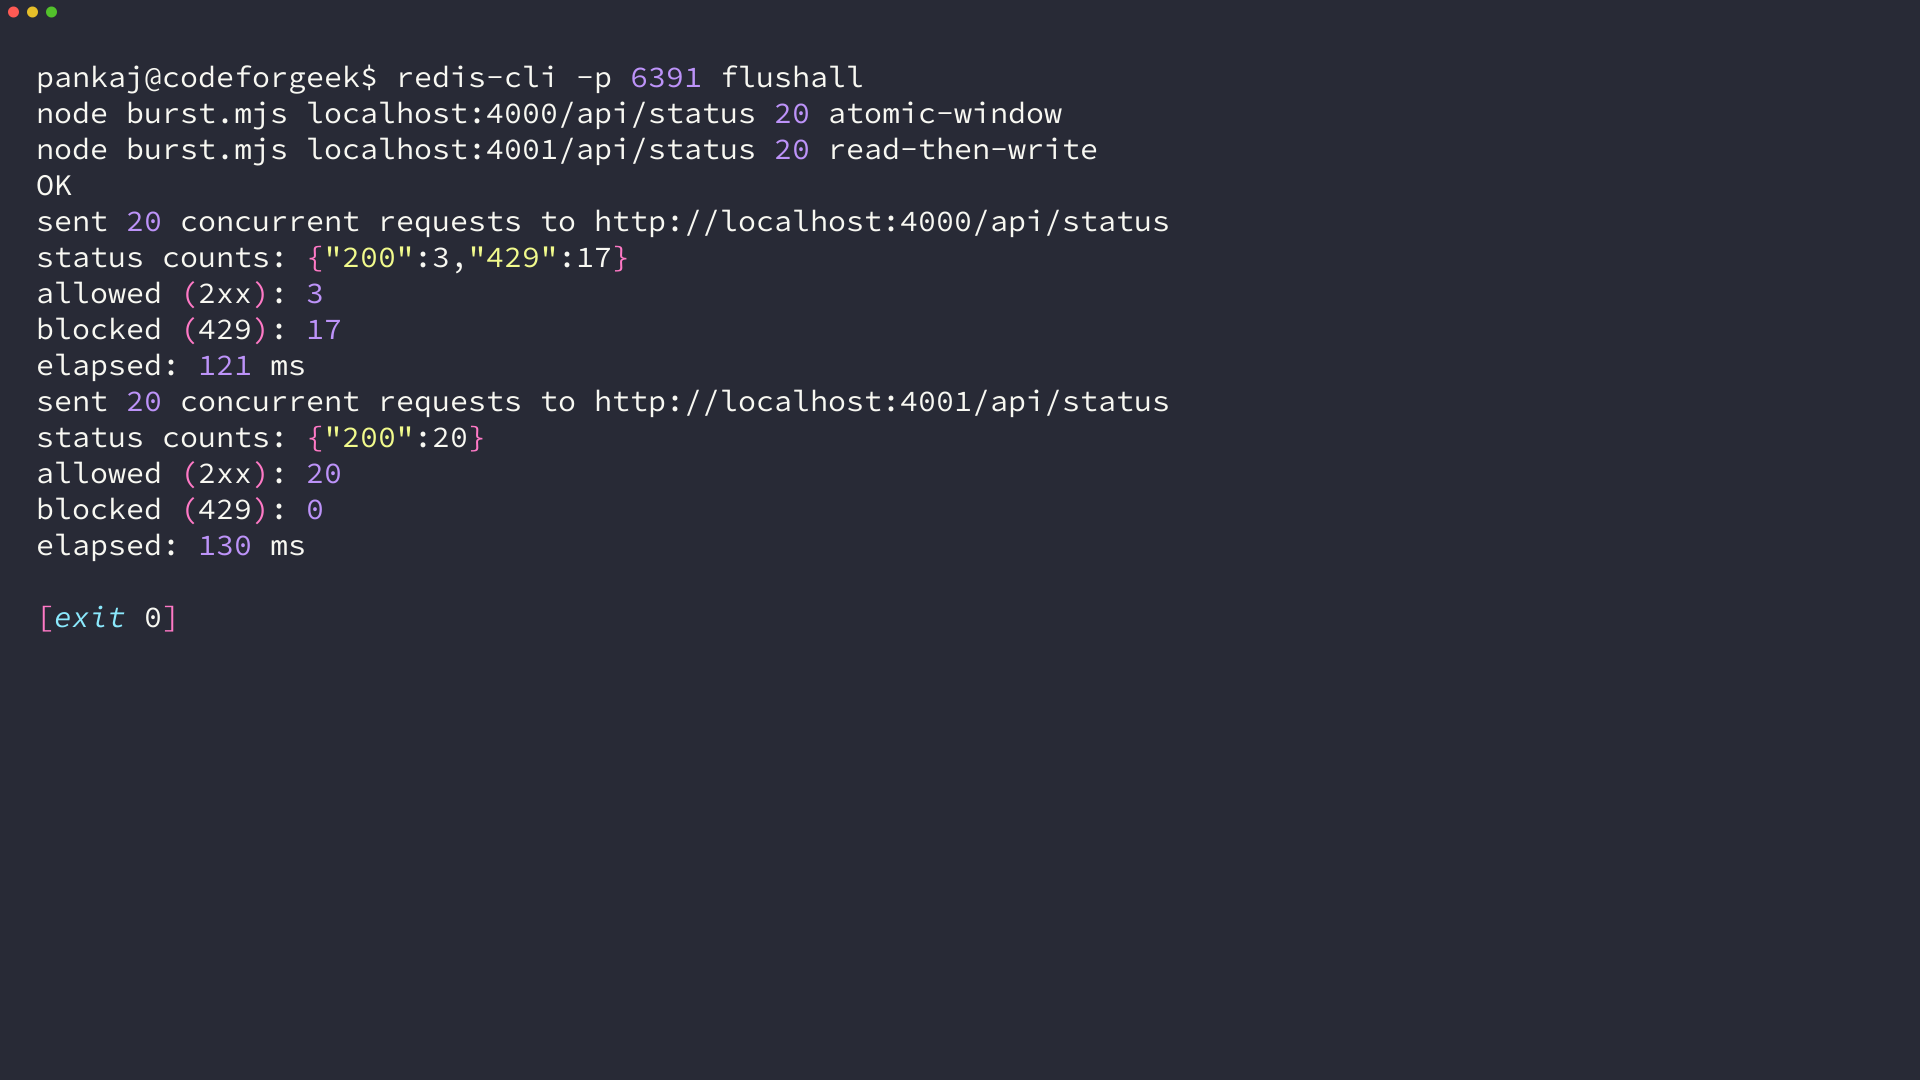
The same function carries a second fault that appears without any concurrency. The comparison runs after the increment against a greater-than, so a sequential run of five calls against a stated limit of three admitted four before the fifth was rejected.
Neither problem is fixed by a bigger limit or by a lock inside your process.
The value that decides a call has to come out of the same operation that reads it, which is what the single transaction gives you. Everything else in the middleware is a detail you can change.
Edge cases that decide whether the limiter protects anything
Three conditions change the behaviour of this middleware, and two of them are invisible in local testing. The first is where the client address comes from, the second is how budgets are keyed, and the third is what happens when Redis is not there.
Proxied clients: match trust proxy to the hop count
Express resolves the request address from the socket unless you set trust proxy, so behind a load balancer every call otherwise looks like it came from the balancer and every client shares one budget. That is the same as having no limiter at all, only slower.
Trusting one hop means Express takes the address one step back from the socket. With exactly one address in the header, which is what a single reverse proxy appends, the bucket key becomes the client address and each client gets its own budget.
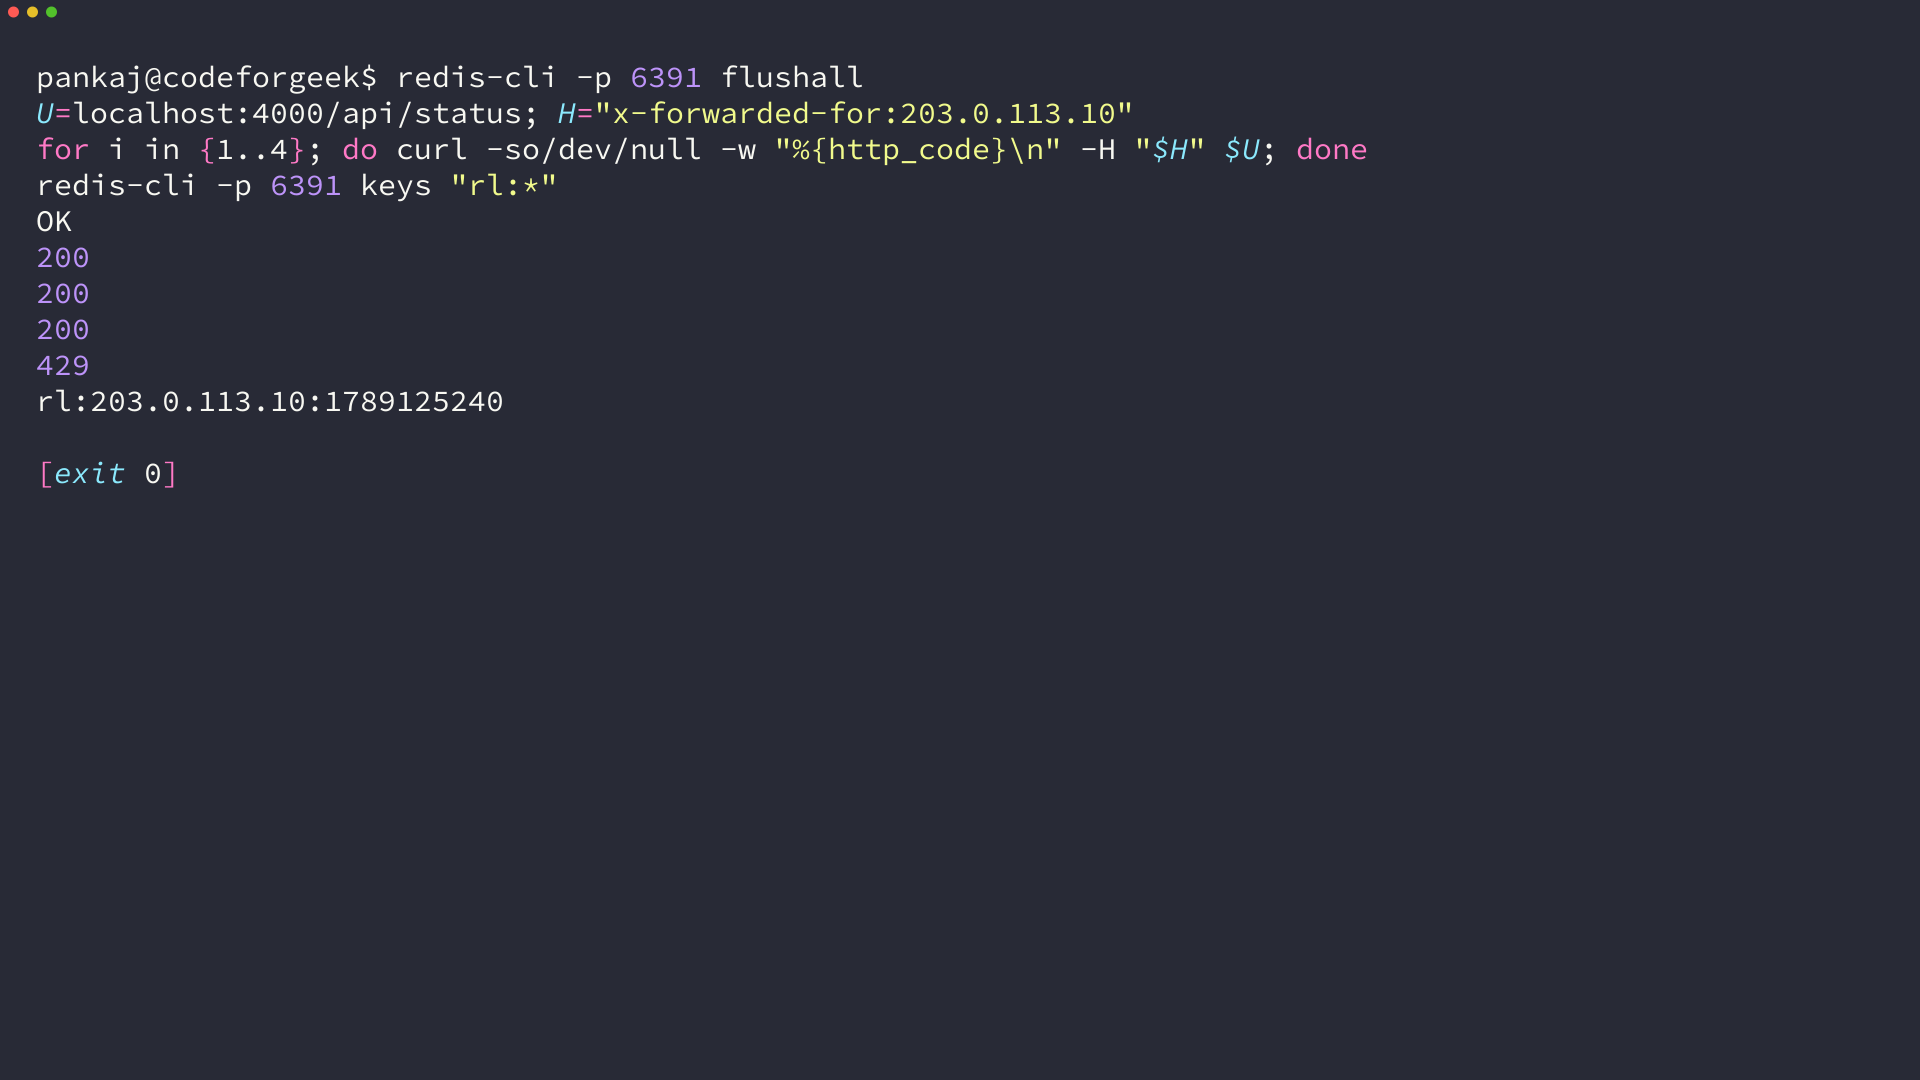
Add an inner address to the header and the same setting breaks in a way that is hard to see. The key becomes the inner address, and both of my test clients landed on one bucket, so the second client was rejected while the first had spent only its own allowance.
Set the number to the count of proxies you actually run, and read the keys in Redis to confirm it.
The key name is the only place this mistake shows up before your users find it. Nothing in the response tells you that every client shares one budget.
Give each route its own prefix
The prefix sits inside the key, so two routes that share a prefix share one budget. A search route allowing twenty per minute and a status route allowing three kept separate counters in this build, which is what you want until you deliberately want one global budget for a client.
Decide what happens when Redis is gone
A limiter that waits on a dead store converts an outage into latency, and the client does not save you, because a client that is reconnecting has not closed.
I stopped Redis under a running server and sent three calls with the default 250 millisecond budget. They came back as 200 responses in about 250 milliseconds each, because the middleware falls through to the route when the store cannot answer.
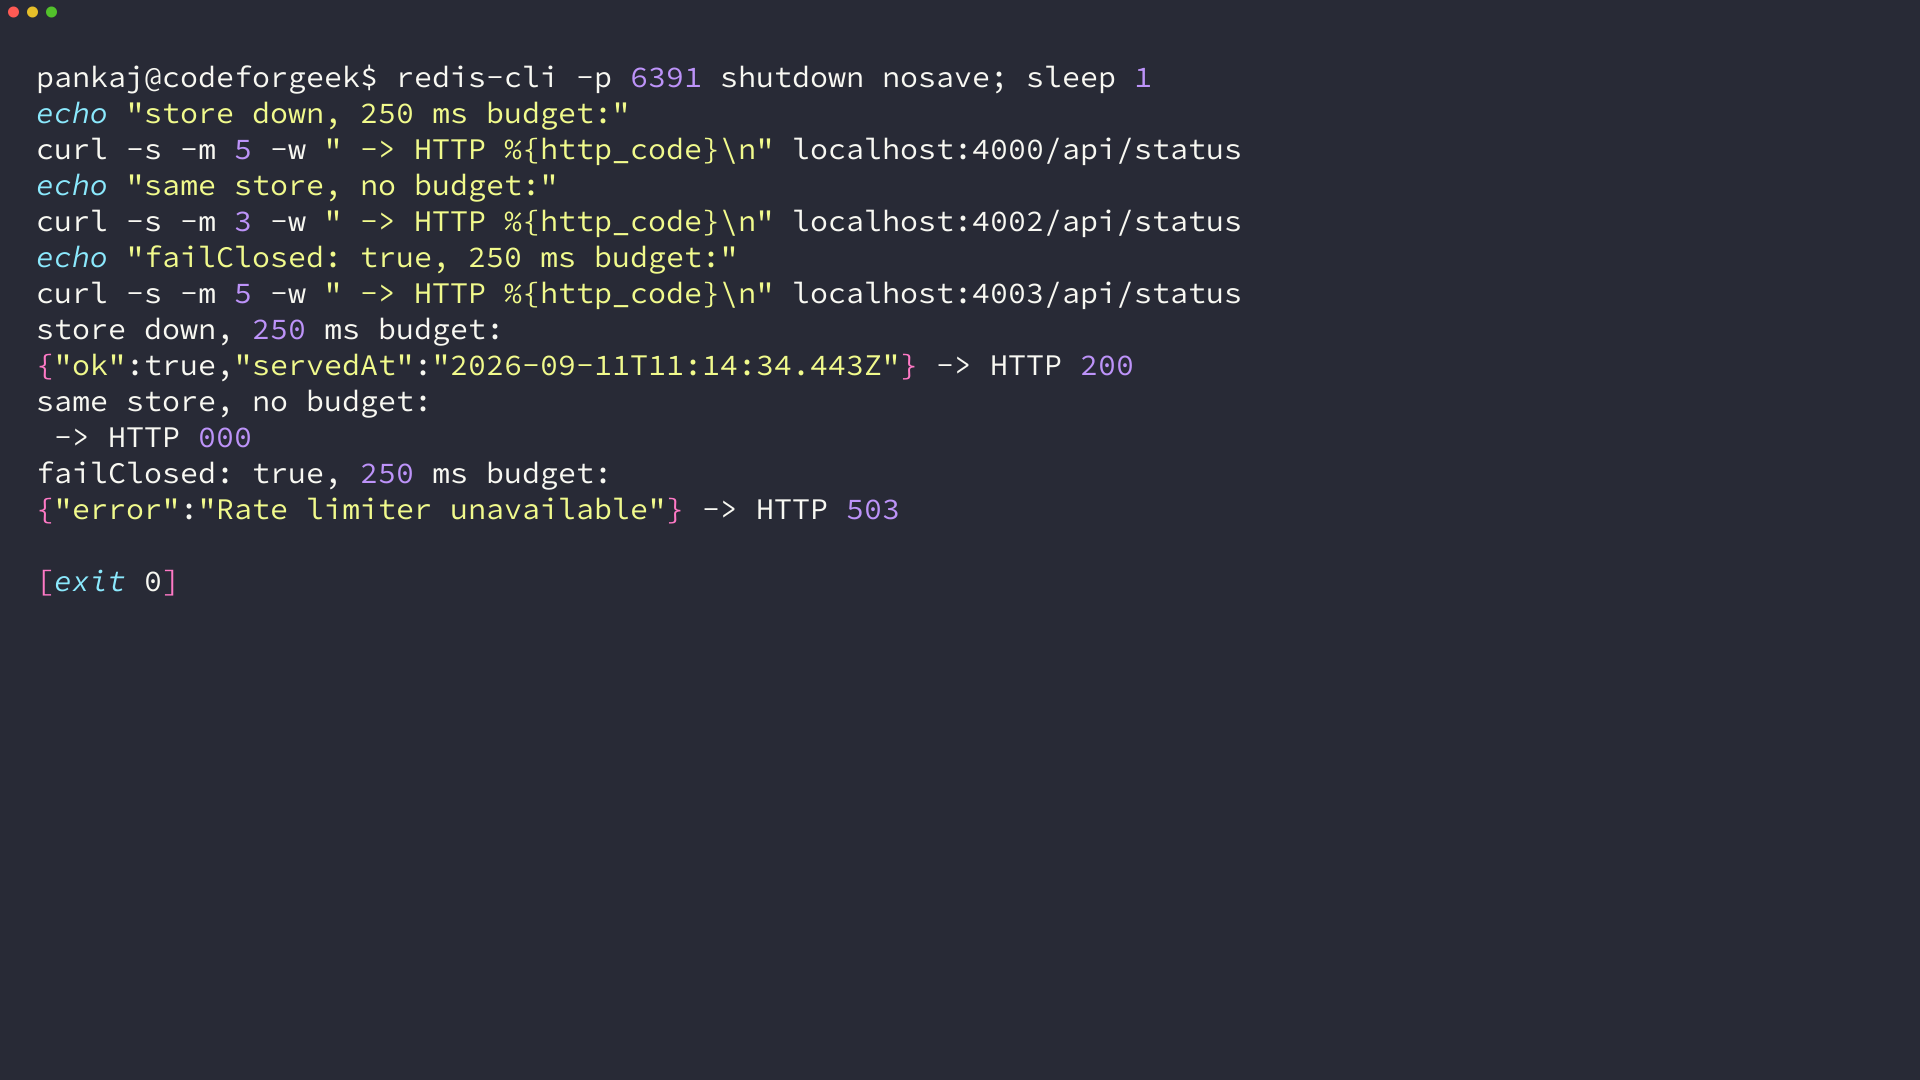
Those same calls with the budget turned off never returned inside the four second window the check allowed, which is the failure worth avoiding. The third configuration returns 503 from the middleware instead, and it did so inside the same budget.
Fail open serves traffic and loses the limit for that period, which is the safer default for most public read endpoints. Fail closed protects a route that costs money or writes to your database, at the price of an outage your users can see.
Pick one deliberately and write it down near the route. The middleware cannot guess which you meant, and the two behaviours are opposites.
What you have now, and the next thing to build
You have a limiter that counts atomically in Redis, rejects with 429 and the headers a client can use, keeps a separate budget per route, and behaves predictably when the store is unreachable. The whole thing is three short modules, which is the point of writing it yourself once.
The rule worth keeping is that the value deciding a limit has to be produced by the same operation that reads it. Everything else in this middleware is a detail you can change, including the window length and the identity rule.
When a fixed window is not enough, reach for the maintained library instead of extending this one. express-rate-limit with a Redis store wraps the same counter and adds sliding windows, per-key stores, and the header work.
| When this changes | What to do next |
|---|---|
| A second server joins the pool | nothing changes, the counter already lives in Redis |
| The boundary burst costs money | move the counter to a sliding window |
| Plans need different budgets | key the window on the plan instead of the address |
| The route is expensive to serve | set failClosed so an outage rejects instead of serving |
If the boundary burst is what costs you money, a sliding window counter is the next mechanism to read. It reuses the key and the expiry you already have, so the upgrade is one extra read per call.
FAQ
Do I need Redis to add rate limiting to a Node.js API?
No, an in-process counter works while you run a single server. Redis becomes necessary as soon as a second copy of the process runs, because each copy would otherwise keep its own count and a client would get one budget per instance.
What is the difference between fixed window and sliding window rate limiting?
A fixed window resets the counter at a clock boundary, so a client can spend a full budget either side of that boundary and reach twice the configured limit. A sliding window weights the previous window against the current one, which smooths the boundary at the cost of one extra read.
Should a Node.js rate limiter fail open or fail closed?
Fail open when the endpoint is public and cheap to serve, because a Redis outage should not take your API down with it. Fail closed when the call is expensive, writes data, or is the only protection on an account-level action such as a password reset.
Can I use express-rate-limit with Redis instead of writing this middleware?
Yes, and for most projects you should. express-rate-limit 8 with a Redis store gives you sliding windows, per-key stores, and the response headers, and it relies on the same trust proxy setting this article walks through. Writing the counter yourself is worth doing once, so the failure modes are obvious when the library reports them.