New to Rust? Grab our free Rust for Beginners eBook Get it free →
How to Update Node Version on Windows, Linux, and macOS

Node.js is an extremely vast, server-side open-source JavaScript environment that runs on Chrome’s V8 JS engine. This enormousness of Node.js has resulted in a huge and active community of users, flooding contributions every second.
Node.js is an emerging technology and it provides regular updates, it is essential to keep updating to the latest versions of Node to follow up with the community and upcoming documentation.
The new versions come with more enhanced security, introducing better features considering the increasing threats and changing demands out there.
In this tutorial, we will walk you through various ways of updating Node.js on MacOS, Windows and Linux.
Also Read: How to Build and Publish a NPM Package
Check the version of Node.js
Before we begin, let’s start by checking our version of Node.js, like this:
node –version
or
node -v
Different Ways to Update Node on macOS
1. npm
NPM(node package manager) is an online open-source repository for publishing Node.js projects. It is also a command-line utility for interacting with those repositories and helps in package installations.
If you are a MacOS user, this simple update method of using npm for Node.js update is relevant for you.
To update Node.js via the command line, we can use a tool called n in the npm command. This will help us interact with different versions of Node.
Let us first clear any cache that’s present:
npm cache clean –f
Installing n globally:
npm install -g n
Now that we have n installed, let’s install the latest stable version of Node:
sudo n stable
You may even choose to install the latest features by:
sudo n latest
To download a specific version, you can simply do this:
n 14.17.1
2. Homebrew
Homebrew is made for MacOS and is a popular package management tool. We can use it to update the version of Node.js on our Mac machine.
Start by running this command in our MacOS terminal:
brew install node
Update Homebrew before updating Node, run:
brew update
Update node:
brew upgrade node
To easily switch between Node.js versions:
brew switch node 14.17.1
How to Update NodeJS on Windows
nvm-windows
We can make use of the nvm-windows and NVM(Node Version Manager) tool to update Node version windows. Although there are several usage similarities, NVM and nvm-windows aren’t the same.
It is required that you uninstall any existing Node and npm versions, otherwise, there’s a chance for versions to conflict. Make sure you also delete any existing installation directories for example (%ProgramFiles%\nodejs)
Click here to download the nvm-setup.zip file and run the latest installer.
Now, jump to your Command Prompt or PowerShell terminal. Remember to Run it as Administrator because the utility runs in an Admin shell.
Start by installing the LTS (long-term supported) version, let’s say we want to install 14.17.1:
nvm install 14.17.1
Next, switch to the version you just installed:
nvm use 14.17.1
Or, you can choose to simply install whatever is the latest version:
nvm install latest
To view a list of installed Node.js versions, run this:
nvm list
To view a list of versions available for download, run this:
nvm list available
Different Ways to Update NodeJS on Linux (or macOS)
1. Node Version Manager
A Node version manager is a tool or a utility that enables developers to install different versions of Node.js and switch impeccably between them.
There are two Node version managers to choose from for Linux or MacOS, nvm or n.
nvm
nvm is nothing but a script-based version manager of Node.js. You can update your version of Node.js on Linux or MacOS with Wget or cURL.
Let’s say we want to install the v0.38.0 of nvm, in this example.
To update with Wget, run this command:
wget -qO- https://raw.githubusercontent.com/nvm-sh/nvm/v0.38.0/install.sh | bash
To update with cURL, run this command:
curl -o- https://raw.githubusercontent.com/nvm-sh/nvm/v0.38.0/install.sh | bash
These commands will also let you clone the repo to ~/.nvm in a way to let you make changes to your bash profile and gives you access to nvm globally around your system.
Let us check if the installation was successful:
command –v nvm
If installed properly, it will spit out nvm.
n
We have already seen how we can upgrade Node.js on MacOS with n. These steps that follow are for Linux.
Let us first clear any cache that’s present:
npm cache clean –f
Installing n globally:
npm install -g n
Now that we have n installed, let’s install the latest stable version of Node:
n stable
You may even choose to install the latest features by:
n latest
To download a specific version, you can simply do this:
n 14.17.1
To see a list of downloaded versions on your machine:
n
To upgrade to the latest LTS version:
n lts
Updating NodeJS using a Node Installer
Although this is the least recommended way to perform a version update for Node.js, it is still a possible solution if for some reason you face issues with any steps above.

Updating Node.js with Installer on Linux
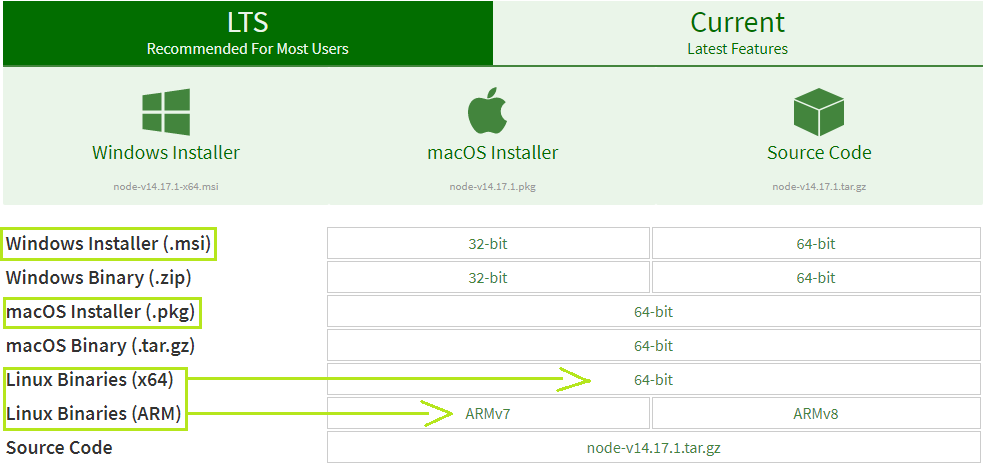
Simply jump to the downloads page where you will find many Linux binary packages. Select your preferred installer.
Updating Node.js with Installer on Windows & macOS
Based on your system, you can select from any of the two highlighted installers for Windows and macOS.
Run the installation wizard. Normally, there’s nothing of the defaults that you would have to change.
After you’re done, it will have flawlessly completed installing Node.js and upgrading your version of Node.js by replacing it with the new one.
Summary
Node.js is updating regularly to provide better security, new features and more stability. When a new version is presented, the documentation is also updated, and to follow up on that documentation you must install the latest version. For example, if you are using an old version and try to access a method by reading the documentation of the latest version will cause an error. So updating to the latest version is a great way to solve this conflict. We hope this tutorial helps you update to the latest version of Node.js on your respective operating system.
Reference
https://nodejs.org/en/download/


