
New to Rust? Grab our free Rust for Beginners eBook Get it free →
How to Create an NPM Package in Node.js: A Full Walkthrough
In this guide I will show you how to create and publish an npm package step by step. I’ll also tell you a couple of secrets to make your packages look professional and better than existing ones.
Why Create an NPM Package? My Personal Experience
If you ever worked with Node.js, you used npm to install packages by running a command like npm install package-name. Every package you install is created by someone and you can also create your own package and publish it to the npm registry.
Creating and publishing an npm package is useful if you have custom functions or reusable code that you use repeatedly in your different projects. You can publish it as a package and install it when you need it.
Last week I created an npm package that accepts an AI API key as input and automatically detects which AI provider it can be used for, then uses that provider’s API endpoint.
I built this because today developers work with multiple AI API keys, so it becomes confusing to figure out which endpoint should be used with a specific API key.
What You Need Before You Create an NPM Package in Node.js
You need Node and npm installed. Check both with:
node -v
npm -v
If either command fails instead of printing a version, your PATH (the list of folders your terminal searches for commands) probably needs fixing. This guide covers the common Windows case.
npm comes bundled with Node, so you don’t install it separately. As of this writing, Node 24 is the active LTS (long-term support, meaning years of security fixes) line, Node 22 is in maintenance and Node 20 already reached end of life. Update first if you’re behind.
You’ll also need a free account on npmjs.com once you reach the publish step, though everything before that works without one.
Pick a Package Name Nobody Else Has
Before writing any code, check whether your chosen name is already on the registry:
npm view your-package-name
If that returns package details instead of an error, someone already owns it. npm names also follow a few rules: lowercase only, no spaces, hyphens are fine.
If your first choice is taken, you have two options. Pick a different name, or publish under your own scope (a name prefixed with your username, like @yourname/your-package-name). Scoped names are always available since they’re tied to your account, though publishing one publicly needs an extra flag, which I’ll get to.
Set Up Git First
Most packages live in a git repository even before they live on npm, so I get this part out of the way early.
Initialize the repository
mkdir slugify-lite
cd slugify-lite
git init
Add a .gitignore
This keeps node_modules and your build output out of version control by accident:
node_modules
dist
Leave out the dist line for now if you’re not using a build step yet.
Make your first commit
git add .
git commit -m "Initial commit"
Push to GitHub afterward if you want a remote copy.
Run npm init and Look at What It Creates
npm init
Running it without -y walks you through a few questions: name, version, description, entry point, test command, git repository, keywords, author and license. Answer them honestly since most of these end up on the npm page people see before they install your code.
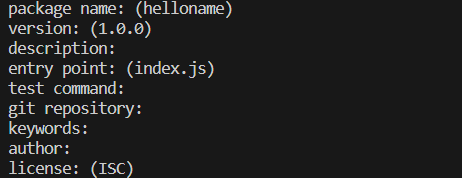
If you’d rather skip the prompts, run npm init -y and edit package.json (the file npm reads to understand your package) by hand afterward.
What a fresh package.json looks like
{
  "name": "slugify-lite",
  "version": "1.0.0",
  "description": "Turn any string into a URL-friendly slug",
  "main": "index.js",
  "type": "module",
  "files": ["index.js"],
  "engines": { "node": ">=18" },
  "keywords": ["slug", "slugify", "string"],
  "author": "Your Name",
  "license": "MIT",
  "homepage": "https://github.com/yourname/slugify-lite",
  "repository": {
    "type": "git",
    "url": "git+https://github.com/yourname/slugify-lite.git"
  },
  "bugs": {
    "url": "https://github.com/yourname/slugify-lite/issues"
  }
}
The fields that actually matter
- name: what people type after npm install. A scoped name avoids clashes but needs an extra publish flag.
- type: set to “module” for ES modules (export and import). Leave it out for CommonJS (module.exports and require()).
- main: the file Node loads when someone imports your package.
- files: which files actually get published. Skip this and npm ships almost everything except node_modules, test files included.
- engines: which Node versions you support. Define this properly and npm install warns people if their version falls outside it.
- keywords: part of how your package turns up in npm’s own search, so use words people would actually type.
- homepage, bugs, repository: not required, but they add real links to your npm page, and later integrations like provenance look for the repository field specifically.
Write the Code
For something this small, plain JavaScript is enough:
// index.js
export function slugify(text) {
  return text
    .toString()
    .toLowerCase()
    .trim()
    .replace(/[^a-z0-9]+/g, '-')
    .replace(/^-+|-+$/g, '')
}
If you went with CommonJS instead, drop the type field and write it like this:
// index.js
function slugify(text) {
  return text
    .toString()
    .toLowerCase()
    .trim()
    .replace(/[^a-z0-9]+/g, '-')
    .replace(/^-+|-+$/g, '')
}

module.exports = { slugify }
You’ll also see an older pattern in some docs, attaching functions to the exports object directly instead of replacing module.exports:
exports.slugify = function (text) {
  // same logic
}
All three work. I default to export/import now since that’s where most new packages have been heading, but plenty of widely used packages stay on CommonJS, and there’s nothing wrong with that. Pick one and stick with it, since switching later breaks anyone calling require() on your package.
I usually resist adding options before anyone’s actually asked for them. A small package that does one thing well is easier to maintain than one with a dozen flags nobody uses.
Add TypeScript If You Want Type Safety
A good number of packages on npm now ship written in TypeScript, mostly so editors can show people the right argument types without anyone opening your source code.
Install it and create a config
npm install typescript --save-dev
npx tsc --init
That second command generates a tsconfig.json (TypeScript’s settings file) you can edit. The options that matter most for a package are module, target, outDir and turning on declaration, which makes TypeScript also generate the .d.ts type files that give your users autocomplete.
{
  "compilerOptions": {
    "target": "es2022",
    "module": "NodeNext",
    "moduleResolution": "NodeNext",
    "outDir": "./dist",
    "rootDir": "./src",
    "strict": true,
    "declaration": true,
    "esModuleInterop": true,
    "skipLibCheck": true
  },
  "include": ["src"]
}
Point package.json at the build output
Write your source in a src folder. Then point package.json at the compiled output instead of your raw files:
{
  "main": "./dist/index.js",
  "types": "./dist/index.d.ts",
  "files": ["dist"],
  "scripts": {
    "build": "tsc"
  }
}
Run npm run build before you publish, or add a prepack script that calls build automatically, so you never publish a stale dist folder by accident.
When tsc alone isn’t enough
If your package needs to support both CommonJS and ESM consumers, or bundles CSS or other non-JavaScript assets, tsc alone won’t cover it. You’ll want an actual bundler such as Rollup or tsup instead, with its own config file and plugin choices. It’s only worth that extra weight once plain tsc output stops meeting what you need.
Format Your Code
Not required, but Prettier (a tool that auto-formats your code to one consistent style) is small enough that I add it to most projects so I stop thinking about formatting at all.
npm install --save-dev prettier
{
  "semi": true,
  "singleQuote": true,
  "printWidth": 80
}
"scripts": {
  "format": "prettier --write ."
}
Write Tests Before You Publish Anything
Node has a built-in test runner, so for a small package you don’t need to install anything extra:
// test/index.test.js
import { test } from 'node:test'
import assert from 'node:assert/strict'
import { slugify } from '../index.js'

test('turns spaces into dashes', () => {
  assert.equal(slugify('My First Package'), 'my-first-package')
})
Run it with node –test, and add it as your test script in package.json so npm test does the same thing.
If you’re on TypeScript and want more built-in matchers, Vitest needs barely any setup. Jest with ts-jest works too and is what a lot of older TypeScript projects already use, though it needs more configuration. None of these are required for a small package. What matters is that something runs your code and checks the output, not which tool does it.
Test the Package Itself, Not Just the Code
This is the step that catches the most embarrassing mistakes, and it’s different from running your unit tests. Your tests run inside your own project, where imports resolve relative to your repository. Once someone installs your package, none of that is true anymore, so you need to check what actually happens after install.
Preview the tarball first
npm pack --dry-run
This lists every file that would end up in the tarball (the compressed file npm actually uploads) without creating one. Read that list. If something’s missing or something shouldn’t be there, fix your files field now.
Install it like a real user would
npm pack
cd ../some-test-project
npm install ../slugify-lite/slugify-lite-1.0.0.tgz
This gets you closest to a real install.
Use npm link while you’re still iterating
A quicker option while you’re actively working is npm link, which creates a symlink (a shortcut pointing at your real folder) instead of a real install:
npm link
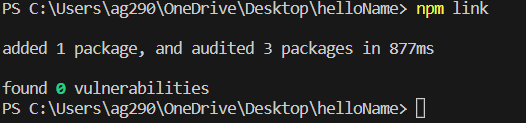
Then from the project where you want to use it:
npm link slugify-lite
Changes to your source show up right away without reinstalling, though it isn’t a fully production-like test. Installing by relative path behaves about the same way, just without the extra command. The same idea applies to running packages and scripts locally in general, since none of it touches the public registry.
Run a private registry for full confidence
If you maintain more than one or two packages, it’s worth running a private registry like Verdaccio locally, so you can publish and install for real without touching the public registry at all. That’s more setup than most personal packages need, but it’s the closest thing to a true end-to-end test.
Add a README, a License and Maybe a CONTRIBUTING File
Write a README that actually gets read
The README is what someone reads to decide whether to install your package at all, before they read a line of code. I keep mine to four parts: what it does in one sentence, how to install it, a usage example you can copy straight into your own code and a short reference for anything beyond the basic case.
Add a LICENSE file too
Not just a license field in package.json. MIT is what most small packages default to, since it places almost no restrictions on how people use the code. Pick one at choosealicense.com if you’re unsure which fits.
Consider a CONTRIBUTING file
If you expect pull requests, a short CONTRIBUTING.md explaining how to run tests and submit changes saves you from answering the same questions in every issue. Skip it for a package only you maintain.
Log In and Understand What npm Expects From Your Account
npm login

By default, new packages on npm require two-factor authentication (2FA, a second login step beyond your password) to publish. If you haven’t set it up yet, npm walks you through it the first time you try to publish, usually with an authenticator app or a hardware security key.
npm also rolled out staged publishing this year, where your package sits in a queue until you approve it with 2FA instead of going live right away. It’s opt-in, mostly aimed at teams publishing from automated pipelines who want a human to confirm before code reaches the registry.
Preview What You’re About to Publish
Before the real publish, run a dry run (a preview that shows the result without actually doing it):
npm publish --dry-run
This shows the exact tarball contents, the package size and the version that would go live. It’s a good last check for stray files, a wrong version number or a missing build step.
Publish It
For an unscoped name:
npm publish
For a scoped package, publishing defaults to private, which needs a paid plan. Add the access flag to publish publicly for free:
npm publish --access public
Once that runs without an error, check the package page at npmjs.com/package/your-package-name.
Install It Somewhere Else to Confirm It Works
Don’t stop at the publish succeeding. Go to a different folder and install it the way a real user would:
mkdir ../confirm-it-works
cd ../confirm-it-works
npm init -y
npm install your-package-name
Write one line that imports it and runs it. This catches the bugs your local testing can’t, the ones that only show up once your code sits inside someone else’s node_modules instead of your own project folder.
Version It Properly From Here On
Bump versions with npm version, not by hand
Use npm version instead of hand-editing the number in package.json. It bumps the version, updates package.json and package-lock.json and creates a git commit and tag if you’re in a git repository:
npm version patch   # 1.0.0 -> 1.0.1, bug fixes
npm version minor    # 1.0.1 -> 1.1.0, new features that don't break existing usage
npm version major   # 1.1.0 -> 2.0.0, breaking changes
Then publish again. npm rejects a publish if the version already exists on the registry, so running npm publish twice by accident fails safely on the second run.
These numbers follow semver (semantic versioning, the major.minor.patch system). The tilde and caret symbols people see in other projects’ dependencies control which of your future versions they’ll accept automatically.
Know the unpublish rules before you need them
npm only lets you unpublish a version within 72 hours of publishing it. After that window, you need npm support directly. That limit exists because of an incident back in 2016 where someone unpublished a tiny package called left-pad, which broke a large number of unrelated builds that depended on it.
Treat publish as close to permanent. Lean on npm deprecate instead of unpublish if a version ships with a real problem. It marks the version as deprecated and warns anyone who installs it, without removing it and breaking projects that already depend on that exact version.
Set Up CI So You’re Not Testing by Hand Forever
Once a package has tests worth running, add a GitHub Actions (GitHub’s built-in automation runner) workflow that runs them on every push and pull request:
# .github/workflows/ci.yml
name: CI
on:
  push:
    branches: [main]
  pull_request:
    branches: [main]
jobs:
  test:
    runs-on: ubuntu-latest
    steps:
      - uses: actions/checkout@v4
      - uses: actions/setup-node@v4
        with:
          node-version: 24
      - run: npm ci
      - run: npm run build --if-present
      - run: npm test
This catches a broken build or a failing test before it gets close to npm publish, instead of after.
Add a Basic Security Check While You’re at It
npm audit checks your dependencies against known vulnerabilities and ships with npm already, so running it costs nothing:
npm audit
If you want something that runs automatically on every push, tools like Snyk plug into GitHub Actions the same way the test workflow above does, scanning for vulnerable dependencies on every commit instead of only when you remember to check.
Automate the Version Bump and the Publish Itself
Once you’re past publishing by hand every time, you have a few options, and none of them is obviously correct for everyone.
Tag and publish, the manual baseline
Keep using npm version locally, push the tag and let a GitHub Actions workflow run npm publish whenever a new tag shows up. Least to set up, and keeps you in full control of when a release happens.
Changesets, for deliberate releases
Add a short changeset file describing each change as you make it. A script bundles them into a version bump and a changelog when you’re ready to release. Good fit if you want releases to stay deliberate but don’t want to write the changelog by hand.
Semantic-release, where commits decide
This reads your commit messages, written using conventional commits (a fixed prefix like feat: or fix:), and decides on its own whether the next release is a patch, a minor or a major version, then publishes once your main branch passes CI. Least manual of the three, but the commit format becomes part of the release process, so the whole team needs to follow it.
Whichever you pick, the GitHub Action ends up looking similar: check out the code, install dependencies, run your tests, then run the publish step, increasingly without a stored npm token at all.
If You Publish Through CI, Skip the Long-Lived Token
npm now supports trusted publishing through OIDC (a way for GitHub to prove its identity to npm without a stored password). Your workflow authenticates directly, without you ever storing a token in your repository’s secrets. It also generates a provenance attestation automatically (a signed record of exactly which commit and workflow built the package), which shows up as a badge on your npm page.
Setting this up takes more than anything else here, but it matters once you’re maintaining a package other people depend on, since a leaked token in an old CI config is one of the more common ways packages end up compromised.
A Few Mistakes That Catch People Out
- Wrong main path: pointing main at a file that doesn’t exist in the published tarball is the most common one, since it works locally and only breaks once someone installs the real package. Check with npm pack –dry-run before every publish.
- Missing files field: skipping files or a .npmignore means your test folder, local notes and sometimes your entire .git history get published with your code. It doesn’t break anything, but it makes the package heavier and looks unfinished.
- Secrets in the folder: a local .env file with real credentials goes out to the whole registry along with everything else sitting in the folder when you publish, so check what’s actually in there first.
- Name collisions: a name close enough to a popular package that people install the wrong one by typo is a real problem on the registry, so search npmjs.com itself, not just npm view, before settling on a name.
- No engines field: skipping it means compatibility problems show up as a confused GitHub issue months later instead of npm’s own install-time warning.
Key Takeaways
- Check the package name on npm’s registry before writing any code, and use a scoped name like @yourname/package if it’s taken.
- npm init creates package.json. The fields that matter most are main, type, files, engines and keywords.
- Plain JavaScript works for most packages. Add TypeScript only once other developers expect type definitions and autocomplete.
- Test the package itself with npm pack –dry-run or npm link before publishing, not just your code with unit tests.
- A clear README, a LICENSE file and, if you expect contributions, a CONTRIBUTING file matter as much as the code.
- npm requires two-factor authentication to publish by default, and recently added staged publishing as an extra approval step before code goes live.
- Use npm version to bump versions instead of hand-editing the number, and remember unpublishing only works within 72 hours of that version going live.
- Once a package is worth maintaining long-term, add CI, a basic security check and automate releases with Changesets or semantic-release instead of publishing by hand.
Frequently Asked Questions
How do I create an npm package in Node.js?
Run npm init to create a package.json, write your code in an index.js file, test it locally with npm pack –dry-run or npm link, then publish it with npm publish (add –access public if the name is scoped). Everything else in this guide makes that loop safer and more repeatable.
Do I need to know TypeScript to publish an npm package?
No. Plain JavaScript, either CommonJS (module.exports) or ES modules (export and import), works for most packages. TypeScript adds value once other developers expect autocomplete and type checking from your package, but it’s an addition, not a requirement.
How do I test an npm package before publishing it?
npm pack –dry-run shows exactly what would be published without creating anything. npm pack followed by an install from the generated .tgz file, or npm link, lets you try the package in a separate project before it ever touches the public registry.
What’s the difference between npm pack and npm publish?
npm pack builds the tarball locally so you can inspect or install it yourself. npm publish runs the same packaging step and then uploads the result to the registry, making it installable by anyone.
Can I unpublish an npm package after it’s live?
Only within 72 hours of publishing that version. After that, you need npm support directly, and even inside the window it’s discouraged since other projects may already depend on it. npm deprecate is the safer way to flag a broken version without removing it.
Is publishing a scoped npm package free?
Yes. Scoped packages (@yourname/package) default to private, which needs a paid plan, but adding npm publish –access public makes them public and free, the same as an unscoped package.
Why does npm ask for a one-time password when I run npm publish?
Because two-factor authentication is required by default on new packages. It stops someone who only has your password from publishing a compromised version under your name, which is one of the more common ways malicious code ends up in the registry.
That’s the whole process, start to finish. Most packages only need the first half, the part up through publish. The rest, the TypeScript build, the CI pipeline, the automated releases, is there for whenever a package outgrows being something only you maintain by hand.


