New to Rust? Grab our free Rust for Beginners eBook Get it free →
A Beginner’s Guide to Streamlit in Python
Do you know that you can build simple web applications without using web development technologies? Yes, it’s possible because we have Python, which can make anything possible. Python utilizes a library known as Streamlit, which enables this magic to happen. If you are into data science and want to deploy your models quickly and easily with just a few lines of code, Streamlit is a great choice. Today, we will be delving into Streamlit in detail, so let’s get started.
Overview of Streamlit Module
Before we get into the installation and usage of Streamlit, let’s understand what Streamlit is and why it’s so important to us.
What is Streamlit?
Streamlit is a free tool for making good-looking web apps for machine learning and data science. It’s made for people who work with machine learning but don’t know much about making websites. Instead of spending a lot of time learning complicated stuff, they want something easy. Streamlit lets them make nice apps with only a few lines of code, focusing on showing data and getting the info they need for their models.
Why to Use Streamlit?
Making an app successful means having a good and easy-to-use interface. But for apps with lots of data, it’s hard to make a good interface quickly. Streamlit is a helpful tool. It’s a free library for Python that makes it easy to create nice interfaces without much trouble.
Some of its best features are listed below:
- Streamlit makes it easy for developers to create interactive web apps using simple Python commands.
- Streamlit works well with common data science tools like Pandas, NumPy, and Matplotlib. This means you can easily show and study data in web apps.
- You can easily share and use Streamlit apps. You can put them on your computer or on the internet using platforms like Heroku, AWS, or Google Cloud.
Installing and Setting Up Streamlit Module
You can set up Streamlit in different ways. Check out the options below to see which one fits you best.
Method 1: Using pip
Set up your Python development environment and then run the following command:
pip install streamlit
If successfully installed, you can verify it by running a simple program:
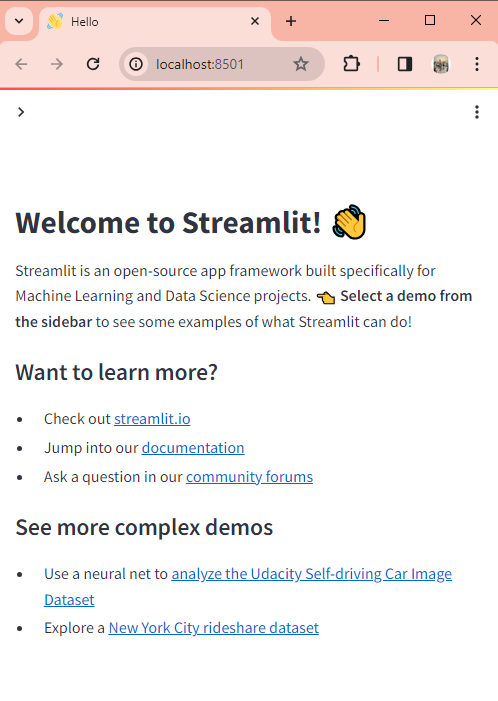
streamlit hello
You must see a welcome page like this:
Method 2: Using GUI
You may find it easier to use a visual interface. Install Streamlit by clicking through the Anaconda Distribution program. This method works best, especially if you’re using Windows or haven’t set up Python yet. Refer here for the detailed guide.
Method 3: Using Cloud
If you don’t want to set up Python on your computer, there’s another option. You can use a cloud-based setup. Try Streamlit Community Cloud with GitHub Codespaces. This means you don’t have to install Python or set anything up. Click here to see the guide.
Executing Streamlit Code
Here is how you can run your Streamlit code :
streamlit run file.py
Just replace “file.py” with the real name of your Python code file. When you run the script, a Streamlit server starts on your computer. Then, your app opens in a new tab in your web browser. This app is where you can make charts, write text, add buttons, tables, and more.
Understanding Streamlit Basic Functionality
Streamlit is very easy to use. Some basic usages listed below will confirm this fact.
1. Displaying Texts
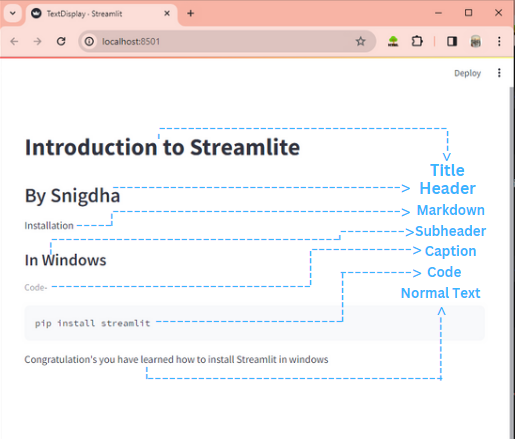
First, let’s see how we can display text. We’ll explore the different ways and commands to do this. Take a look at the code example below.
import streamlit as st
st.title("Introduction to Streamlite")
st.header("By Snigdha")
st.markdown("Installation")
st.subheader("In Windows")
st.caption("Code-")
st.code("pip install streamlit")

st.write("Congratulation's you have learned how to install Streamlit in windows")
Here,
- The first line is the import statement where we import Streamlit.
- st.title is used to create the main title that appears at the top of the page.
- st.header creates a header that is used to introduce sections or provide important information.
- st.markdown adds text to the page using Markdown formatting. Markdown is a simple language used to format text online.
- st.subheader creates a subheader that is used to organize content under a main header.
- st.caption adds a caption that provides some additional context.
- st.code displays a block of code on the page.
- st.write adds a text paragraph to the page.
When we run the provided code, we get the following web page as output.
Output:
2. Displaying Images, Videos, and Audio Files
Now, let’s learn how to display images, videos, and audio files. We’ll understand this with an example where we create a webpage advertising Paris. Let’s see it in action.
import streamlit as st
st.title("Welcome to paris")

st.header("Here an image of Paris")
st.image("Paris Image.jpg")
st.header("Here an image glimpse of Paris in 2 minutes")
st.video("Paris in 2 minutes.mp4")
st.header("Enjoy the music of song Paris!")
st.audio("ChainsmokersParis.mp3")
In this code,
- st.image() shows an image on the webpage.
- st.video() adds a video to the webpage.
- st.audio() embeds an audio player on the web page, allowing users to listen to the audio file.
Output:
3. Using Input Widgets
Streamlit offers different input tools that let you add interactivity to your apps. You can use buttons, sliders, text boxes, and more. It’s just like input options you get in a form. Let’s understand it with an example.
import streamlit as st
st.write("Do you want to visit Paris?")
st.checkbox('Yes')
st.button('Let us go!')
st.radio('Pick your Travel partner', ['Solo traveler', 'Love birds', 'Wander Gang'])
st.selectbox('Have you taken Schengan Visa?', ['Yes', 'No'])
st.multiselect('Your must visit places in Paris', ['Eiffel Tower', 'DisneyLand', 'Louvre Museum',
                                                   'Arc de Triomphe', 'Tuileries Garden'])
st.select_slider('Are you Excited?', ['No', 'Yes', 'Absolutely Yes!!!'])
st.slider('Pick number of days in Itinerary', 0, 20)
st.date_input("When will you fly?", datetime.date(2019, 7, 6))
Here,
- st.checkbox(‘Yes’) creates a checkbox with the label “Yes“, allowing the user to select it if they want to visit Paris.
- st.button(‘Let us go!’) creates a button with the label “Let us go!“.
- st.radio() helps you create a radio button group with the labels of your choice. Here it is “Pick your Travel partner” and options are “Solo traveler“, “Love birds“, and “Wander Gang“. The user can choose only one option from these.
- st.selectbox() builds a dropdown select box with a label and its options. The user can choose one of these options.
- st.multiselect() forms a multi-select dropdown with the label and options for popular places in Paris. The user can select multiple options from this list.
- st.select_slider() helps us to make a slider with the label “Are you Excited?” and options “No“, “Yes“, and “Absolutely Yes!!!“. The user can select one option by sliding the slider.
- st.slider() forms a slider with the label “Pick number of days in Itinerary” and a range from 0 to 20. The user can slide to select the number of days for their itinerary in Paris.
- st.date_input() displays a date input widget.
Output:
4. Using Display Boxes
Streamlit provides various colored display boxes for showing different types of special message pop-ups, such as error messages, warnings, success messages, and information.
import streamlit as st

st.error('This seems like an error', icon="🚨")
st.warning('Warning', icon="⚠️")
st.info('For your kind information', icon="ℹ️")
st.success('Implementation is successful!', icon="✅")
e = TypeError('This is an exception of type TypeError')
st.exception(e)
In the given code,
- st.error() displays an error box.
- st.warning() displays a warning section.
- st.info() displays an information content.
- st.success() displays a success message.
- st.exception() displays an exception.
The icon parameter helps us to add an emoji.
Output:

5. Using Visual Effects
Streamlit also offers us amazing and visually appealing art effects like floating balloons and falling snowflakes. Let’s see how this magic works with an example.
import streamlit as st
import time


def bring_food():
    msg = st.toast('Tasty food upcomming...')
    time.sleep(1)
    msg.toast('Pizza', icon="🍕")
    time.sleep(1)
    msg.toast('Burger', icon="🍔")
    time.sleep(1)
    msg.toast('Fries', icon="🍟")
    time.sleep(1)
    msg.toast('Cola', icon="🥤")
    time.sleep(1)
    msg.toast('Cake', icon="🍰")
    time.sleep(1)
    msg.toast('Want more?')


def trigger_action(action):

    action()
    time.sleep(5)
    st.experimental_rerun()

if st.button('Let it snow!'):
    trigger_action(st.snow)

if st.button('Happy Birthday!'):
    trigger_action(st.balloons)

if st.button('Bring the Food'):
    bring_food()
Here,
- st.balloons() help us to draw celebratory balloons.
- st.snow() helps us show snowfall.
- st.toast() helps us to display a short message, known as a notification “toast”. The toast appears in the app’s bottom-right corner and disappears after defined seconds.
Output:
6. Displaying Progress and Status
We can also display the progress and status of a process with Streamlit. Here is an example of a download and installation process, where we portray the use of these features.
import streamlit as st
import time

progress_bar = st.empty()
Text = st.subheader('Downloading...')


with st.spinner('Waiting to download...'):
    time.sleep(3)
st.success('Download started..')

for percent_complete in range(101):
    time.sleep(7 / 100)
    progress_bar.progress(percent_complete)


Text.subheader('Download complete!')

with st.status("Installing App...", expanded=True) as status:
    st.write("Searching for disk space...")
    time.sleep(2)
    st.write("Accessing Permissions")
    time.sleep(1)
    st.write("Installing Setup...")
    time.sleep(1)
    status.update(label="Installation complete!", state="complete", expanded=False)
In the given code,
- st.spinner() builds a spinner that simulates waiting for download, followed by a success message indicating download initiation.
- st.progress() displays a progress bar. A loop updates a progress bar to simulate download progress incrementally.
- st.status() insert a status container to display output from long-running tasks. Status messages simulate app installation steps, concluding with a completion status update.
Output:
Summary
And yes, that’s the end of this article. Here, we covered basic knowledge about Streamlit. We explored its different methods of installation and six basic API implementations. We saw how we can insert text widgets, and add images, videos, and audio to a webpage. We also learned how to add form filling like input widgets, display info boxes, and flash eye-appealing visuals, along with displaying the progress and status of a process.
But wait, this was only the introductory episode! We have a whole lot of Streamlit content left, so do check out the following:
Reference