
New to Rust? Grab our free Rust for Beginners eBook Get it free →
Set Up an Nginx Reverse Proxy on Linux with Node.js Application

Did you know that placing a reverse proxy in front of a Node.js server is considered to be a very vital and good practice? Node.js is a famous runtime environment and is loved by developers all around the globe. But what if your website grows huge traffic? This may lead to the degradation of the performance and user experience of your website. This is when reverse proxy comes in handy and it is best achieved with NGINX. In this article let’s try to understand reverse proxy, the need for it and a step-wise explanation to achieve it using Nginx.
Introduction to Nginx
Nginx is a very popular, open-source web server. It was created by Igor Sysoev, a Russian developer, in the year 2004. The correct pronunciation for Nginx is “engine-x”. The Nginx server works for HTTP, HTTPS, SMTP, POP3, and IMAP protocols. There are mainly two versions of it: NGINX Open Source and NGINX Plus. It is a very powerful request management server that helps when there is a lot of heavy traffic on the original server. It consumes very less resources and servers static content, improving the overall performance of web applications.
Nginx is well known basically for its three main capabilities: namely a reverse proxy server, a load balancer, and an HTTP cache. We already have well-explained articles about HTTP cache and load balancer, so don’t forget to check out:
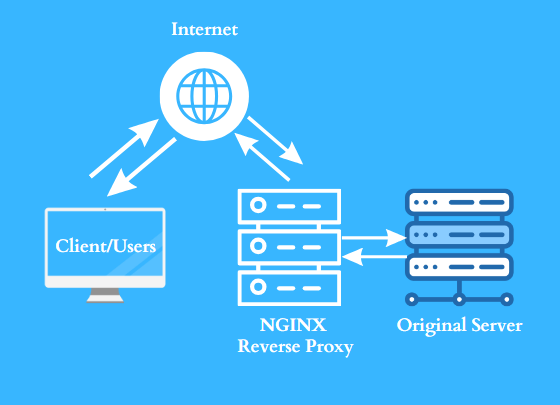
What Is Reverse Proxy and Its Need?
A Reverse proxy is a unique type of web server designed to receive requests from different clients. It then forwards each request to the right server capable of handling it and sends the server’s response back to the original client. Typically placed at the network’s edge, it catches client requests before reaching the origin server. It’s commonly set up to adjust the request in some way before directing it correctly. You may relate it to a real-life example.
Real-Life Example of Reverse Proxy
Imagine yourself as a client or customer. It’s Valentine’s Day, and you want to buy chocolate for your partner. If you decide to go directly to the factory to make the purchase, you’ll encounter a large crowd already gathered there, all wanting to buy chocolate for their loved ones. This means there’s increased traffic, and you’ll have to wait for a long time. Additionally, you might not find your preferred flavour.
However, if there’s a retailer shop acting as a reverse proxy, sourcing its stock from the same factory, it would be easier for you to buy from them. This is because you’ll experience less traffic and faster service, and you can easily find your preferred flavour.

Now that you know what a is Reverse proxy and its importance, let’s learn how to deploy it in our application. But let’s see how to install and configure Nginx first.
Installing Nginx on Linux
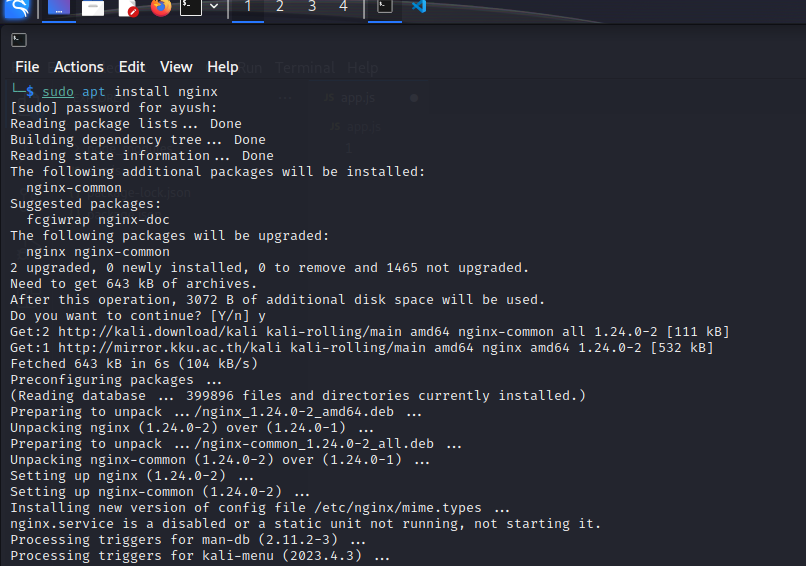
Step 1: Open your Linux terminal and write the following commands in the terminal to install Nginx into your system:
sudo apt install nginx
Step 2: After this process is complete run the following commands to enable the working of Nginx and see its status:
sudo systemctl enable nginx
sudo systemctl start nginx
sudo systemctl status nginx
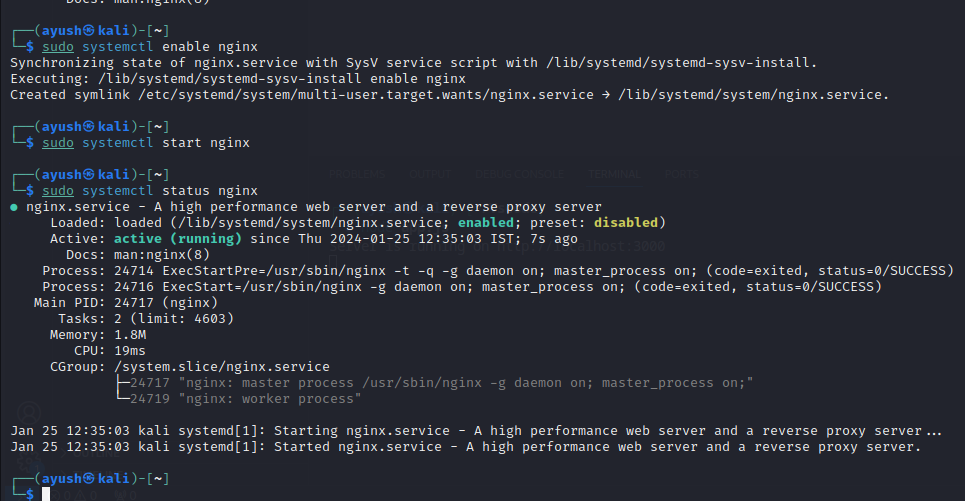
After running the above commands, you will see the results same as shown in the image. If you look closely, the console displays that the service is enabled and the status is active (running).
Validating the Nginx Installation
Now to confirm that Nginx is successfully installed, you may perform any one of the two tests.
Test 1:
The Nginx server will run on port 80 of your system’s IP address. To know your system IP address, run the given command:
hostname -I
This will display the IP address associated with the current host.
Using the obtained IP address, write the next command:
curl -I <obtained IP address>
This will inspect the HTTP headers of a web server associated with that IP and by looking at we can confirm the presence of the Nginx server.
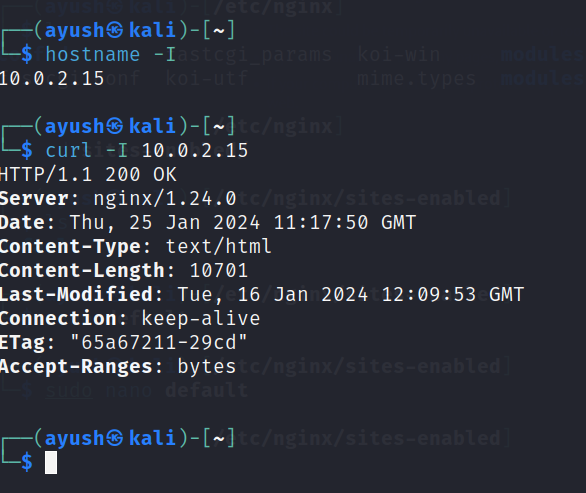
You can see in the server section, nginx/1.24.0 which confirms that Nginx is successfully installed in your system.
Test 2:
Use the IP address of your system which you obtained before and paste it into the search bar of your web browser. You will see a page like this:
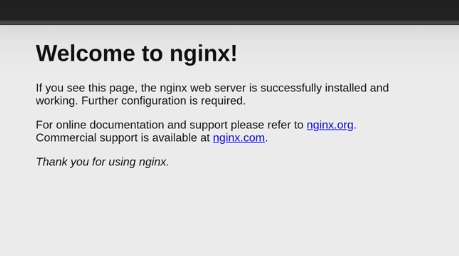
If you see this type of welcome page then it’s confirmed that you have Nginx as a web server. Now that we have Nginx installed in our system, Let’s create a Node.js application and see if we can reverse proxy it.
Creating a Node.js Application for Reverse Proxy
Now, we will create a Node.js application that will be hosted on port 3000 so that we can see how to use a reverse proxy to host it on an Nginx server or port 80.
To create a Node.js application hosted on port 3000 or localhost, follow the below steps.
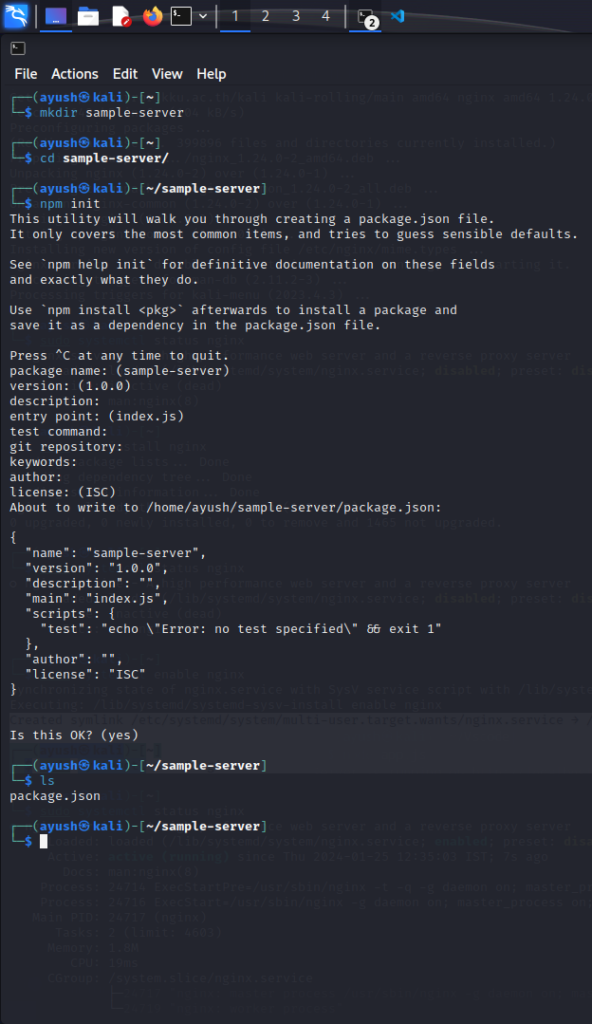
Step 1: Make a directory where your Node.js application will store and use cd to point towards it.
mkdir sample-server
cd sample-server/
Step 2: Now create a package. After it is created, you can see the list of generated files using the ls command.
npm init
ls
Step 3: Now you need to install express so that we can create a server. Once express is installed , we create a server.js file and open it using nano (Text editor). Follow the given commands:
npm i express
nano server.js

Step 4: Once the nano editor is opened, write the following code in it. Also while using nano, pay attention to the following Shortcuts:
- M+6 : To copy
- Ctrl+U : To cut
- Ctrl+/ : Go to line
- Ctrl+O : Write Out
- Ctrl+X : Exit
const express = require('express')
const app = express()
const port = 3000

app.get('/', (req, res) => {
  res.send('Hello and Welcome to CodeForGeek!')
})

app.listen(port, () => {
  console.log(`Example app listening on port ${port}`)
})
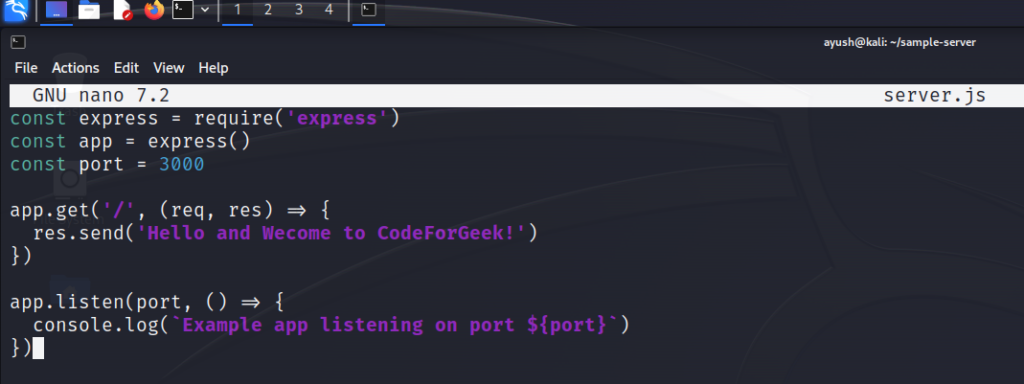
Use Ctrl+O and Ctrl+X to save and exit the editor.
Step 5: Now run your application using the following command and see if it works:
node server.js
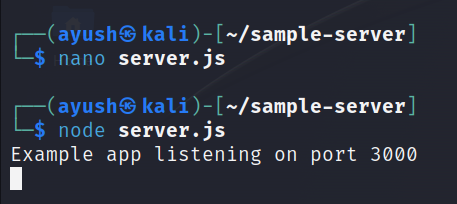
If you see the above display then the application is created successfully. Now let’s configure it for reverse proxy.
Configuring Nginx for Reverse Proxy with Node.js Application
Now that we have created the application, we will set up a reverse proxy to redirect it and change the host from localhost to the Nginx server. For this, we need to configure the default Nginx settings to act as a reverse proxy.
To modify the default Nginx configuration for reverse proxy, follow the below steps.
Step 1: Firstly point towards the /etc/nginx. Then by ls, list the files and direct them towards the sites-enabled.
cd /etc/nginx
ls
sites-enabled

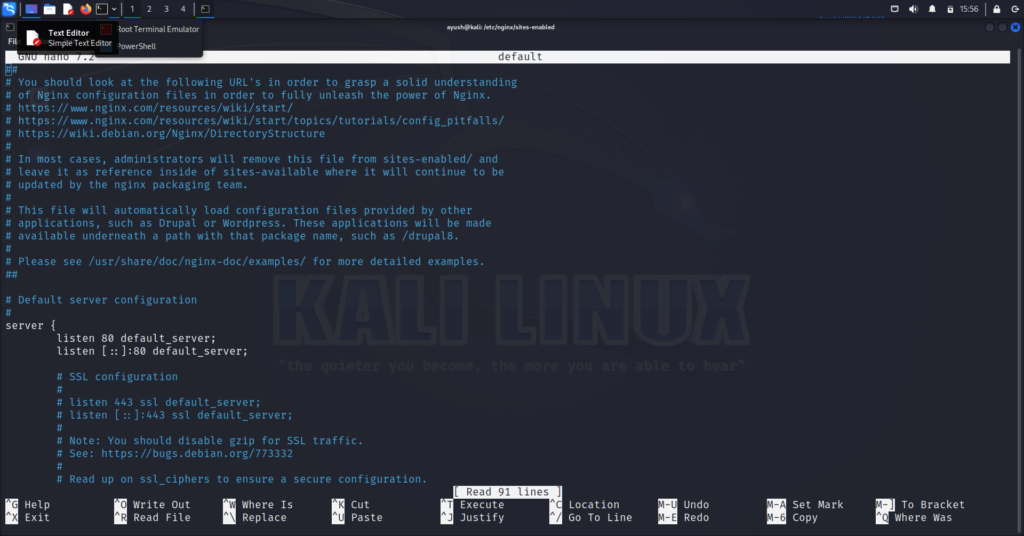
Step 2: On directing towards /etc/nginx/sites-enabled, open the default configuration page using the following command:

After you run this command a default page like the following will open:
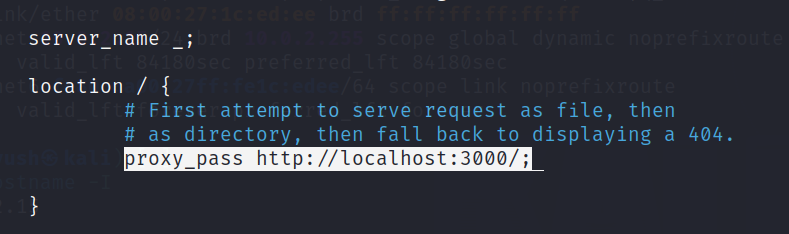
Step 3: Scroll down to the location section and look for the line “try_files $uri $uri/ =404;“:
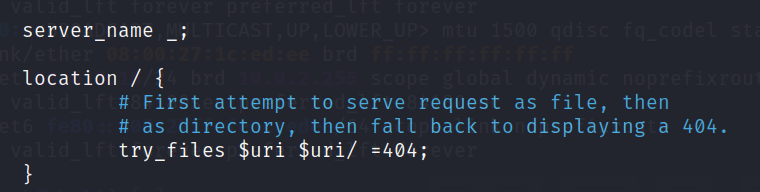
Replace the line with the syntax “proxy_pass http://localhost:3000/;“. proxy_pass directs Nginx to forward the request to a specified location and http://localhost:3000/ is the address of the backend server where the requests should be forwarded.
Again press Ctrl+O and Ctrl+X to save and exit the default page.
Step 4: Type the following command in the terminal to check if the syntax is ok and test is successful for the default configuration.
nginx -t
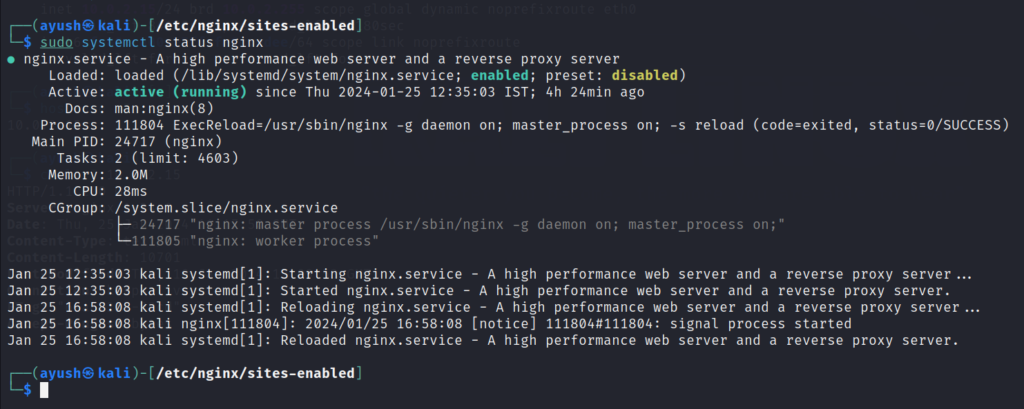
If the check is a success, run the following command to reload the Nginx configuration:
sudo systemctl reload nginx

Step 5: Run this final command to check if the Reverse proxy server is activated:
sudo systemctl statux nginx
Step 6: Now, it’s time for the final step. Testing whether your Node.js application works with a reverse proxy. Open your web browser and enter your system’s IP address in the search bar. You should see your Node.js application running on the specified new PORT, which was previously hosted on port 3000.
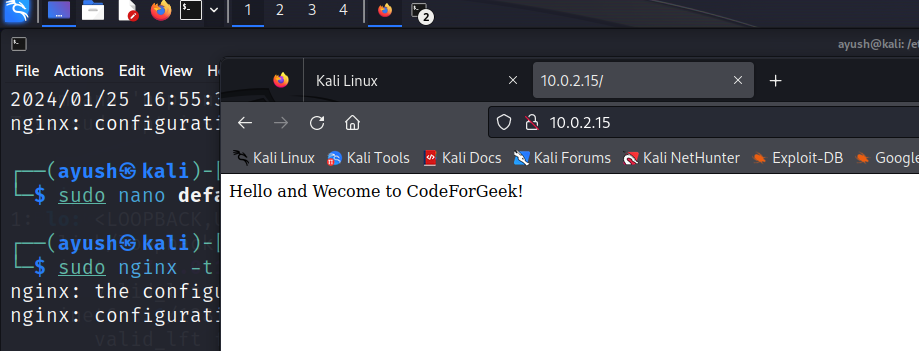
If your result is the same as the result displayed above, congratulations! You have successfully added a reverse proxy to your application with Nginx!
Conclusion
Nginx is awesome, you can use it as a simple web server, load balancer, or cache. Setting up a reverse proxy in front of an application is just one of the many use cases that Nginx can handle for you. A proxy is definitely a useful thing to have. It provides you with efficient traffic management and enhances the security of your application.
Reference
https://stackoverflow.com/questions/72184916/configuring-nginx-reverse-proxy-for-node-js-app


