New to Rust? Grab our free Rust for Beginners eBook Get it free →
Load Balancing Node.js Application Servers with Nginx

Nginx can play many roles in your system design. It can work as a Web server, proxy server, reverse proxy and as a load balancer as well. In this article, we’re going to learn how to load balance NodeJs servers using Nginx.
As you know, we redesigned Codeforgeek and used Nginx as a load balancer. I used Nginx to perform all the heavy computational effort such as Compression and SSL encryption.
A bit about Nginx
Nginx is an open-source software that can play many roles in your system architecture. Nginx is widely used as a Web server with WordPress installation for faster performance.
You can download Nginx for your system from their download page.
If you use Ubuntu, you can simply run this command in the terminal to install Nginx.
sudo apt-get update && sudo apt-get install nginx
What is load balancing
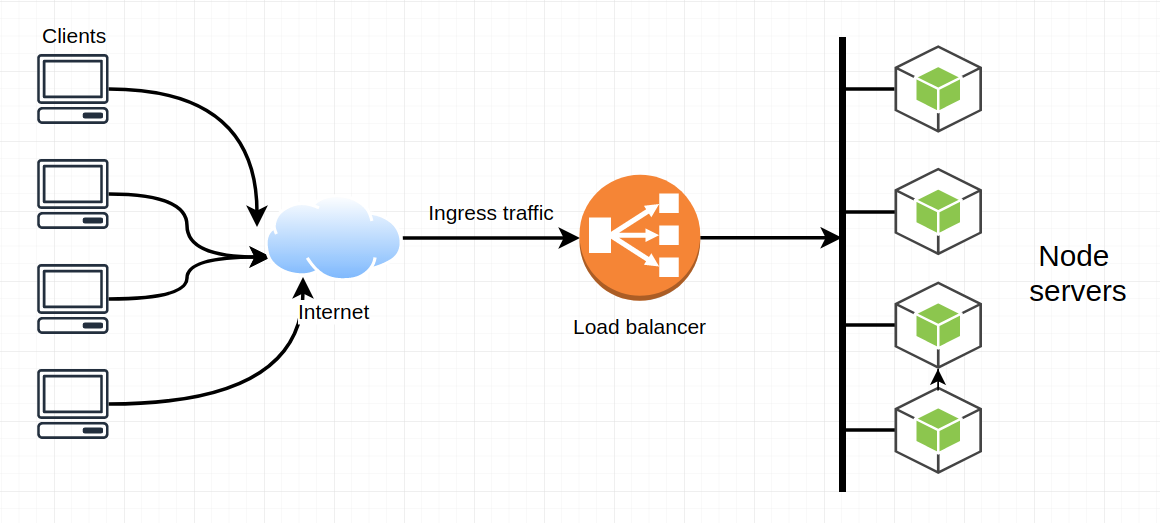
Load balancing is an approach to distribute and allocate the ingress traffic to multiple application servers.
In high traffic apps, we can’t rely on server handling every request. We run multiple application servers preferably on different machines and distribute our traffic among them to reduce response time and achieve higher availability.
The load balancer stays in between the client and application servers and decides on which server this request should go. The decision can be configured using different algorithms.
Here is the sample diagram to explain the above scenario:
Let’s build a sample application and try it out.
Sample application
Let’s build a simple Node application that will act as an application server.
Create a new node project.
mkdir nodeBalanceDemo && cd nodeBalanceDemo
npm init --y
Let’s install the express as a dependency.
npm i --S express
Here is our simple Node server.
const express = require('express');

const router = express.Router();

const app = express();
router.get('/', (req,res) => {
res.send('Hello');
});
app.use('/', router);
app.listen(process.argv[2] || process.env.PORT || 3000, () => {
console.log(`App is listening at ${process.argv[2] || process.env.PORT || 3000}`);
});
The codebase is pretty simple to understand. We just exposed one route and listening to the port for a request.
In order to run multiple instances of the Node, we need to use a process manager. I highly recommend pm2 to handle process management for Node.js.
First, install PM2 as a global package.
npm i --g pm2
We will create 4 application server instances using PM2.
pm2 start app.js -f --3000

pm2 start app.js -f --3001

pm2 start app.js -f --3002

pm2 start app.js -f --3003
Now let’s configure our Nginx to perform the load balancing. To do so, let’s create a configuration file in Nginx conf.d directory.
If you already have a file, you don’t need to create one.
Here is the simple Nginx configuration.
upstream app_servers {

    server 127.0.0.1:3000;

    server 127.0.0.1:3001;

    server 127.0.0.1:3002;

    server 127.0.0.1:3002;

}
server {
listen 80;
server_name your-domain.com www.your-domain.com;
location / {
proxy_set_header X-Real-IP $remote_addr;
proxy_set_header Host $http_host;
proxy_pass http://app_servers;
}
}
Kindly replace the domain details with your actual domain values.
Restart the Nginx server to update the changes.
sudo service nginx restart
or
sudo systemctl nginx restart
Once Nginx successfully restarts, open PM2 logs using pm2 logs all command and hit the request from the browser. You should see the request received and processed by 4 Node application servers in a round-robin manner.
By default, Nginx uses Round-robin as a load balancing method.
Nginx load balancing methods
You can use the following load balancing methods:
- Round-robin (Default)
- hash
- IP hash
- Least connections
- Least time
Round-robin
It’s the default method. In this, Nginx runs through the list of upstreams servers in sequence, assigning the next connection request to each one in turn.
Hash
In this method, Nginx calculates a hash that is based on a combination of text and Nginx variables and assigns it to one of the servers. The incoming request matching the hash will go to that specific server only.
Example:
upstream app_servers {

    hash $scheme$request_uri;

    server 127.0.0.1:3000;

    server 127.0.0.1:3001;

    server 127.0.0.1:3002;

    server 127.0.0.1:3002;

}
IP Hash
This method is the only available for the HTTP server. In this method, the hash is calculated based on the IP address of a client. This method makes sure the multiple requests coming from the same client go to the same server. This method is required for socket and session-based applications.
Example:
upstream app_servers {

    ip_hash;

    server 127.0.0.1:3000;

    server 127.0.0.1:3001;

    server 127.0.0.1:3002;

    server 127.0.0.1:3002;

}
Least connections
In this method, Nginx sends the incoming request to the server with the fewest connection thus maintaining the load across servers.
We use this method for our Codeforgeek setup.
upstream app_servers {

    least_conn;

    server 127.0.0.1:3000;

    server 127.0.0.1:3001;

    server 127.0.0.1:3002;

    server 127.0.0.1:3002;

}
Least time
In this method, Nginx calculates and assigns values to each server by using the current number of active connections and weighted average response time for past requests and sends the incoming request to the server with the lowest value.
It’s a premium feature and only available in Nginx plus.
Which load balancing method to choose?
It totally depends on the traffic pattern and nature of your application. For a site like Codeforgeek, the least connection method suits the best i.e server the lowest number of active connection should get the request to divide the load evenly and improving performance at the same time.
You can select based on your traffic pattern. For socket-based apps, IP hash suits the best.
Conclusion
In this article, we studied about load balancing and how to load balance Node applications using Nginx. Load balancing helps us to improve performance and availability and Nginx’s in-built methods work like a charm.