New to Rust? Grab our free Rust for Beginners eBook Get it free →
Pandas qcut() Function in Python: A Beginner’s Guide
When the pandas library is already in possession of a function to cut any given dataset, which is cut( ), why on Earth does it offer another by the name qcut( )? We shall explore just that in this article. What’s more, is that we shall get to know about the nuances and the thin line that differentiates the pandas cut( ) from the pandas qcut( ) function in the following sections:
- Pandas qcut( ) vs. Pandas cut( )
- Syntax of Pandas qcut( ) Function
- Using Pandas qcut( ) Function in Python
Let us not waste more time & get things started by importing the pandas library using the below code:
import pandas as pd
Pandas qcut( ) vs. Pandas cut( )
Segmentation and sorting of a given dataset into the desired bins of choice might be synonymous characteristics offered by both these functions, but there is a fine difference that sets them apart. It has to do something with how the data segmentation takes place.
The qcut( ) function segments the dataset using different interval sizes whereas, the cut( ) function on the other hand segments the dataset using equal intervals. Due to this, the former has roughly the same amount of entities in each bin, whereas the latter contains a different count of entities in each bin after the segmentation.
Syntax of Pandas qcut( ) Function
The qcut( ) function works based on quantile-based discretization using which a given dataset is discretized into bins of equal size in accordance with the rank or sample quantiles.
Given below is its syntax mentioning the mandatory and optional constituents required for its effective functioning.
Syntax:
pandas.qcut( x, q, Labels=None, retbins=False, precision=3, duplicates=’raise’)
where,
- x – One-dimensional array or a series that is to be discretized.
- q – Number of quantiles into which the input dataset is to be cut.
- Labels – Set to ‘None’ by default, it is used to include names for the bins of the discretized data.
- retbins – Set to ‘False’ by default, it is used to specify whether or not to return bins.
- precision – Set to ‘3’ by default, it is used to specify the number of decimal digits that are to be present on the data returned.
- duplicates – Set to ‘raise’ by default, it is used to specify the handling of duplicity in the bin edges. The default setting results in an error upon encountering duplicity, whilst it shall remove the duplicate bin edge when set to ‘drop’.
Using Pandas qcut( ) Function in Python
Let us first construct a dataframe that shall be used to demonstrate the working of the qcut( ) function.
df = pd.DataFrame({'Distance':[70, 78, 12, 45, 79, 13, 43, 49, 57, 91, 45, 72]})
The above dataframe is now cut across the quantiles using the qcut( ) function.
Catg = pd.qcut(df['Distance'], 4)
print(Catg)
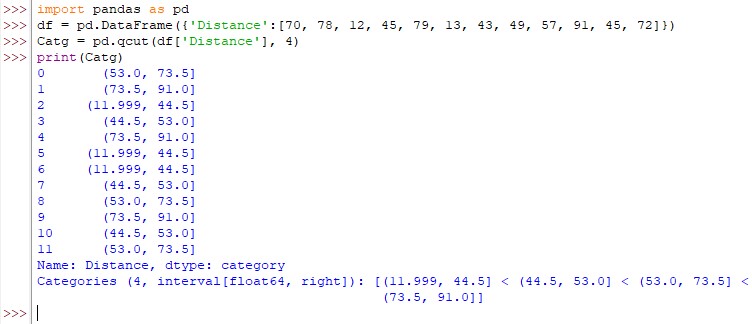
Upon closer observation, it can be seen that the count of entities within each bin after the segmentation remains the same.
Let us now tweak it a bit, by using the same dataset, but specifying the quantiles along with restricting the number of decimals that are to be returned.
Catg = pd.qcut(df['Distance'], q=[0, 0.4, 0.8, 1], precision = 1)
print (Catg)
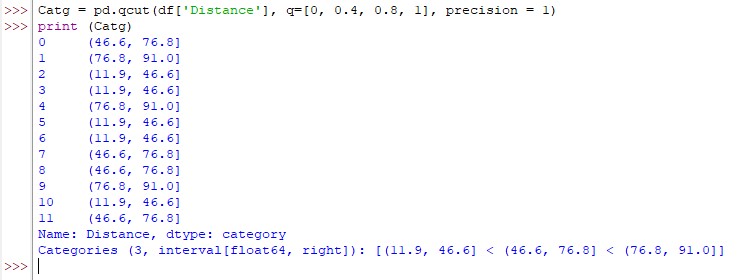
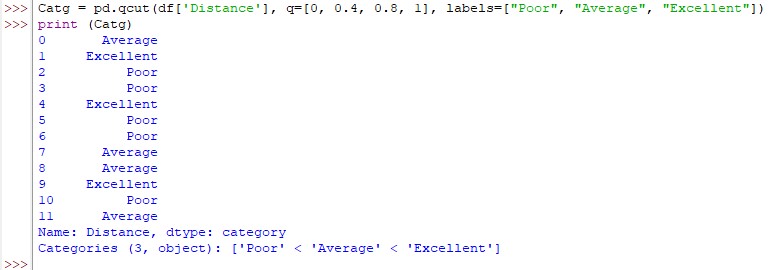
One can also go a step further by using the labels of choice to interpret the above result.
Catg = pd.qcut(df['Distance'], q=[0, 0.4, 0.8, 1], labels=["Poor", "Average", "Excellent"])
print (Catg)
Conclusion
Now that we have reached the end of this article, hope it has elaborated on how to use the qcut( ) function from the pandas library. Here’s another article that details the divide( ) function from the numpy library within Python. There are numerous other enjoyable and equally informative articles in CodeforGeek that might be of great help to those who are looking to level up in Python.
Reference
https://pandas.pydata.org/docs/reference/api/pandas.qcut.html


