New to Rust? Grab our free Rust for Beginners eBook Get it free →
Convert VirtualBox-VM to Google-VM
Instructions to create a VirtualBox-VM on a Windows box and convert it into a Google-VM
This article will demonstrate how to take an OS-ISO file and run it as a Google-Cloud Virtual-Machine using just a Windows-10 computer.
Google-VM certainly has many Linux distros to choose from, but they may not have your favorite distro. For illustration purposes, i will be using Centos-8 because Rocky-Linux has not quite yet been released at the time of this writing, and I am preparing for it. And Google-VM is not likely to have Rocky-Linux available anytime soon after its debut release.
I would like to add a very special note of gratitude and appreciation to Rich Alloway of https://www.perforce.com/ for his patience in helping me complete this project. Without his assistance, I would have abandoned this effort early on.
The following are the prerequisites for this project:
- Centos-8 (I am choosing Centos-8 for demonstration purposes)
- Virtualbox
- Windows-10 tar command
- Windows-10 gzip command
- PuTTY
Note that some of these steps may be easier to use the GoogleCloudSDKInstaller, but I will be using just Windows-10 utilities.
Also, note that the tar & gzip steps could certainly be done faster on another Linux box, but for point of illustration we will be doing everything necessary on a Windows-10 box.
Create a new VirtualBox-VM
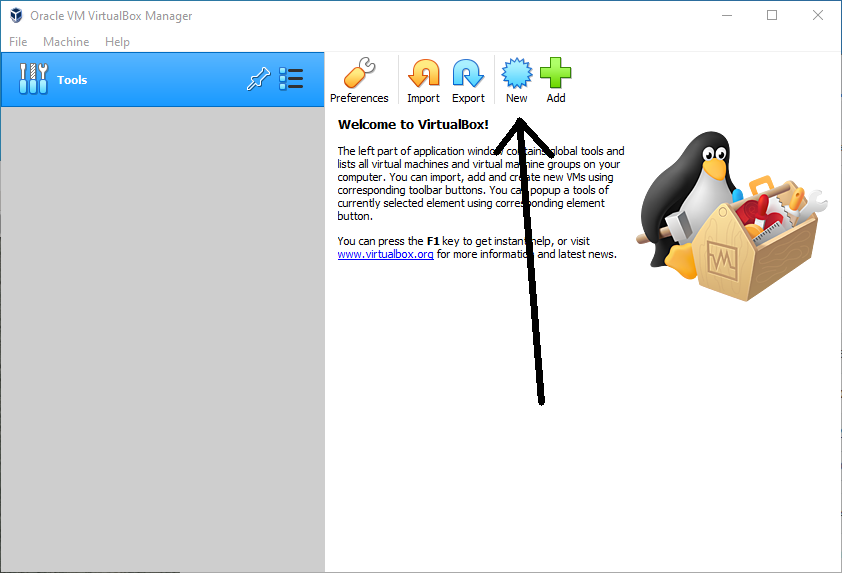
Create a VirtualBox-VM install to be transferred to Google-VM Start up VirtualBox and click “New”.
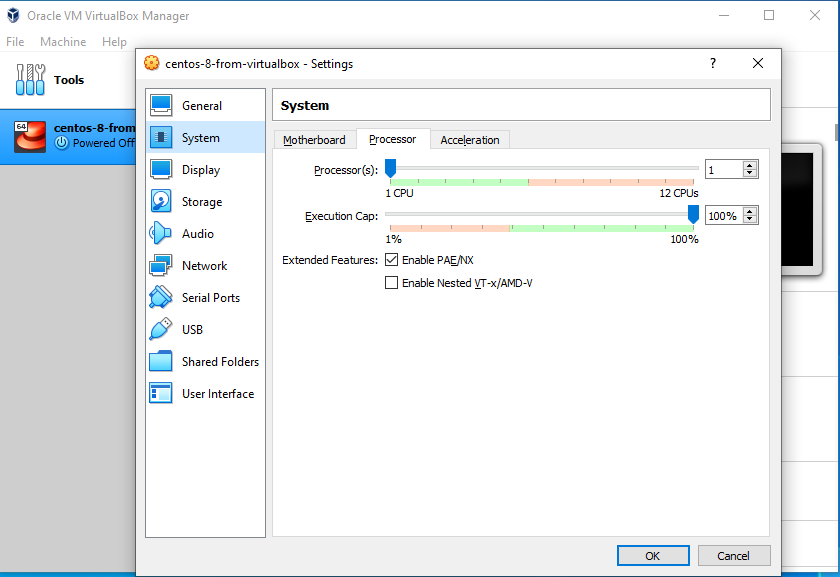
Name your new VirtualBox-VM and give it the desired memory size. This value is easily changed later.
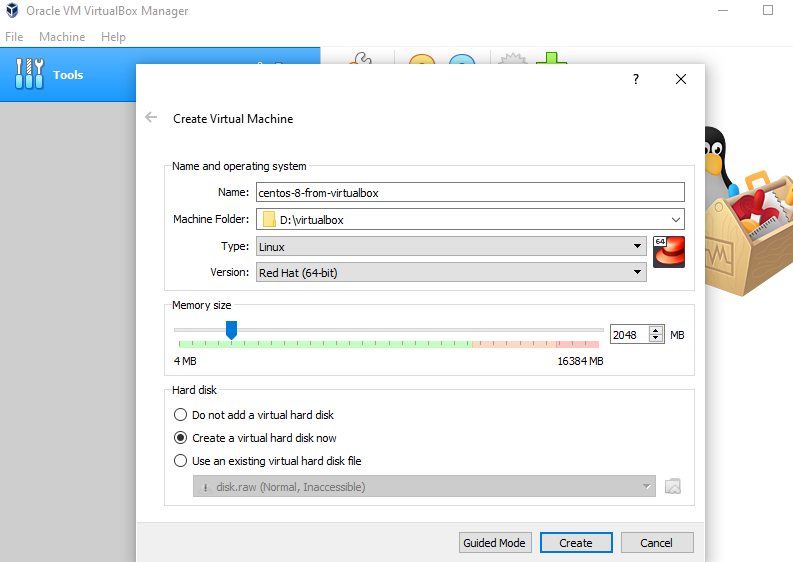
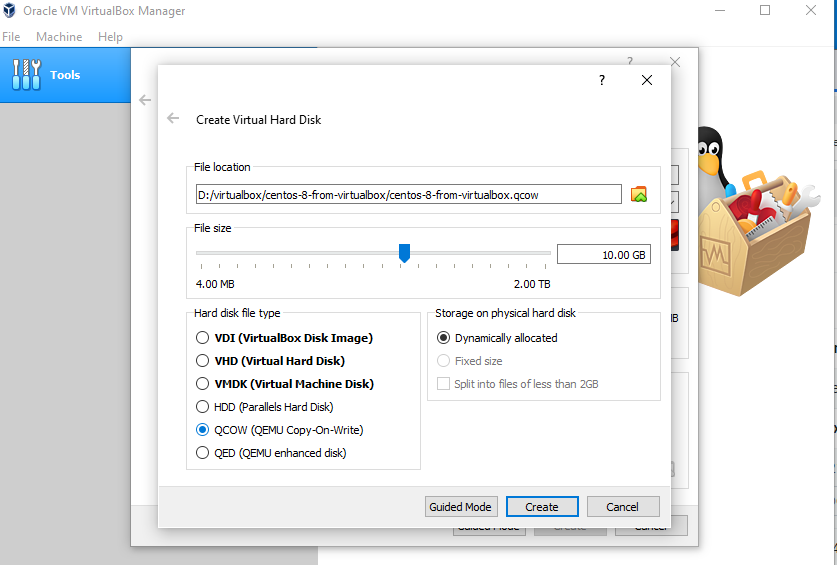
Our Google-VM instance will require an exact number of gigabytes. Also, the format is optional, but some have recommended QCOW instead of the default VDI.
Disable the floppy drive.
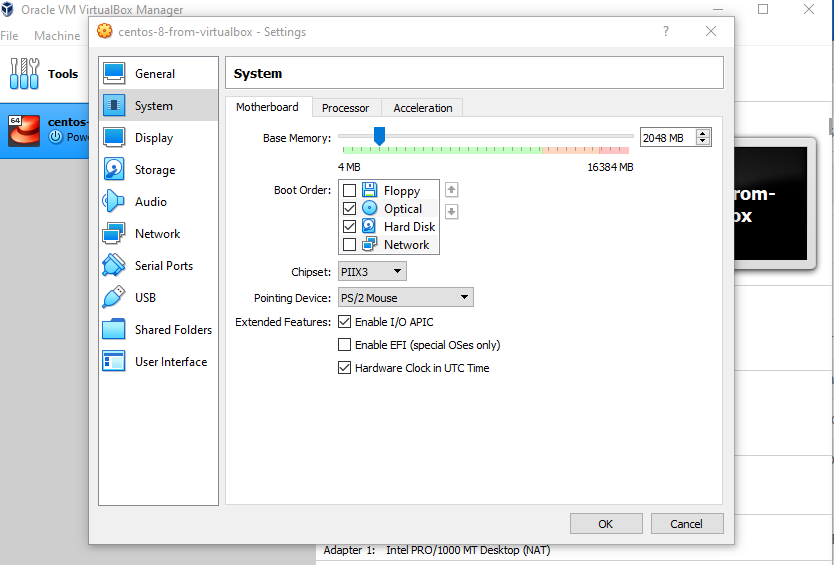
Enable PAE/NX. This was required for me to run it locally.
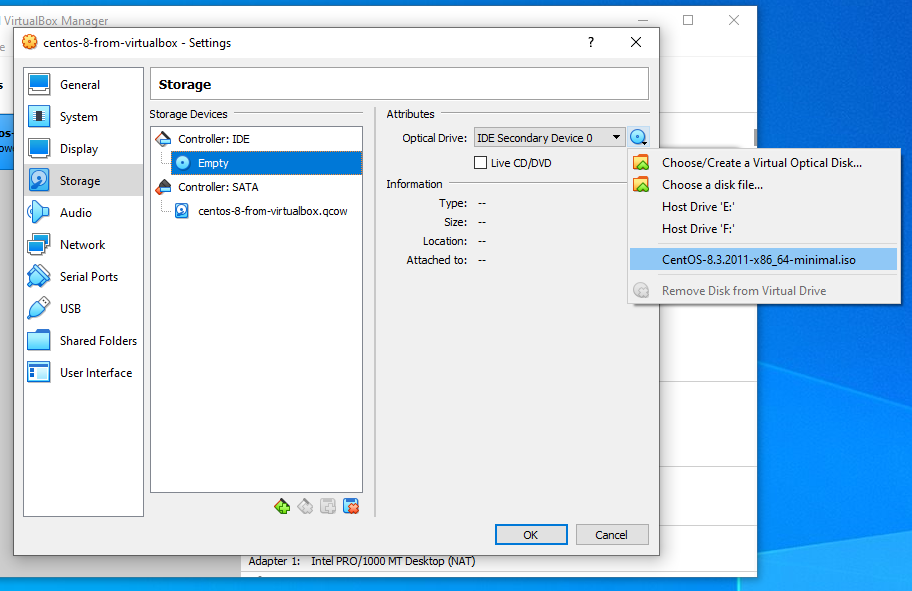
Select your chosen ISO file as the optical drive. Click the little CD icon (right) and select your ISO file attach ISO file to the virtual cd drive.
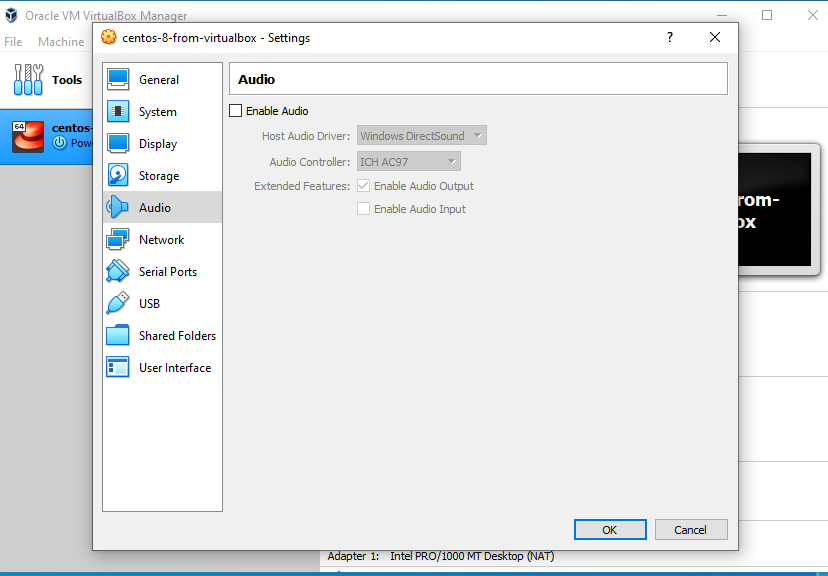
Disable audio by unchecking the checkbox. (Optional step, may not be required).
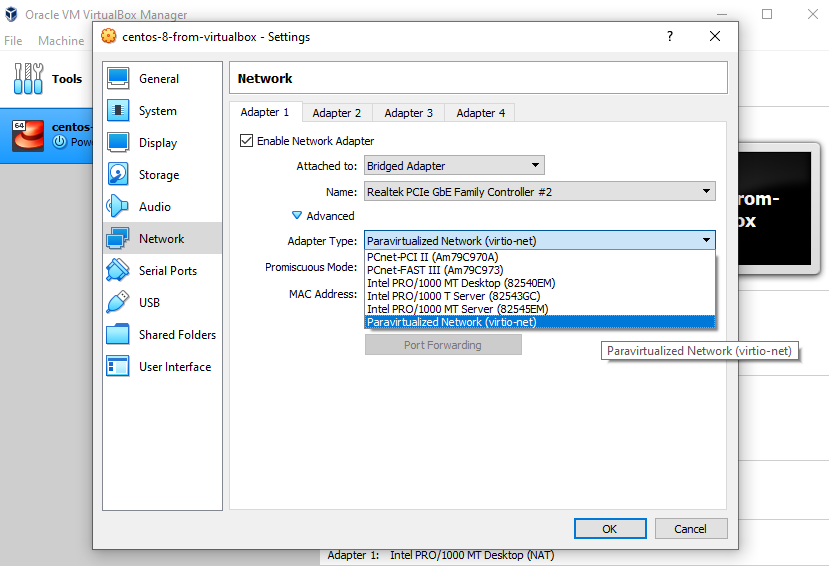
Select Network: ADVANCED and select ‘paravirtualized network (virtio-net)’. This is required for the Google-VM network drivers.
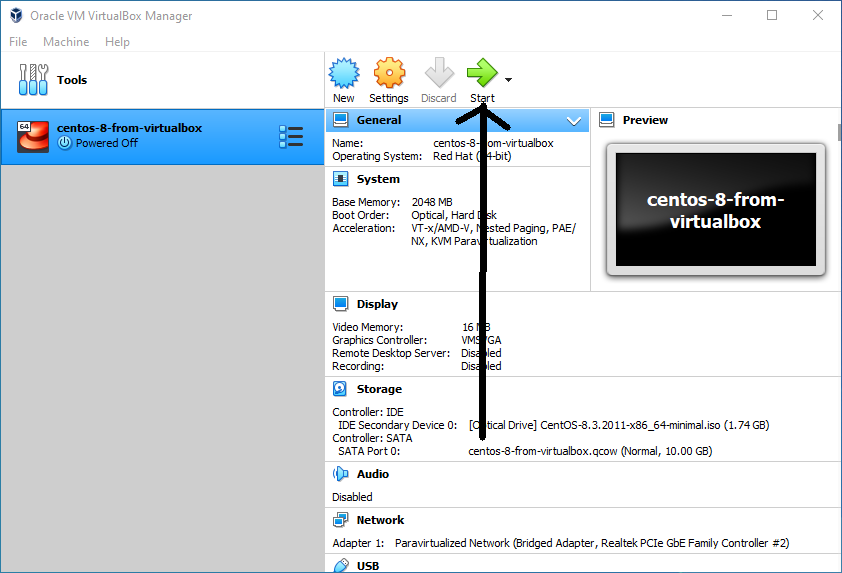
Finally, start up your new VirtualBox-VM and watch it boot from your chosen ISO-CD.
I was required to select my CD boot disk in the most recent version of VirtualBox.
Install Operating System On Virtual Machine
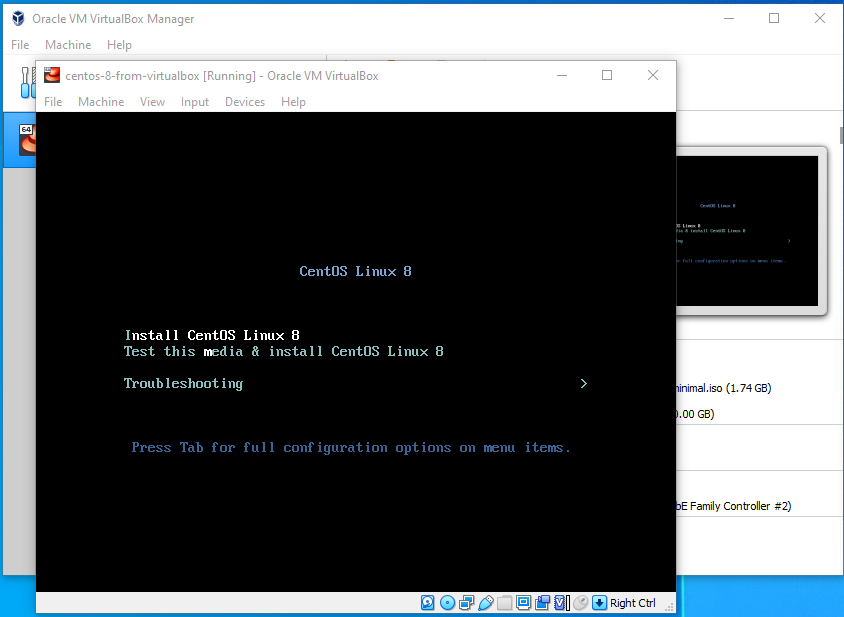
Select the “Install Centos 8 Linux” option by pressing the up-arrow to highlight it. Optionally, you may test the distribution.
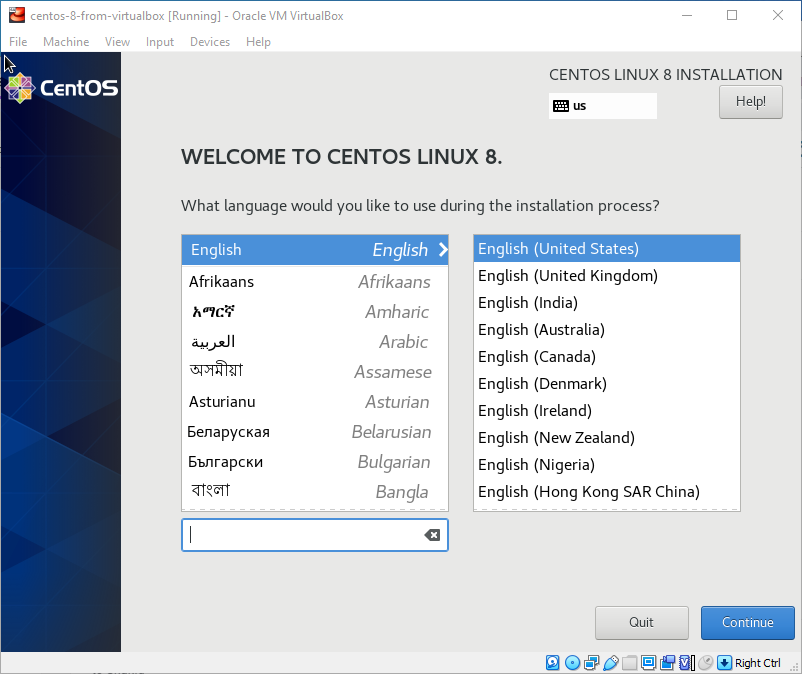
Select your chosen language.
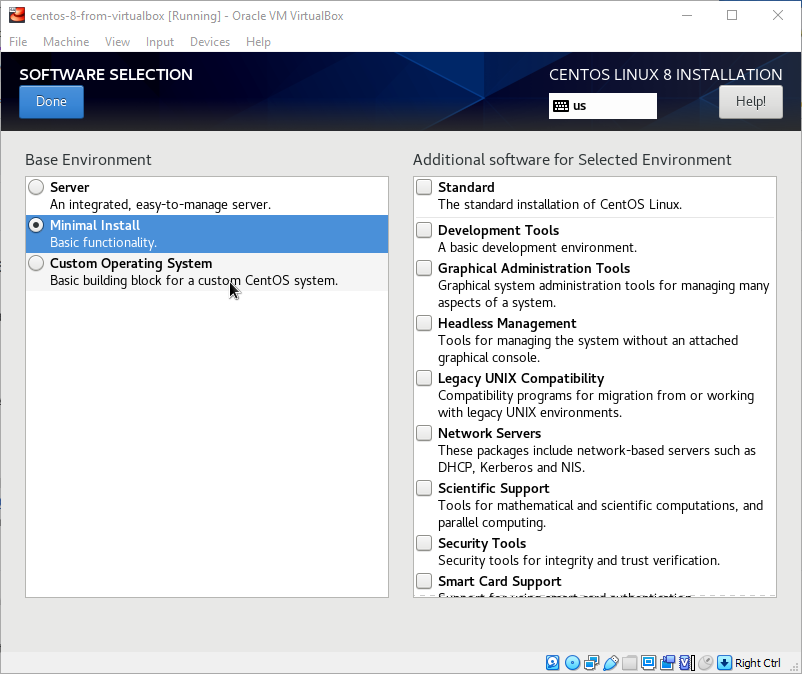
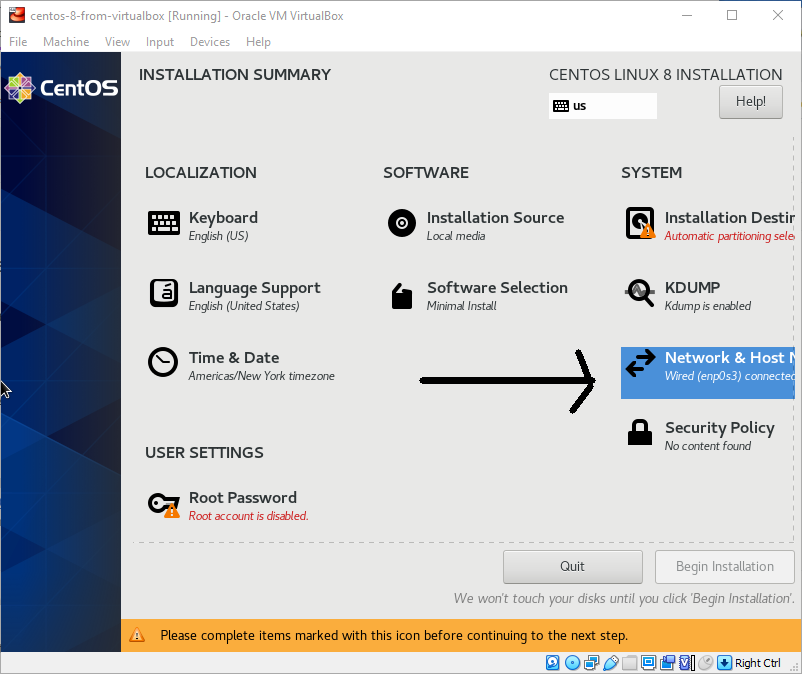
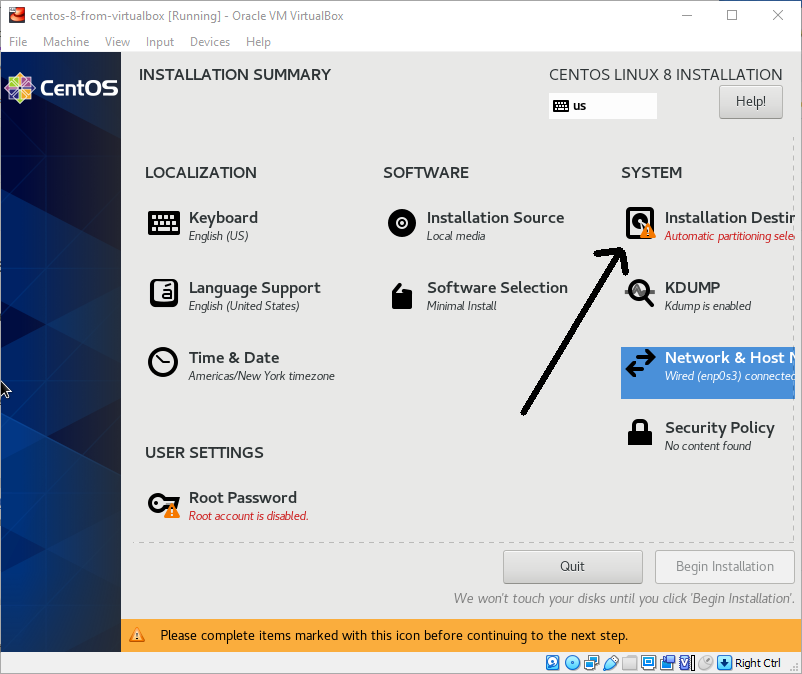
When presented with the Installation Summary screen, choose “Software Selection”
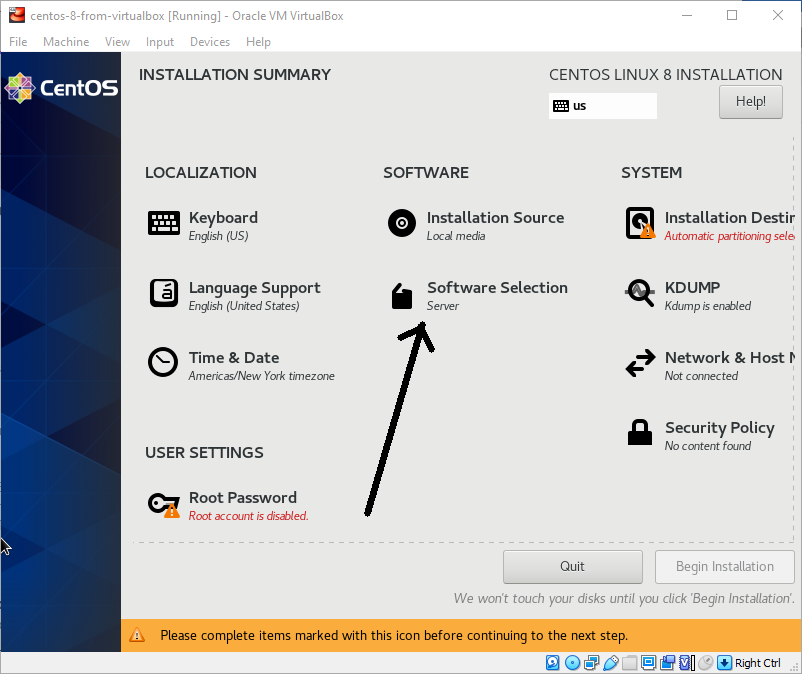
Under “Software Selection” I choose “minimal functionality” for brevity. Then click “Done”.
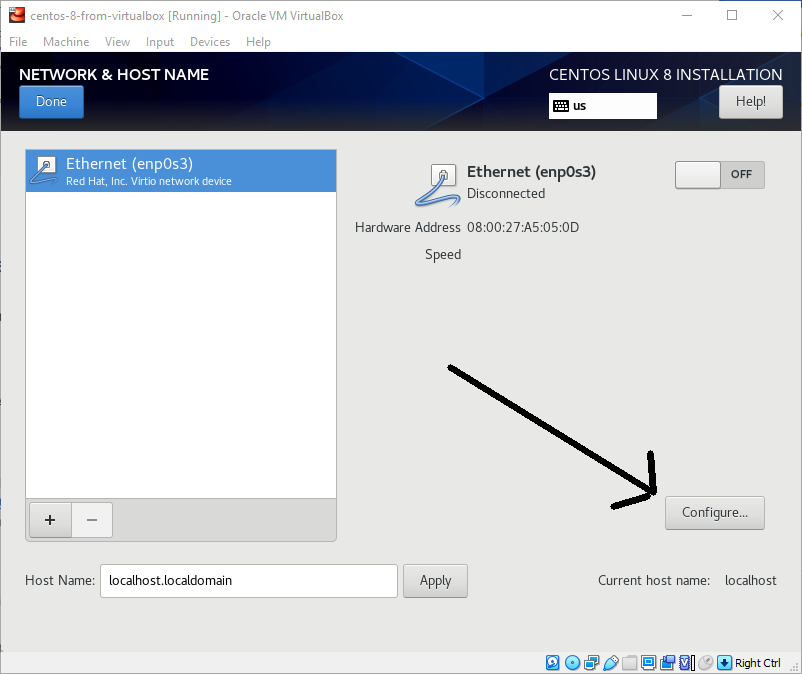
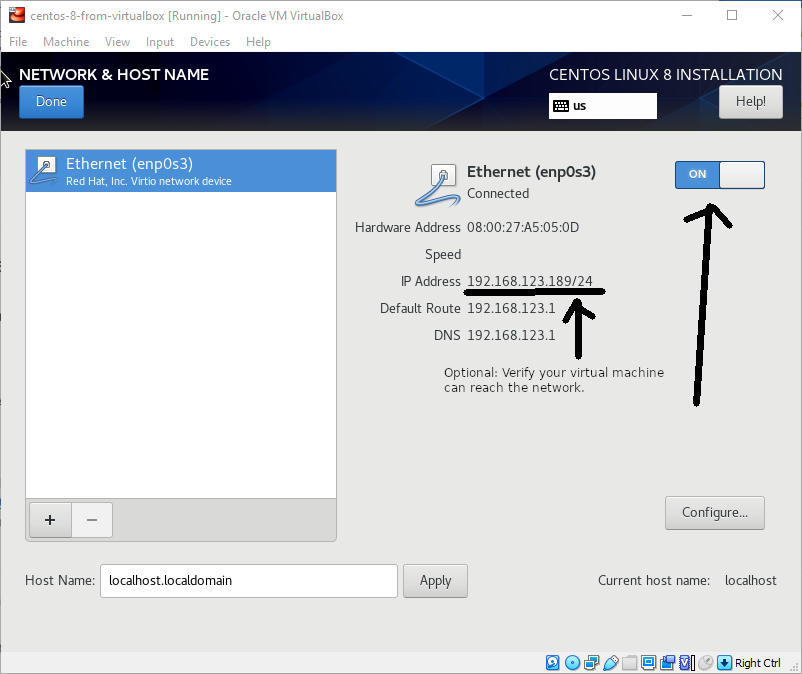
Now click the Network Option.
Click the “Configure” button.
Under the “General” tab, and select “Connect automatically with priority”
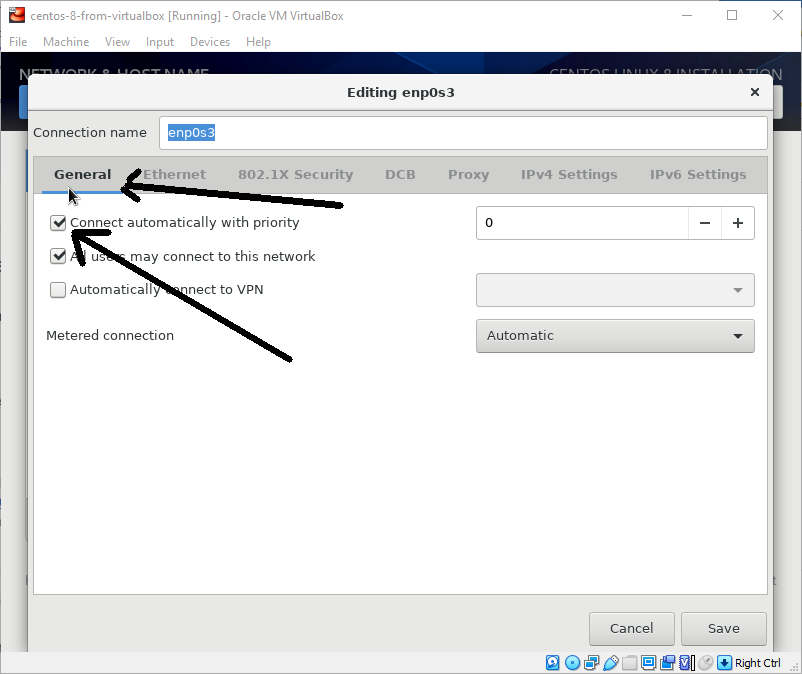
Also under NETWORK, i like to make sure the network is working, there is an ON-OFF slider and you should be issued an IP number which you should verify it looks like one issued from your own LAN.
Now click the “Installation Destination” option.
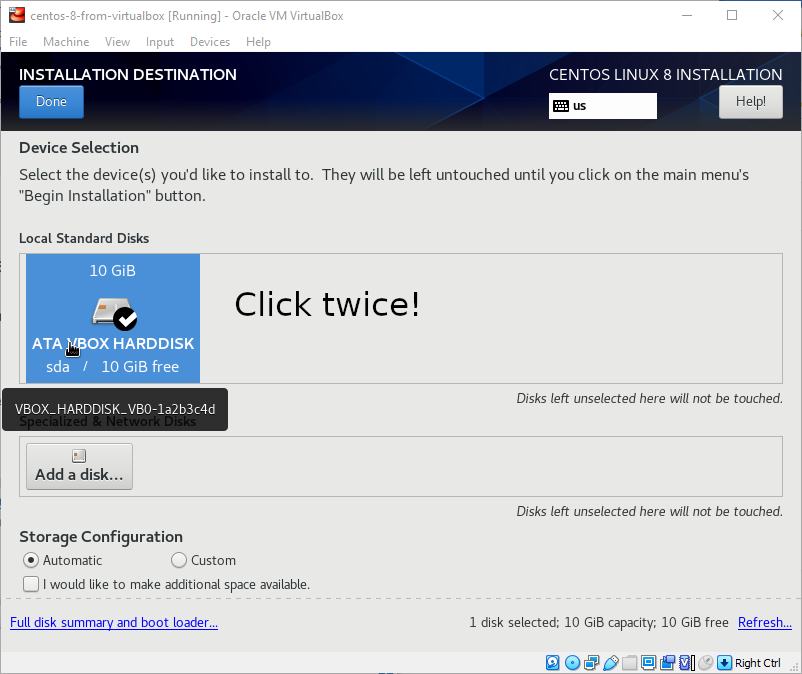
Under Device Destination, i had to click my ATA-VBOX-HARDDISK option twice. Notice the checkbox and the blue hightlighting.
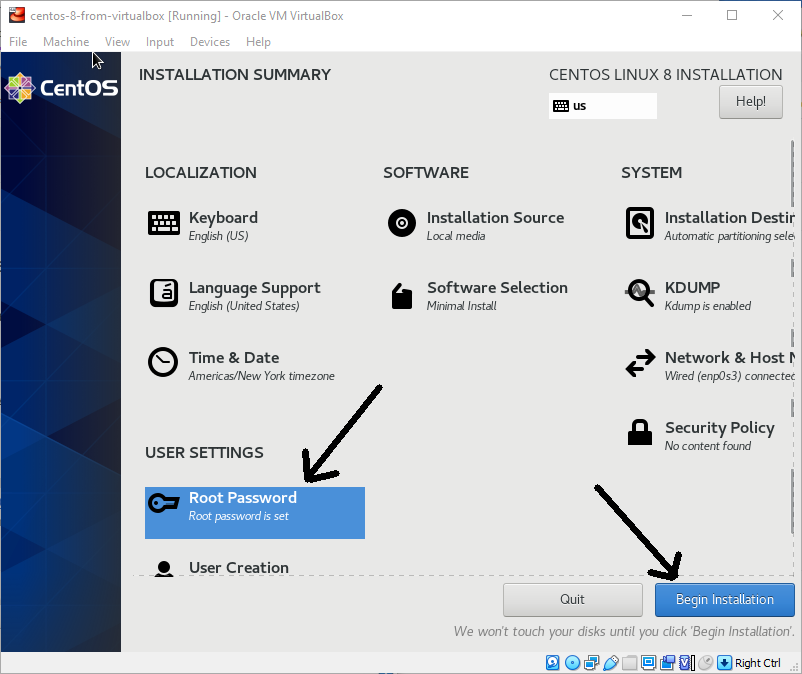
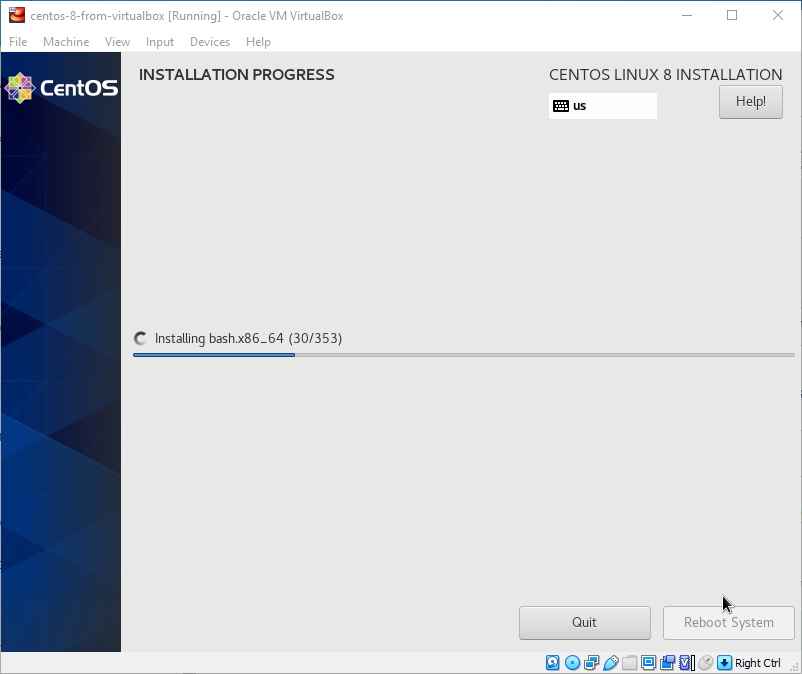
Now create a root password. the new Centos-8 requires you to set the root password. Don’t forget what you select! Then click “Begin Installation”.
Time to go take a well-deserved break while this is finishing.
Done! Don’t reboot the system quite yet. Just power it off.
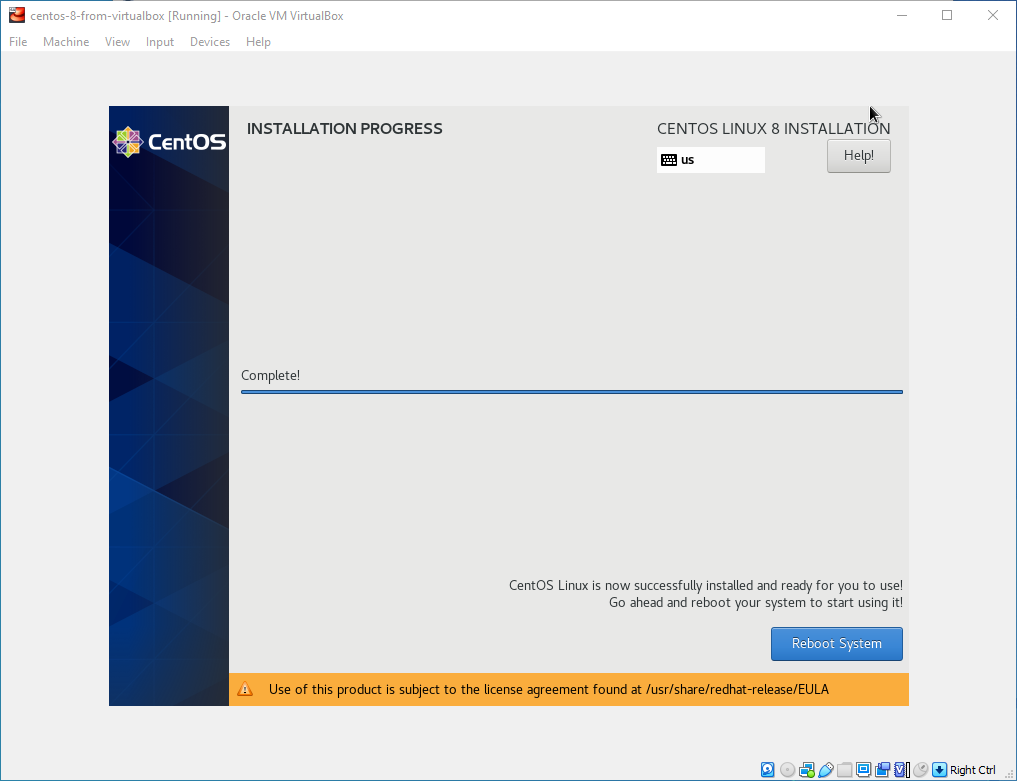
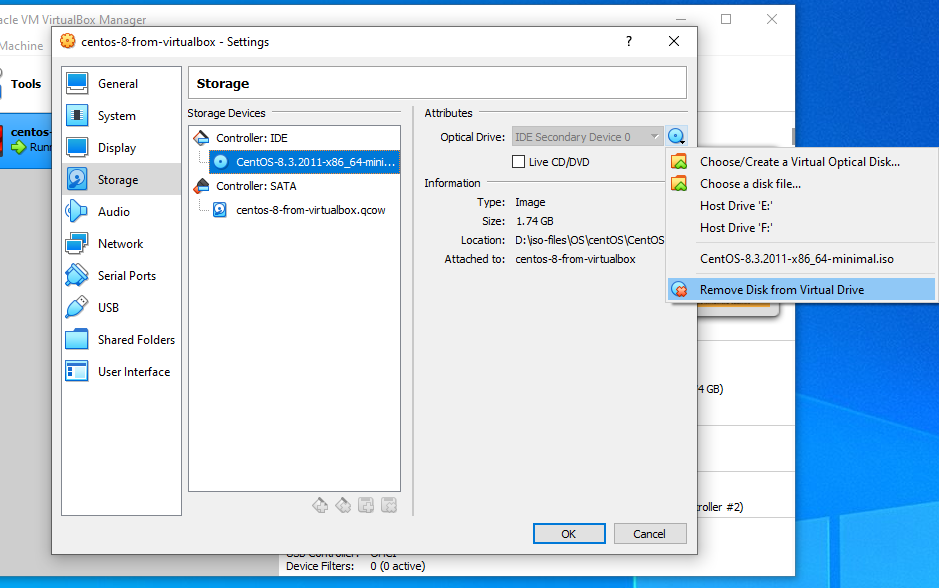
Lastly, remove the optical drive from the earlier step.
Prepare your Virtual-VM
Now restart your new Virtual-VM and log into it.
There are a couple of steps we need to perform in order to to prepare your new Linux distro for Google-VM usage. Note that these steps are most likely specific to Centos/RedHat.
To perform these next steps, I have a BASH script that will do the work for us. In order to get this BASH script to our new VirtualBox-VM,
I have found the easiest way is to just create an SFTP server and use FileZilla. There may be a better way to copy/paste into the Virtualbox machine command-line mode, but I have yet to find one. Besides, its more interesting to use SFTP than it is to simply copy/paste!
- Edit the file /etc/ssh/sshd_config
- Locate the line that contains: PasswordAuthentication no
- Change the line to: PasswordAuthentication yes
- Save file and exit
- Enter the command: systemctl restart sshd.service;
Alternatively, you may have to install an ftp service:
- dnf –assumeyes install vsftpd;
- systemctl enable vsftpd;
- systemctl start vsftpd;
- firewall-cmd –zone=public –permanent –add-port=21/tcp ;
- firewall-cmd –zone=public –permanent –add-service=ftp ;
- firewall-cmd –reload ;
Now execute the following BASH-shell script: (Notice GRUB changes for rocky-linux. Also notice that WordPress does not allow use of left-arrow-right-arrow, so I was forced to use the Unicode arrow characters for display purposes. You will need to fix this if you wish to use this script.)
#! /bin/bash -w

########################################
ls -l /etc/default/grub ;
cp --verbose /etc/default/grub ~/grub-backup ;
cat ﹥ /etc/default/grub ﹤﹤END_OF_GRUB ;
### grub2-mkconfig --output=/boot/grub2/grub.cfg ;
GRUB_TIMEOUT=5
GRUB_DISTRIBUTOR="$(sed 's, release .*$,,g' /etc/system-release)"
GRUB_DEFAULT=saved
GRUB_DISABLE_SUBMENU=true
GRUB_TERMINAL_OUTPUT="console"
# Rocky Linux:
#GRUB_CMDLINE_LINUX="console=ttyS0,38400n8d crashkernel=auto resume=/dev/mapper/rl-swap rd.lvm.lv=rl/root rd.lvm.lv=rl/swap"
# Centos:
GRUB_CMDLINE_LINUX="console=ttyS0,38400n8d crashkernel=auto resume=/dev/mapper/cl-swap rd.lvm.lv=cl/root rd.lvm.lv=cl/swap"
GRUB_DISABLE_RECOVERY="true"
GRUB_ENABLE_BLSCFG=true
END_OF_GRUB
ls -l /etc/default/grub ;
## 'compile' the new grub
grub2-mkconfig --output=/boot/grub2/grub.cfg ;
## add the new lines to the dracut configuration file (per Rich Alloway)
echo '# Ensure Google Compute Engine drivers are built into initramfs' ﹥﹥ /etc/dracut.conf.d/GCE.conf ;
echo -e "\\nadd_drivers+=\\" virtio_scsi virtio_blk virtio_net\\"" ﹥﹥ /etc/dracut.conf.d/GCE.conf ;
echo '# Ensure AWS drivers are built into initramfs' ﹥﹥ /etc/dracut.conf.d/AWS.conf ;
echo -e "\nadd_drivers+=\\" xen-blkfront xen-netfront\"" ﹥﹥ /etc/dracut.conf.d/AWS.conf ;
echo '# Ensure AWS ENA drivers are built into initramfs' ﹥﹥ /etc/dracut.conf.d/AWS-ENA.conf ;
echo -e "\nadd_drivers+=\\" xen-blkfront xen-netfront nvme \
nvme-fabrics nvme-fc nvme-rdma nvme-fcloop \
nvme-loop nvmet-fc nvmet-rdma nvmet ena\\"" \
﹥﹥ /etc/dracut.conf.d/AWS-ENA.conf ;
kversion=$( rpm -q kernel | sed 's/kernel\-//' ) ;
dracut --verbose --force "/boot/initramfs-${kversion}.img" "$kversion" ;
### end of bash-shell script
##################################################
Lastly, shut down your VirtualBox-VM. I prefer entering “shutdown now ;” at the command line.
Convert VM to RAW file
For this next step, we will use a VirtualBox utility to convert our vdi (or qcow) file to a RAW file format. I find it easiest to just go into the VirtualBox directory rather than setting any windows env variables which I never bothered to learn anyways.
cd  \"Program Files"\Oracle\VirtualBox\

VboxManage.exe   clonemedium      disk  \

  "D:\virtualbox\centos-8-from-virtualbox\centos-8.vdi" \

   "D:\virtualbox\centos-8-from-virtualbox\disk.raw"  -format  RAW

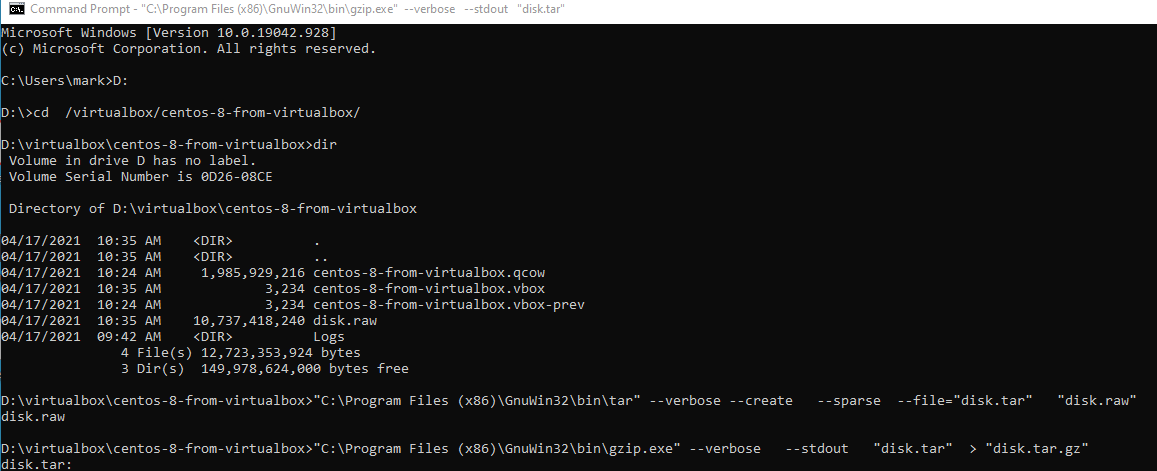
Convert RAW file to TAR file
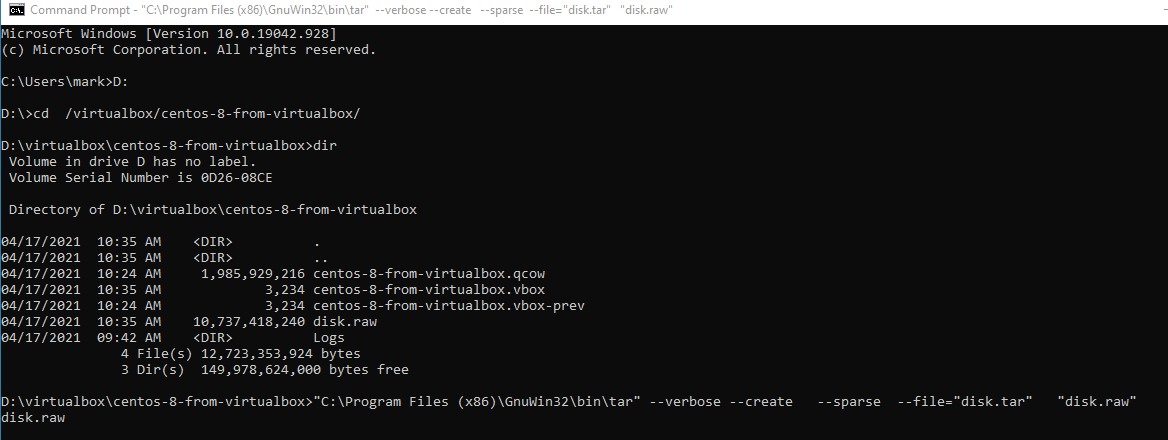
Next for DOS users, we will be turning our RAW file to a TAR (tape-archive) file. Pay particular attention to the file names in quotes (Thank you Rich Alloway).
Google-VM is particularly fussy about the naming of the raw file. It absolutely cannot have any pathname associated with it. (Yes such cutting edge stuff). I find it easier to actually be in the directory I am working in rather than learning any of the DOS shortcuts.
cd \virtualmin\centos-8-from-virtualbox

"C:\Program Files (x86)\GnuWin32\bin\tar.exe" --verbose --create   --sparse  --file="disk.tar"   "disk.raw"
Convert TAR file to GZIP file
Now turn your new TAR file to a gzip file:
"C:\Program Files (x86)\GnuWin32\bin\gzip.exe" --verbose --stdout "disk.tar" ﹥ "disk.tar.gz"
Note that the previous two steps could have been performed on a Linux/Unix machine assuming you have the disk space for it. If so, be SURE to omit the pathname from the command:
tar --verbose --format=oldgnu --create --sparse --gzip --file=disk.tar.gz disk.raw ; ## notice no path name for the RAW file.
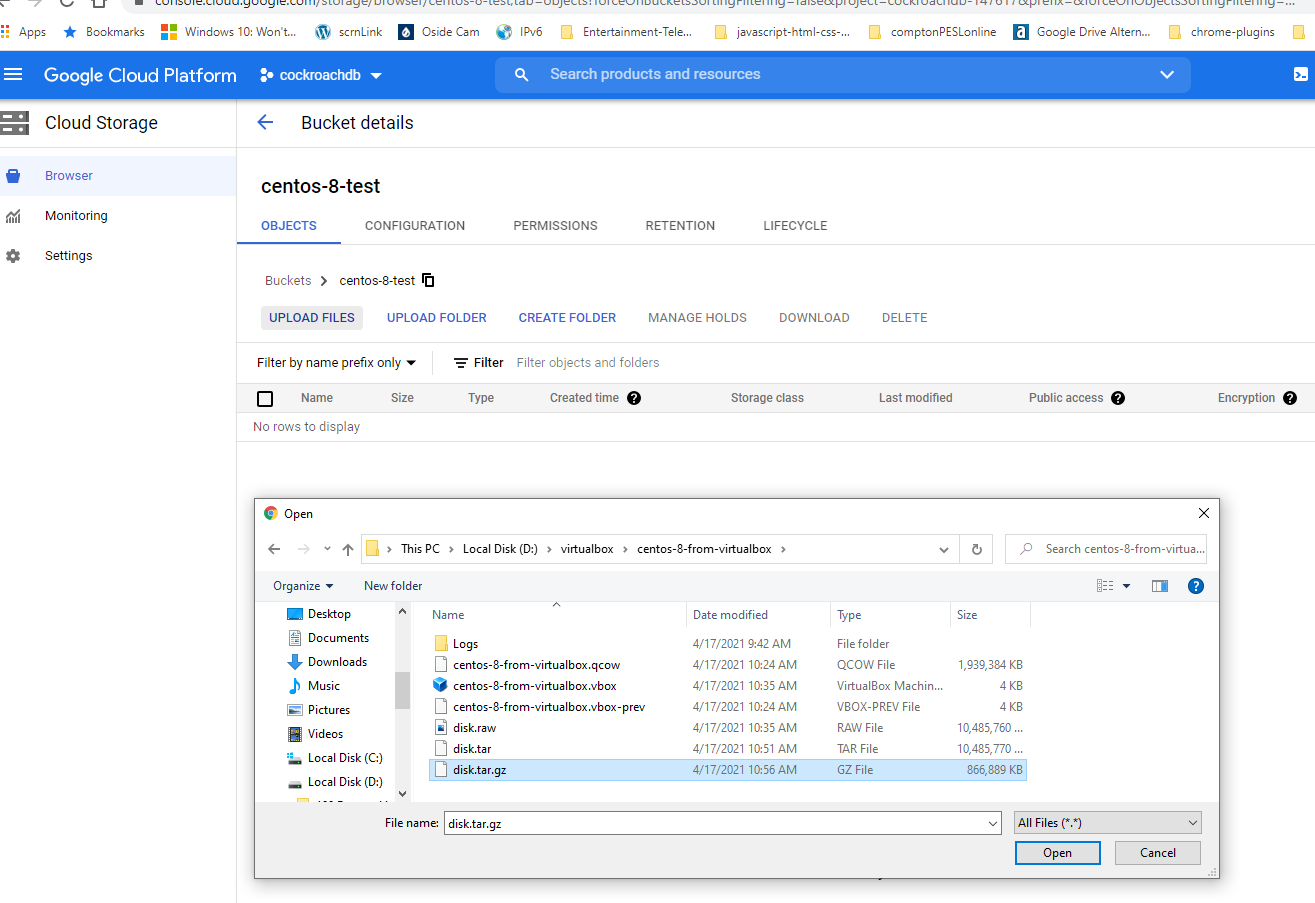
Upload GZIP file
It’s now time to upload your new disk.tar.gz file here: https://console.cloud.google.com/storage/browser/
This very well may be your most time-consuming step depending on your internet speed.
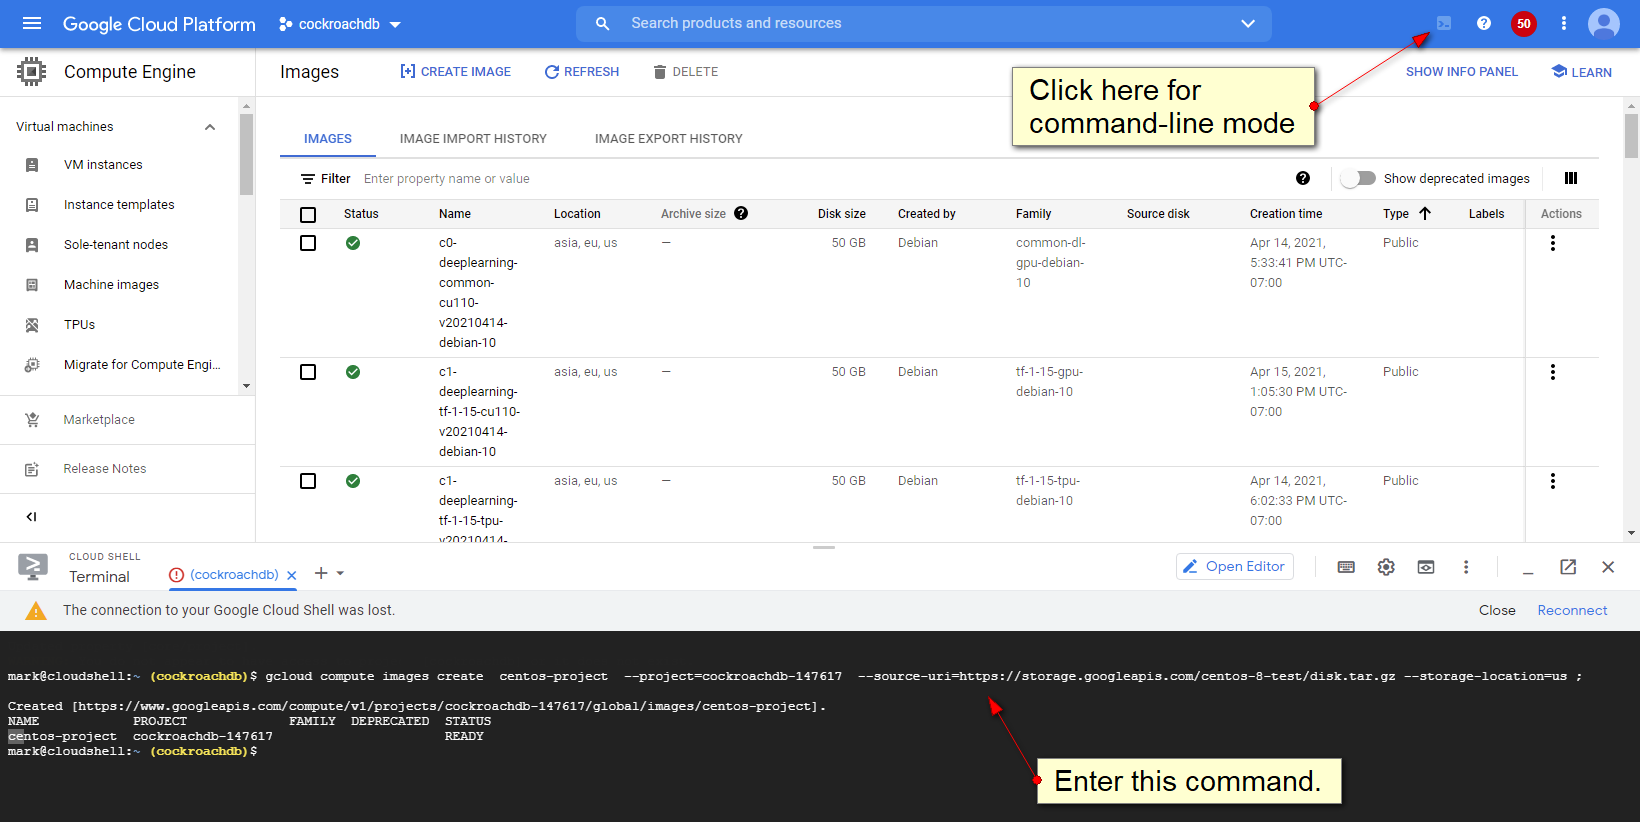
Create Google-VM Image
This next step will take our GZIP file and create a Google-VM image. Go to Google Cloud Images and enter the cloud shell, then enter this command:
gcloud compute images create  centos-project \

--project=marks-project \

--source-uri=https://storage.googleapis.com/centos-project/disk.tar.gz  \

--storage-location=us ;
Create Google-VM Instance
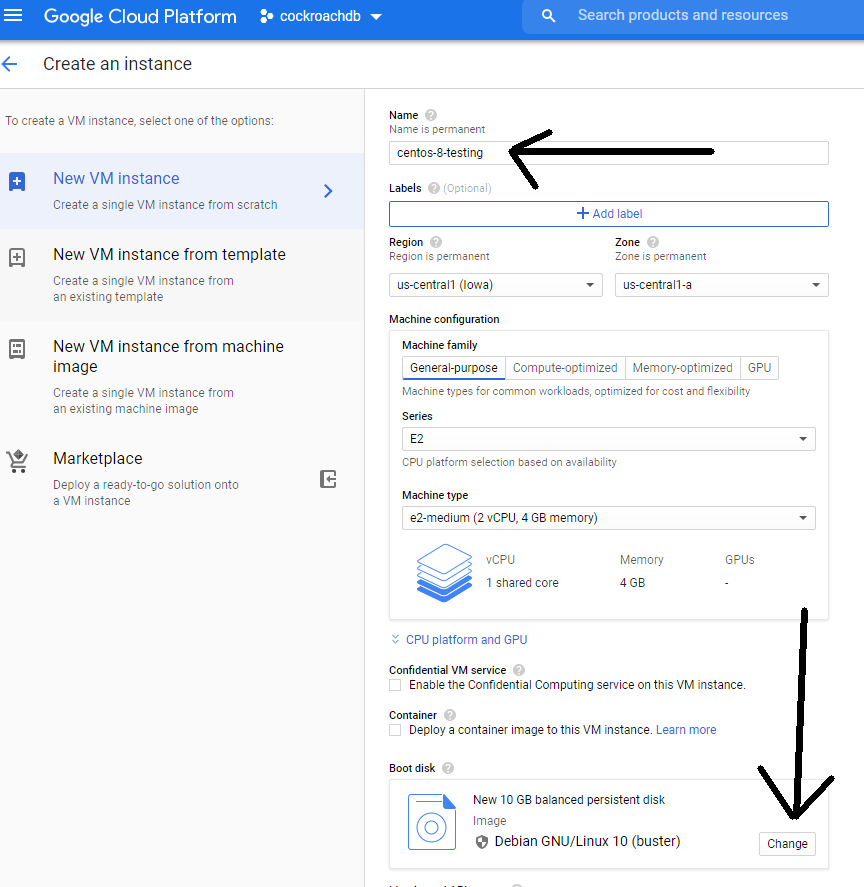
Finally, create a new Google-VM from our newly created image.
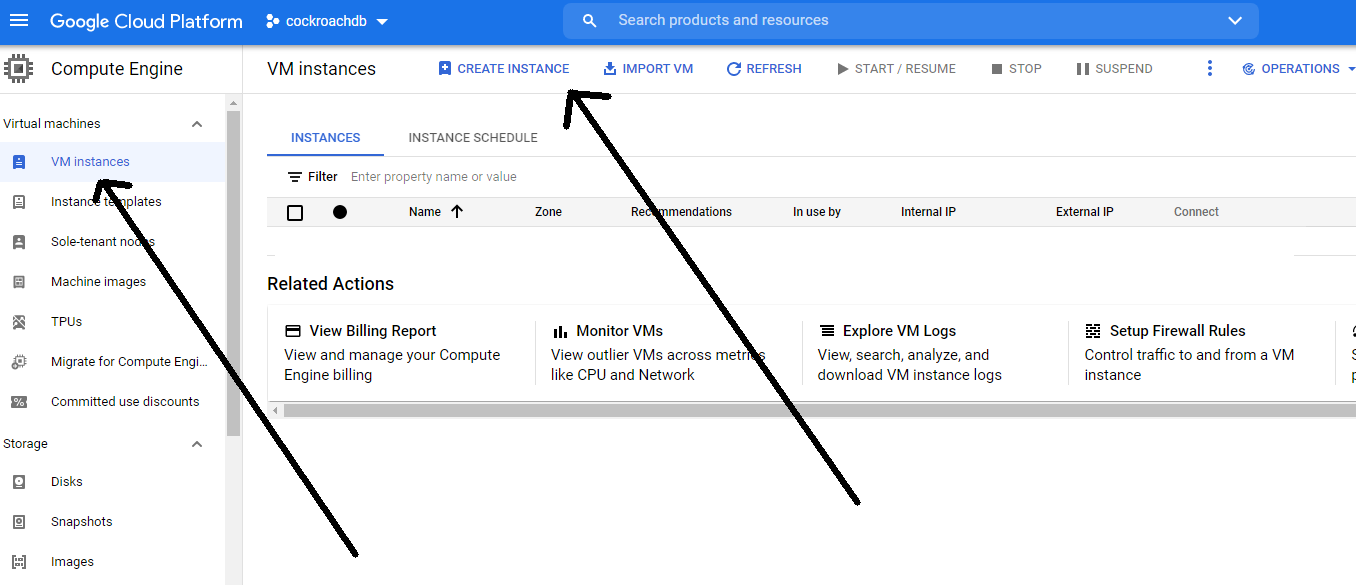
Name your new Google-VM and click “Change”.
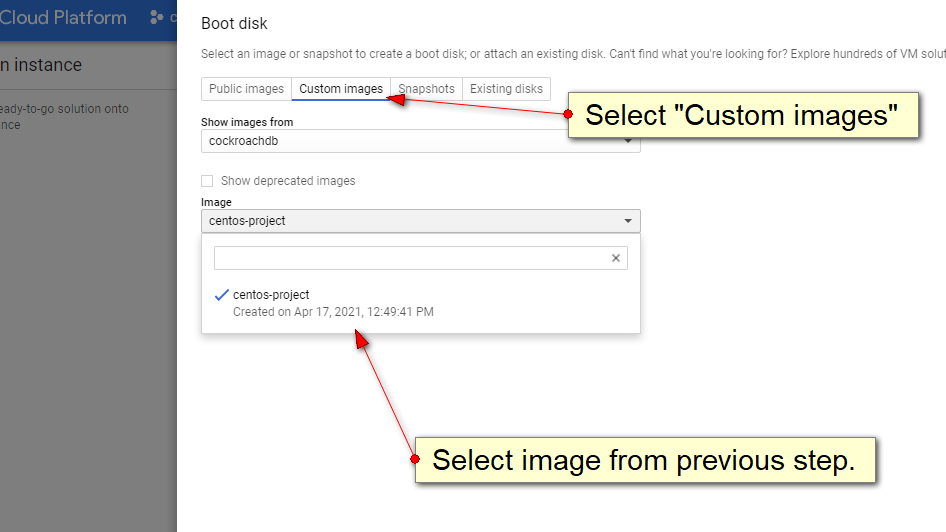
Select “Custom Image” and select the image from the previous step.
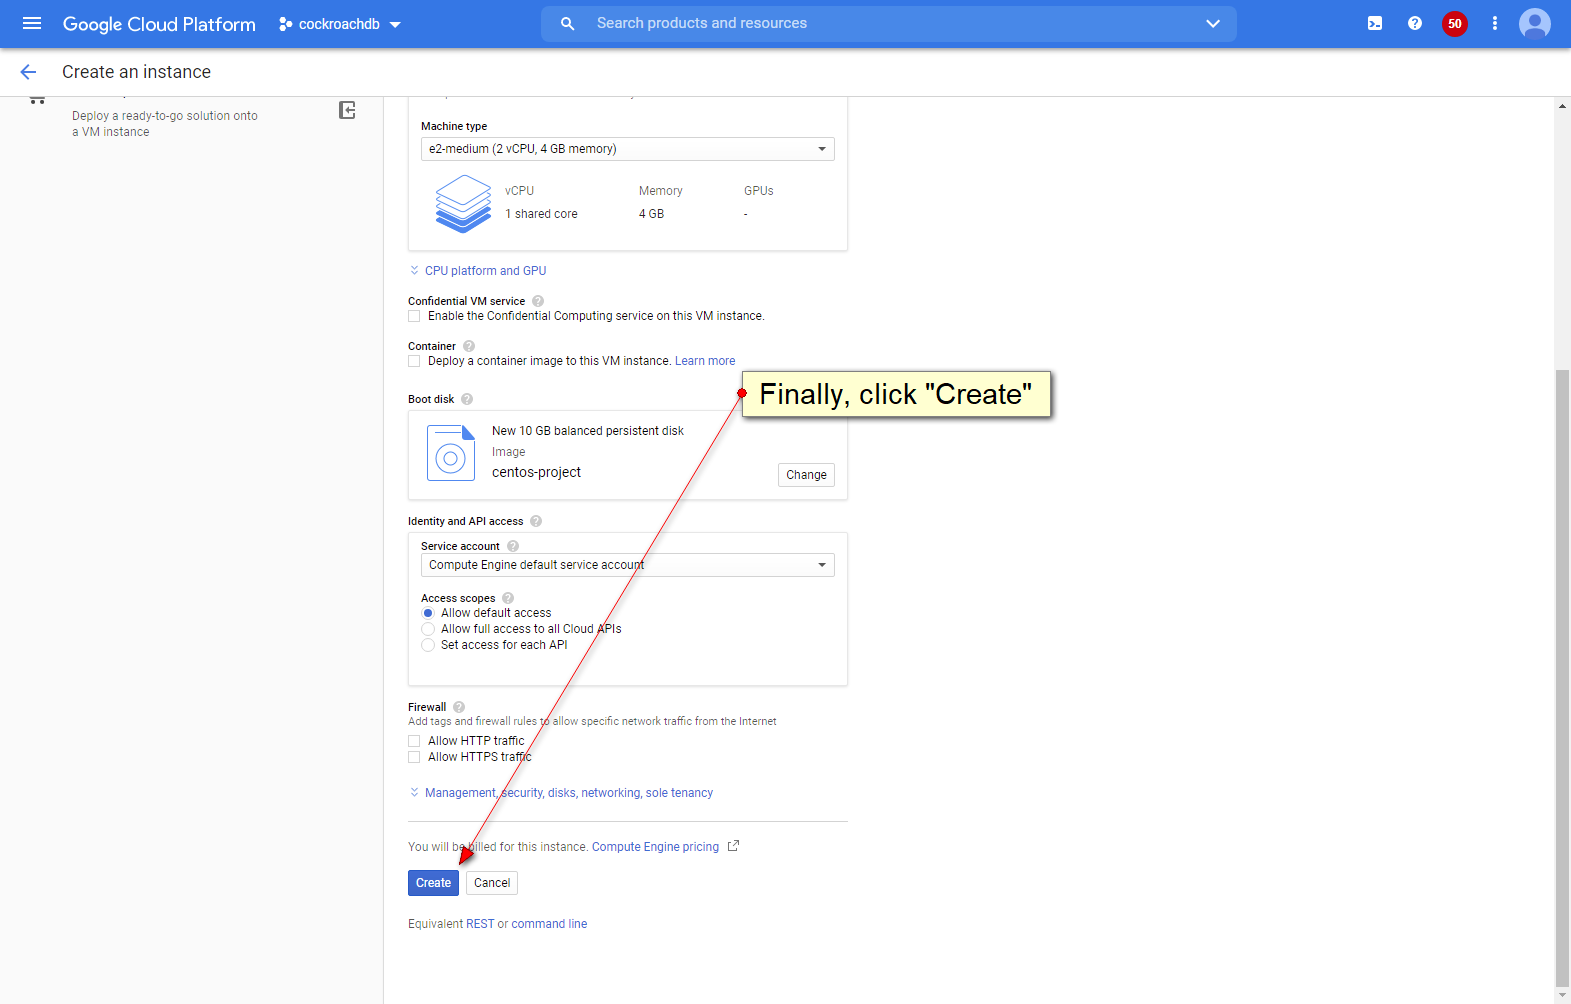
Finally, click “Create”.
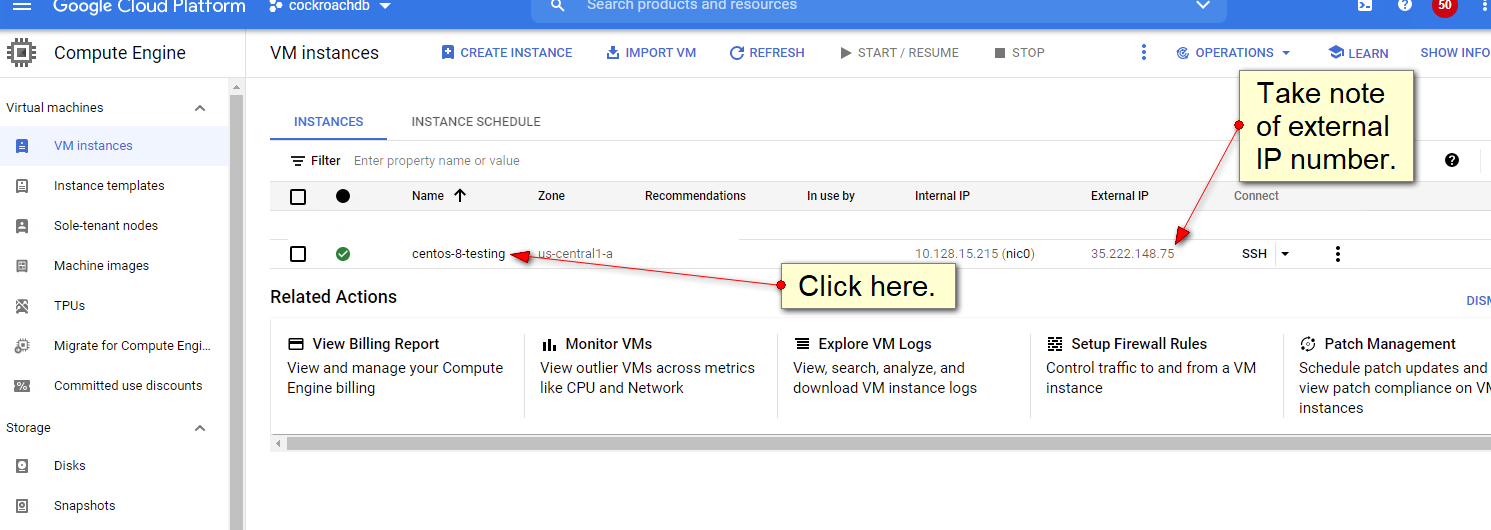
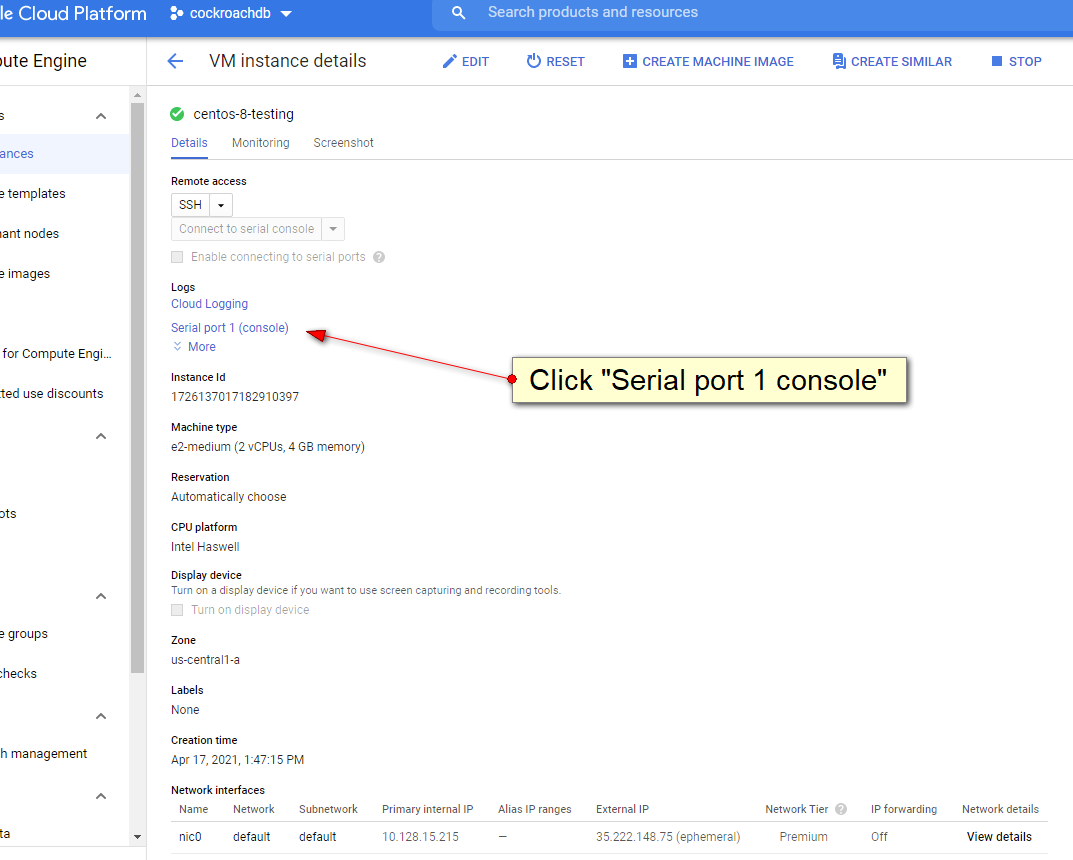
Notice your assigned IP number. Then click the name of your new Google-VM.
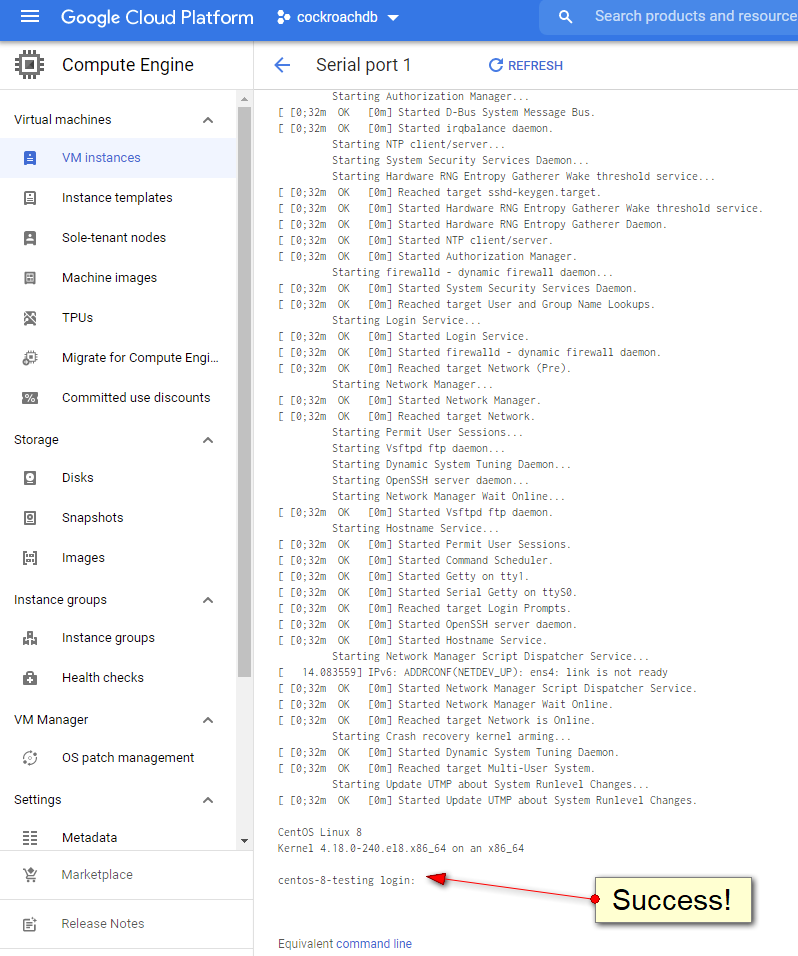
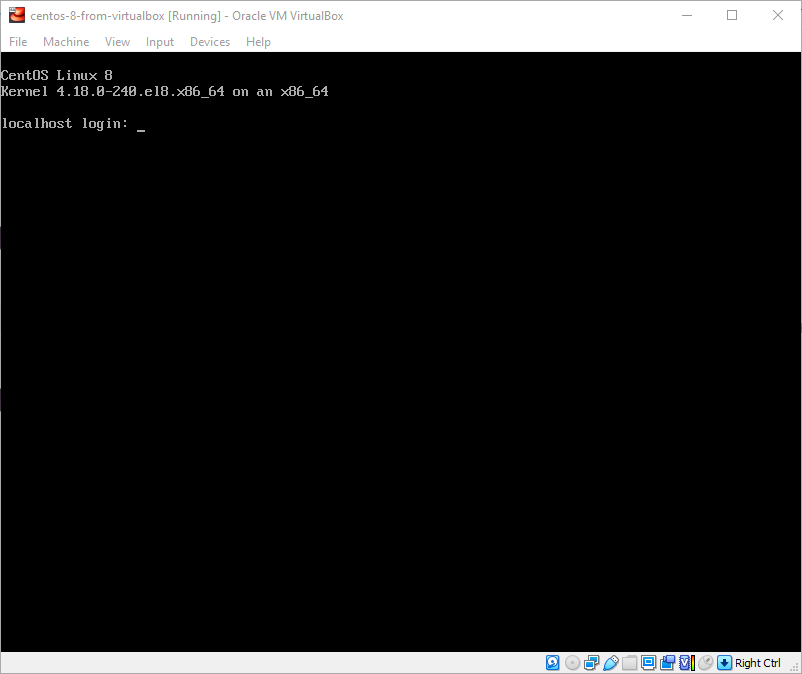
Click “Serial 1 Console”.
Hopefully, the last status line will indicate a login prompt!
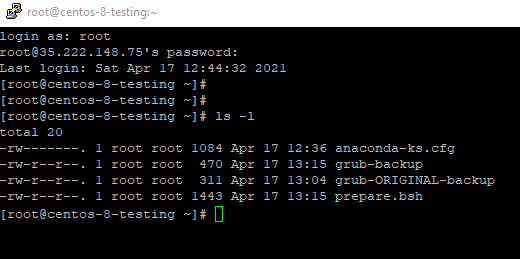
After all this work, lets put your efforts to use. Enter the IP number from the previous step into your PuTTY configuration menu and “Open” this PuTTY session.
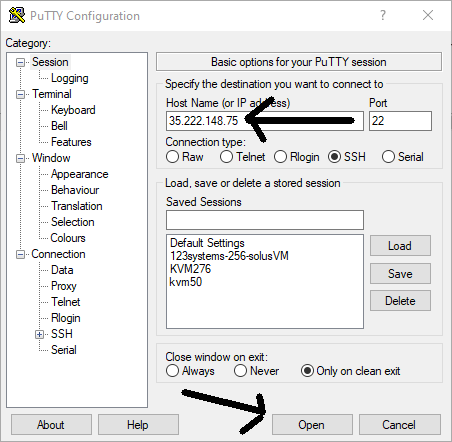
We are not going to be concerned with the SSH keys for this demonstration.
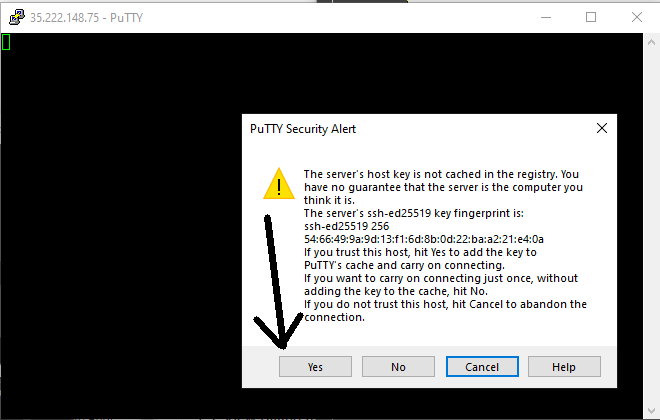
Enter your password from back when you started. Hopefully you remember it!
Success! You have officially logged in from a virtual machine that was originally created by VirtualBox!
Conculsion
We hope you have enjoyed this project. Please let us know what you think in the comments section and please be sure to like us on FaceBook, Twitter, and any other social-media platforms.
Thank you for reading my post