Amazon AWS Lambda is serverless application service. Using AWS Lambda service, we can deploy any number of serverless applications and pay for only what is really used which is time to process the request.
Let’s see first what Serverless applications are.
Serverless application, in a nutshell, is a code without a Server to provision or manage.
So instead of deploying Servers and putting our business logic in them which we mostly do, now we can just deploy our business logic in the form of functions and forget about managing servers.
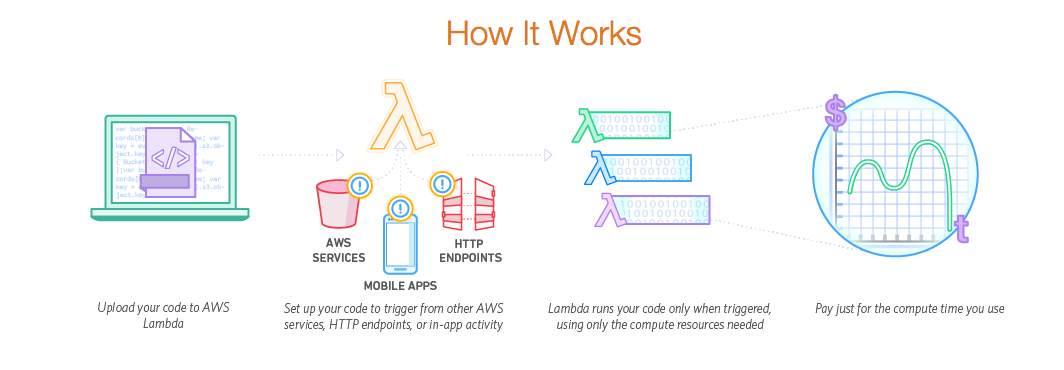
We can invoke these functions via HTTP request, event, internal AWS events etc. This image below defines the AWS Lambda process.
Enough of the theories, let’s see it in action.
Before you begin all of this, you need to have the Amazon AWS account and AWS Access and Secret keys. Follow the steps below to get them if you do not have it already.
Getting AWS Access and Secret Keys
Go to Amazon AWS website and create a new account.
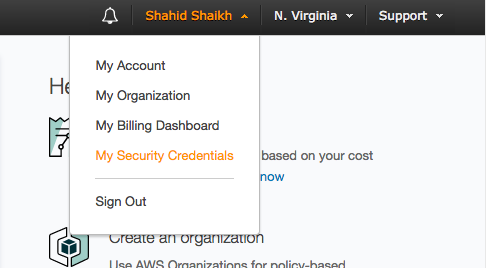
Log in to your account and go to security credentials page.
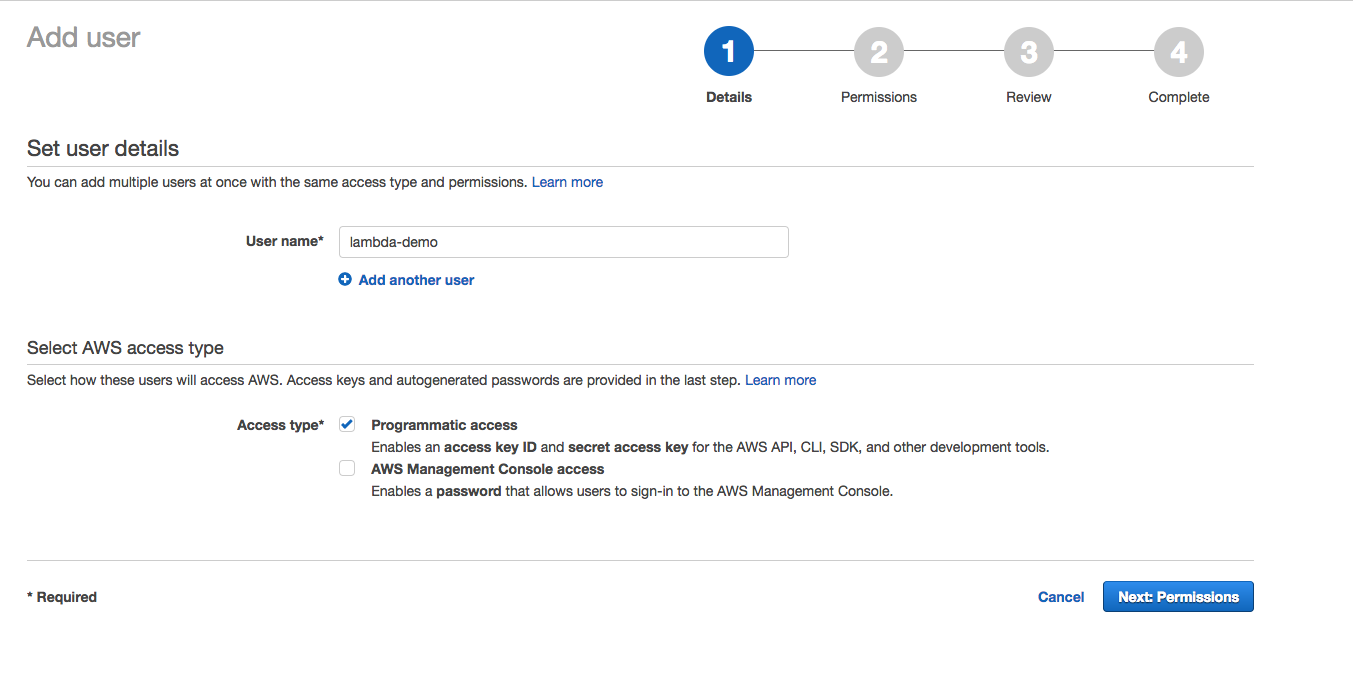
Go to users and click on Add User button.

Give it a name, and check Programmatic Access check box.
In the next screen, click on Attach Existing policies tab and search for “AdministratorAccess”. Check that permission and click on Review button and create a user.
Now copy that access key and secret key.
Let’s move ahead to coding part.
Installing Serverless Module
To create a Serverless application, you need to install it SDK. It is available on NPM. Run the command below with sudo permission to install it.
npm install -g serverless
It will take a while to grab all the dependencies and install it properly.
Once it is installed, you can then create a new serverless application or use existing ones given as an example and reusable component.
Let’s create a boilerplate application to understand its code structure.
Run the following command.
serverless create --template aws-nodejs --path my-service
It will create a new serverless application which runs with Node.js and named as “my-service”.
Switch to my-service project directory. You shall see two files. First is serverless.yml and second is handler.js.
Let’s look at each of them.
first is serverless.yml which is also entry point code of AWS Lambda.
service: my-service
provider:
name: aws
runtime: nodejs6.10
functions:
hello:
handler: handler.hello
First, two block is the name of service and provider which we also passed in the command. What is important piece of code is functions block.
function blocks take the Request and call the handler. Here request is /hello and handler is hello and code for that is in handler.js.
'use strict';
module.exports.hello = (event, context, callback) => {
const response = {
statusCode: 200,
body: JSON.stringify({
message: 'Go Serverless v1.0! Your function executed successfully!',
input: event,
}),
};
// Return the response back
callback(null, response);
};
Here is our hello function which returns the simple response. Note that we are getting event and context parameter from AWS Lambda.
Handler name and the function name is not mandatory to be same.
Let’s deploy one simple application.
Deploying Serverless Application
Remember the Access keys and Secret keys we created earlier, let’s use them.
First, we need to configure our serverless SDK to use our keys to deploy our applications.
Run the following command. Replace the access keys and secret keys with yours.
serverless config credentials --provider aws --key
Now, let’s clone the code and deploy it. Run the following commands one by one.
git clone https://github.com/codeforgeek/aws-lambda-todo-rest-api
Now switch to the directory and install node modules.
cd aws-lambda-todo-rest-api && npm install
Once the installation is done, run the following command to deploy it on AWS Lambda.
serverless deploy
You should see following on the terminal screen.
Serverless: Packaging service...

Serverless: Excluding development dependencies...

Serverless: Creating Stack...

Serverless: Checking Stack create progress...

.....

Serverless: Stack create finished...

Serverless: Uploading CloudFormation file to S3...

Serverless: Uploading artifacts...

Serverless: Uploading service .zip file to S3 (22.73 KB)...

Serverless: Validating template...

Serverless: Updating Stack...

Serverless: Checking Stack update progress...

......................................................................................................

Serverless: Stack update finished...

Service Information

service: serverless-rest-api-with-dynamodb

stage: dev

region: us-east-1

stack: serverless-rest-api-with-dynamodb-dev

api keys:

  None

endpoints:

  POST - https://2dj8uurjx6.execute-api.us-east-1.amazonaws.com/dev/todos

  GET - https://2dj8uurjx6.execute-api.us-east-1.amazonaws.com/dev/todos

  GET - https://2dj8uurjx6.execute-api.us-east-1.amazonaws.com/dev/todos/{id}

  PUT - https://2dj8uurjx6.execute-api.us-east-1.amazonaws.com/dev/todos/{id}

  DELETE - https://2dj8uurjx6.execute-api.us-east-1.amazonaws.com/dev/todos/{id}

functions:

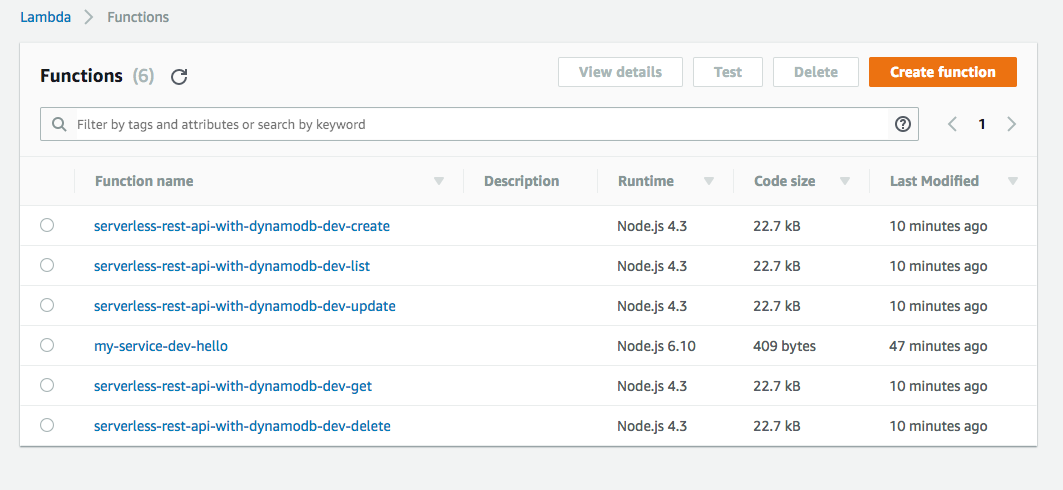
  create: serverless-rest-api-with-dynamodb-dev-create

  list: serverless-rest-api-with-dynamodb-dev-list

  get: serverless-rest-api-with-dynamodb-dev-get

  update: serverless-rest-api-with-dynamodb-dev-update

  delete: serverless-rest-api-with-dynamodb-dev-delete
Your URL would be different.
Now, let’s hit those request and see if it works.
Open up your terminal and create a new todo by executing this command.
Do not forget to replace the URL with your application URL.
curl -X POST https://2dj8uurjx6.execute-api.us-east-1.amazonaws.com/dev/todos -d '{ "text": "Learn Serverless" }'
You should see the following response.
{"id":"0fa52300-9bc6-11e7-b6d3-5f21f89b90da","text":"Learn Serverless","checked":false,"createdAt":1505666062640,"updatedAt":1505666062640}
You can perform the GET operation to see whether it’s created or not.
Now open your AWS console and go to lambda screen. You should see your functions listed under the Functions tab.
Awesome. You can also check the entry in DynamoDB table.
Summary
In this article, we have learned how to setup serverless framework in our machine and get started with a sample application. We also learned how the YML file is structured to route the event. In next series of AWS tutorials, we are going to learn more and more about components of AWS and how to use them to build scalable software.


