
New to Rust? Grab our free Rust for Beginners eBook Get it free →
Using FeathersJS To Access MariaDB With Minimal Coding Part III

Simple CRUD Example Using FeathersJS And Sequelize, Part III

This is the final article of a three-part series. This series of articles will focus on building a complete CRUD interface. The reader is encouraged to optionally install Postman and simulate the same steps using a REST interface.
Article One Of The Three-part Series
Article Two Of The Three-part Series
SECURITY INTRODUCTION
So far we have been doing simple cut/paste right into our FeathersJS page. In this article, we will cover how to put the same code into ANY webpage. And for this article, you do not even need a webpage! You can open up a new tab, no webpage or website is required.
Once upon a time, we could have done this into any page without any security issues to be concerned about. However, as the UK’s “The Telegraph” stated several years ago: ‘The internet can be a dark and dangerous place’. So, we must secure our calls via SSL, or secure socket layer. For an excellent overview on how SSL works, please refer to this article. Recently, most major browsers have started to seriously enforce this requirement.
So let’s secure our FeathersJS server. This is actually quite easy and therefore this will be the shortest article (yes aren’t you relieved?).

PREREQUISITES

This section will require a domain name if you do not already have one. I prefer NameCheap since as the name implies, a domain name can be purchased for as little as $1.
We will also be required to obtain an ssl certification. I will be using LetsEncrypt since it is free and we do not require a high-grade certification for our purposes.
INSTALL LETSENCRYPT
This of course will depend largely on your server type. For Centos7, these are the required steps:
sudo yum --assumeyes install yum-utils;
sudo yum-config-manager --enable rhui-REGION-rhel-server-extras  rhui-REGION-rhel-server-optional ;
sudo yum --assumeyes install python2-certbot-apache;
CREATE A CERTIFICATION
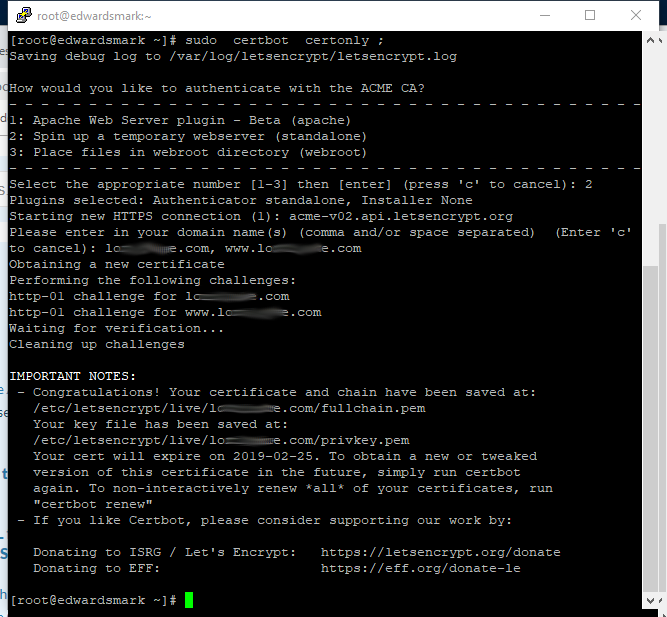
All that is required to create your certification is to enter the following command:
sudo certbot certonly ; ## the certonly switch will not alter your apache configuration.
You will be prompted with a series of questions. Notice that I choose option two, “Spin up a temporary webserver (standalone)”, but you may choose any option. Pay particular attention to the question regarding your domain name. It is recommended that you certify both the domain name and with the www prefix.
You may also be required to enter the following depending on your installation.
sudo chmod --verbose  755  /etc/letsencrypt/archive   ;
sudo chmod --verbose  755  /etc/letsencrypt/archive/YOURDOMAINNAME  ;
sudo chmod --verbose  755  /etc/letsencrypt/live/    ;
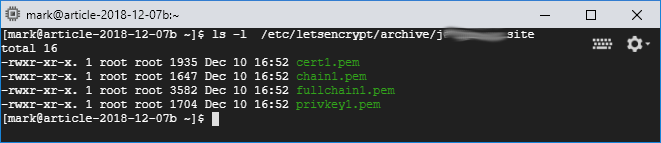
I like to double-check to make sure the certification files are available to me:
ls -l /etc/letsencrypt/live/YOURDOMAINNAME ; ## do NOT use sedo!
NODE PACKAGES
Now we have to manually install the new required node packages:
npm install   https  --save ;
npm install   fs  --save;
CODE MODIFICATIONS
Locate your ./src/index.js script and replace the line
const server = app.listen(port);
with the following code:
/* commented out: const server = app.listen(port);   */
const https = require('https');
const fs = require('fs');

const privkey_pem = app.get('privkey_pem');  // referenced in ./config/default.json
const cert_pem = app.get('cert_pem');        // referenced in ./config/default.json
const chain_pem = app.get('chain_pem');      // referenced in ./config/default.json

const server = https.createServer({
  key: fs.readFileSync(privkey_pem),
  cert: fs.readFileSync(cert_pem),
  ca: fs.readFileSync(chain_pem),
}, app).listen(port);

app.setup(server);
Optionally, find the bottom line:
logger.info('Feathers application started on http://%s:%d', app.get('host'), port)
and change http:// with https:// for the sake of convenience.
Next, go into your ./config/default.json script and add the following:
  "privkey_pem" : "/etc/letsencrypt/live/YOURDOMAINNAME/privkey.pem",
  "cert_pem"    : "/etc/letsencrypt/live/YOURDOMAINNAME/cert.pem",
  "chain_pem"   : "/etc/letsencrypt/live/YOURDOMAINNAME/chain.pem",
I suggest putting these three certbot lines right below the “port”: 3030, line.
And while in this file, let’s update our host line to reflect the domain name. Replace the IP number under host: with your domain name.
RESET MariaDB TABLE
After all this testing, you may need to go back into your database console and enter the following to reset your table:
delete from testConnect ;
alter table testConnect set AUTO_INCREMENT=1 ;
START FeathersJS APPLICATION
Finally start our application once again:
npm start;
Notice something different? Instead of giving us an IP number, FeathersJS is now giving us our domain name instead!
ADD BROWSER CODE
Finally, open a new browser window (control-T) or RIGHT-CLICK and select new tab. Notice that we are NOT using the conventional FeathersJS window, instead we are using a blank window. All steps from the first article should work in your new browser window, with one exception:
Remember where we used:
const socket = io() ;
Instead, let’s use our domain name. Do not forget the https:// prefix!
const socket = io('https://YOURDOMAINNAME:3030') ;
Note: If you are still testing using the FeathersJS default website, this last step is unnecessary, for now.
All code is displayed again for your convenience:
[ '//cdnjs.cloudflare.com/ajax/libs/socket.io/2.0.4/socket.io.js'
, '//unpkg.com/@feathersjs/client@^3.0.0/dist/feathers.js'
].forEach( (src) => {
    let script = document.createElement('script'); script.src = src; script.async = false;
    document.head.appendChild(script);
});

/*** Do not forget to pause for a moment here!   ***/

const app = feathers();
const socket = io('https://YOURDOMAINNAME:3030') ;     // this line was:  const socket = io() ;
app.configure(feathers.socketio(socket));

 /* optionally, establish a listener for create(POST), patched(PATCH), update(PUT), and remove(DELETE) */
app.setup(); /* optional, but good practice to include anyways */
app.service('tiny-connect').on('created', createMessage => { console.log('create(POST)   : ', JSON.stringify(createMessage))});
app.service('tiny-connect').on('updated', updateMessage => { console.log('update(PUT)    : ', JSON.stringify(updateMessage))});
app.service('tiny-connect').on('patched', patchMessage  => { console.log('patch(PATCH)   : ', JSON.stringify(patchMessage ))});
app.service('tiny-connect').on('removed', removeMessage => { console.log('removed(DELETE): ', JSON.stringify(removeMessage))});

/* async functions */
async function createTiny(data) {      /* create(POST) */
  let createResult = await app.service('tiny-connect').create(data);
  console.log('createTiny function result: ' + JSON.stringify(createResult) );
  return createResult;
};
async function getTiny(id) {      /* get(GET) (just one by index) */
  let getResult = await app.service('tiny-connect').get(id);
  console.log('getTiny function: ' + JSON.stringify(getResult) );
  return getResult;
};
async function patchTiny(id, data, params) {      /* patch(PATCH) */
  let patchResult = await app.service('tiny-connect').patch(id, data, params);
  console.log('patchTiny function: ' + JSON.stringify(patchResult) );
  return patchResult;
};
async function findTiny(query) {      /* find(GET) (get all or by query) */
  console.log('Query function using: ' + JSON.stringify(query) );
  let findResult = await app.service('tiny-connect').find(query);
  console.log('findTiny function: ' + JSON.stringify(findResult) );
  return findResult;
};
async function removeTiny(id, params) {      /* remove(DELETE) */
  let removeResult = await app.service('tiny-connect').remove(id, params);
  console.log('removeTiny function: ' + JSON.stringify(removeResult) );
  return removeResult;
};

    /* create row */
let createTinyData = { name: 'mark edwards', address: '123 Swallow Lane' } ;
createTiny(createTinyData).then((value) => {  /* create(POST) */
  console.log('createTiny: ' + JSON.stringify(value));
});

    /* display row */
let findTinyResultAll;
findTiny(null).then((value) => {      /* find(GET) (find all) */
  findTinyResultAll = value;
  console.log('findTiny without query: ' + JSON.stringify(findTinyResultAll) );
});
let findTinyResultOne; let findTinyData = {query:{ id: 1}};
findTiny(findTinyData).then((value) => {      /* find(GET) (with data) */
  findTinyResultOne = value;
  console.log('findTiny with ' + findTinyData + ' query: ' + JSON.stringify(findTinyResultOne) );
});
let getTinyResult = null; let getKey = 1;
getTiny(getKey).then( value => {      /* get(GET) */
  getTinyResult = value;
  console.log('getTiny(' + getKey + ') : ' + JSON.stringify(getTinyResult) );
});

    /* update(PATCH) row  */
let patchResult = null; let patchKey = 1; let patchData = {address: '5678 There Street!' };
patchTiny(patchKey, patchData ).then( value => {      /* patch(PATCH) */
  patchResult = value;
  console.log('patchResult: ' + JSON.stringify(patchResult));
});

    /* remove(DELETE) row */
let removeResult = null; let removeKey = 1;
removeTiny(removeKey).then( value => {      /* remove(DELETE) */
  removeResult = value;
  console.log('removeResult(' + removeKey + ': ' + JSON.stringify(removeResult));
});
Here is what you should see in an empty browser window:
![]()
CONCLUSION
You now are able to have full CRUD capability using any Sequelize database inside of any webpage using secure-socket-layer.
I hope you have enjoyed this three-part article series. Please leave me positive feedback on this article series.


