
New to Rust? Grab our free Rust for Beginners eBook Get it free →
Node.js and MySQL Complete Tutorial

Node.js and MySQL are some of the necessary binding needed for any web application that is frequently used by Full Stack developers. MySQL is one of the most popular open-source databases in the world and is efficient as well. Almost every popular programming language like Java and PHP provides drivers to access and perform operations with MySQL.
In this Node.js MySQL tutorial, we are going to learn how to connect to MySQL database using Node.js. We will also learn how to pool connections to improve performance, query the tables, and call stored procedures.
To be able to follow up with the code examples in this Node.js and MySQL tutorial, you should have MySQL installed on your computer, click here to download MySQL.
Before diving deeper into the process of using MySQL in Node.js, let’s quickly look at an introduction to both.
Introduction to Node.js
Node.js is a lightweight, cross-platform JavaScript runtime built upon the V8 engine that can perform multiple operations simultaneously. It has millions of libraries and tools that can be installed using NPM (Node Package Manager). NPM is installed automatically when you install Node.js, so no additional steps are required. We will also use NPM to install the MySQL client in this article.
Node.js is mainly used for creating the server. The server created using Node.js can interact with the operating system, and file system easily, it can also create and manage all types of databases. We can also build a rest API with Node.js that can be tested using tools like Postman.
Developers typically use MongoDB with Node.js, but MySQL is also a good choice if you want a relational database to store your data in the form of rows and columns.
If you want to know more about the differences between them, check out – MySQL vs. MongoDB: Choosing the Right Database for Integration.
Introduction to MySQL
MySQL is one of the popular SQL databases that follows the relational model to organise data into tables consisting of rows and columns.
The MySQL database can be handled using SQL. SQL stands for Structured Query Language, which can perform many operations such as create, select, update, delete, etc. on the database. We will also perform these operations in this article.
Using the MySQL database, we can also define the primary keys, secondary keys, and foreign keys to establish relationships between tables, this feature is missing in a NoSQL database like MongoDB.
Quick Start: How to Use MySQL in Node.js
Assuming you have Node and MySQL installation done on your computer. Let’s quickly use MySQL in Node in three easy steps:
Step 1: Create a Node.js Project
Create a new project directory and initialize a Node project using the NPM.
$ mkdir mysqlexperiment && cd mysqlexperiment
$ npm init --y
Step 2: Install mysql Module
Install the mysql node module using the NPM.
npm install --save mysql
Step 3: Connect with MySQL
Create an app.js file and copy/paste the code shown below. Change the MySQL credentials accordingly with your system.
const mysql = require('mysql');
const connection = mysql.createConnection({
    host: 'localhost',
    user: 'user',
    password: 'password',
    database: 'databasename'
});

connection.connect((err) => {
    if (err) throw err;
    console.log('Connected to MySQL Server!');
});
Run the code using the following command:
node app.js
If you got the message ‘Connected to MySQL Server!’ in the terminal it means you are successfully connected to the database.
If you have the latest MySQL server installed, you might end up getting an error saying the following:
{
 code: 'ER_NOT_SUPPORTED_AUTH_MODE',
 errno: 1251,
 sqlMessage: 'Client does not support authentication protocol requested by server; consider upgrading MySQL client',
 sqlState: '08004',
 fatal: true
}
To tackle this issue, create a new user in your MySQL server with ‘mysql_native_password’ authentication mechanisum.
Here is how you can tackle this issue:
- First, log in to the MySQL server using root access.
mysql -u root -p
- Then run these commands one by one.
CREATE USER 'newuser'@'localhost' IDENTIFIED WITH 'mysql_native_password' BY 'newpassword';
GRANT ALL PRIVILEGES ON * . * TO 'newuser'@'localhost';
FLUSH PRIVILEGES;
In the code, pass the new credentials to connect to the MySQL server. Let’s proceed further.
Check Out: Getting data from REST APIs in Node
Pooling MySQL Connections
The code shown earlier is not meant for production use. It’s merely to get you started with Node and MySQL. In a production scenario, we must use connection pooling to improve the performance of MySQL and not overload the MySQL server with too many connections.
Let’s explain it with a simple example. Consider the code shown below.
app.js
const express = require("express");
const app = express();
const mysql = require('mysql');

const connection = mysql.createConnection({
    host: 'localhost',
    user: 'username',
    password: 'password',
    database: 'databasename'
});

connection.connect((err) => {
    if (err) throw err;
    console.log('Connected to MySQL Server!');
});

app.get("/", (req, res) => {
    connection.query('SELECT * from users LIMIT 1', (err, rows) => {
        if (err) throw err;
        console.log('The data from users table are: \n', rows);
        connection.end();
    });
});

app.listen(3000, () => {
    console.log('Server is running at port 3000');
});
We are integrating express module to create a web server.
Below is the command to install the express module:
npm install --save express
We are creating a MySQL connection on every request coming from the user. Soon after getting multiple concurrent requests, the MySQL server will get overloaded and throw an error.
To simulate the concurrent connection scenario, we are going to use a tool called siege.
Below is the command to install siege in Ubuntu system:
sudo apt-get install siege
Run the JS file:
node app.js
Let’s simulate the concurrent requests using siege by using the below command:
siege -c10 -t1M http://localhost:3000
Assuming you are running the Node server on Port 3000.
Output:
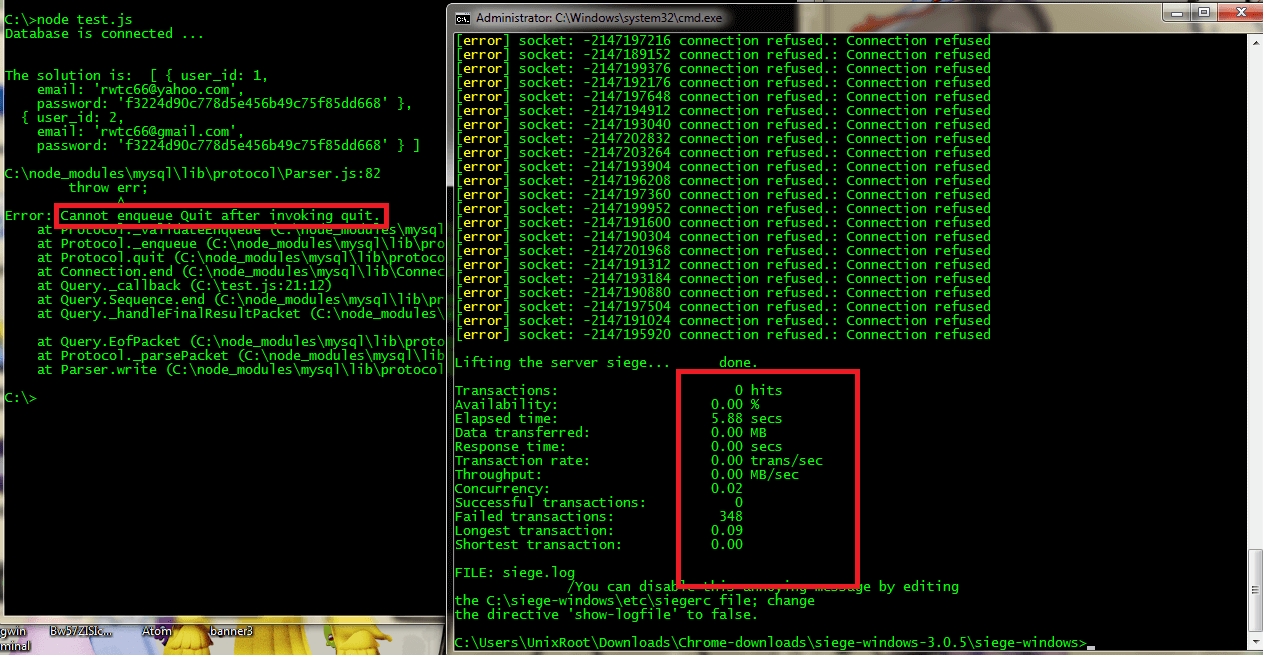
As you can see from the output above, our server crashed while handling concurrent requests. To tackle this scenario, we use the Pooling mechanism.
Connection Pooling is a mechanism to maintain a cache of database connection so that the connection can be reused after releasing it.
Let’s rewrite the code to support connection pooling:
const express = require("express");
const app = express();
const mysql = require('mysql');

const pool = mysql.createPool({
    host: 'localhost',
    user: 'username',
    password: 'password',
    database: 'databasename'
});

app.get("/", (req, res) => {
    pool.getConnection((err, connection) => {
        if (err) throw err;
        console.log('connected as id ' + connection.threadId);
        connection.query('SELECT * from users LIMIT 1', (err, rows) => {
            connection.release(); // return the connection to pool
            if (err) throw err;
            console.log('The data from users table are: \n', rows);
        });
    });
});

app.listen(3000, () => {
    console.log('Server is running at port 3000');
});
Run the code:
node app.js
Let’s fire up 10 concurrent users for 1 minute using siege by using the below command:
siege -c10 -t1M http://localhost:3000
Output:
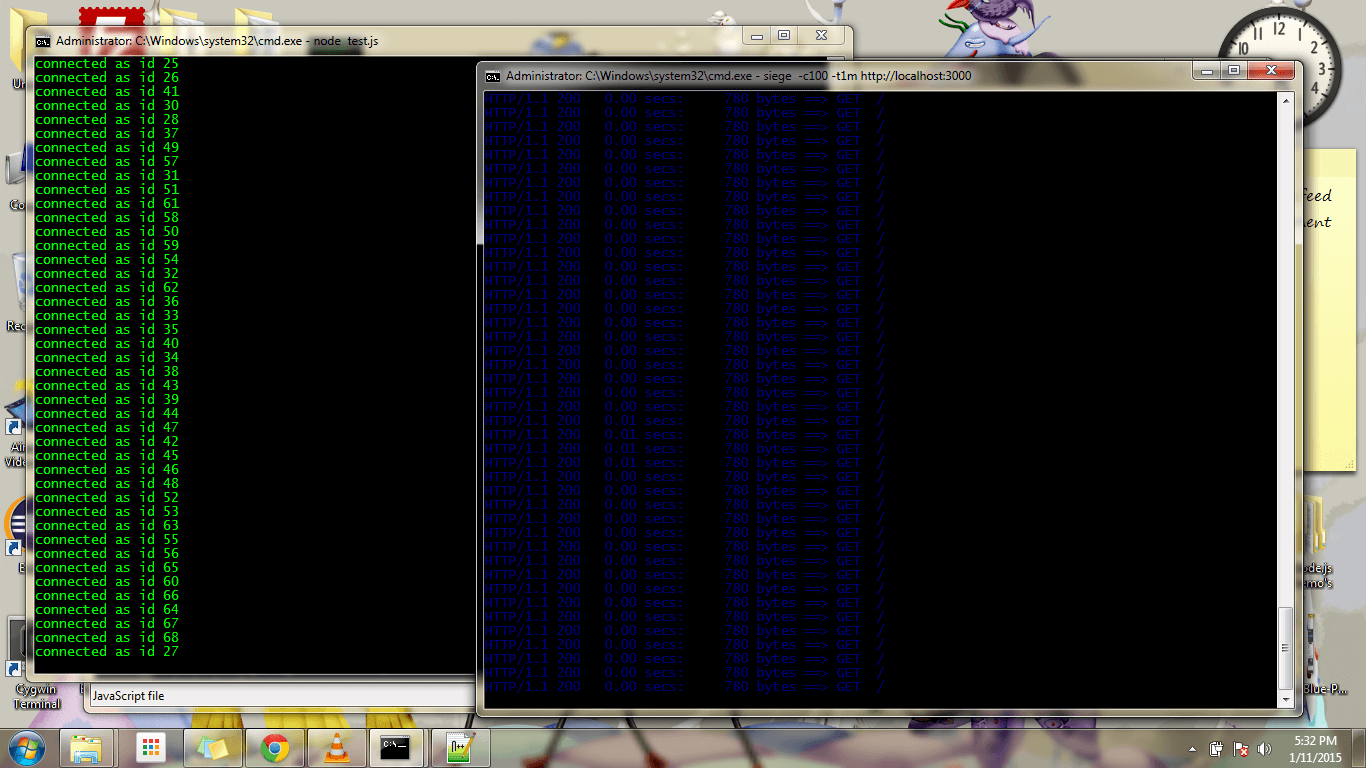
This test specified that the server after connection pooling can effectively handle multiple requests with ease. We have tested this approach in multiple production software solutions with heavy payload and it works like a charm.
Let’s learn how to execute various MySQL queries using Node.
Executing SQL Queries in Node.js
A Node.js application can directly execute SQL queries to interact with a MySQL database. In this section, we will learn to perform CRUD operations on the previously created database.
Inserting Data into Table
We can easily insert data into a Table in MySQL with Node.js by executing the “INSERT INTO” query.
Below is the code to insert a row in a MySQL table:
const mysql = require('mysql');

const pool = mysql.createPool({
    connectionLimit: 100, //important
    host: 'localhost',
    user: 'root',
    password: '',
    database: 'todolist',
    debug: false
});

// add rows in the table

function addRow(data) {
    let insertQuery = 'INSERT INTO ?? (??,??) VALUES (?,?)';
    let query = mysql.format(insertQuery, ["todo", "user", "notes", data.user, data.value]);
    pool.query(query, (err, response) => {
        if (err) {
            console.error(err);
            return;
        }
        // rows added
        console.log(response.insertId);
    });
}

// timeout just to avoid firing query before connection happens

setTimeout(() => {
    // call the function
    addRow({
        "user": "Shahid",
        "value": "Just adding a note"
    });
}, 5000);
The mysql.format function will perform the query escape.
If you would like to add multiple rows in a single query, you can pass an array in the values.
let insertQuery = 'INSERT INTO ?? (??,??) VALUES (?,?);
let values = [["shahid","hello"],["Rohit","Hi"]]; // each array is one row
let query = mysql.format(insertQuery,["todo","user","notes",values]);
Note: To insert data into a table, make sure you have created a table, if you want to make a new table using Node.js, we have a separate article on this – NodeJS MySQL Create Table.
Selecting Data from Table
We can select data from a table in MySQL by executing the “SELECT” query.
Below is the code to query rows in a MySQL table:
const mysql = require('mysql');

const pool = mysql.createPool({
    connectionLimit: 100, //important
    host: 'localhost',
    user: 'root',
    password: '',
    database: 'todolist',
    debug: false
});

// query rows in the table

function queryRow(userName) {
    let selectQuery = 'SELECT * FROM ?? WHERE ?? = ?';
    let query = mysql.format(selectQuery, ["todo", "user", userName]);
    // query = SELECT * FROM `todo` where `user` = 'shahid'
    pool.query(query, (err, data) => {
        if (err) {
            console.error(err);
            return;
        }
        // rows fetch
        console.log(data);
    });
}

// timeout just to avoid firing query before connection happens

setTimeout(() => {
    // call the function
    // select rows
    queryRow('shahid');
}, 5000);
Updating Data in Table
If we have accidentally inserted incorrect data, we can update data using the “UPDATE” query.
Below is the code to update the data in a MySQL table:
const mysql = require('mysql');

const pool = mysql.createPool({
    connectionLimit: 100, //important
    host: 'localhost',
    user: 'root',
    password: '',
    database: 'todolist',
    debug: false
});

// update rows

function updateRow(data) {
    let updateQuery = "UPDATE ?? SET ?? = ? WHERE ?? = ?";
    let query = mysql.format(updateQuery, ["todo", "notes", data.value, "user", data.user]);
    // query = UPDATE `todo` SET `notes`='Hello' WHERE `name`='shahid'
    pool.query(query, (err, response) => {
        if (err) {
            console.error(err);
            return;
        }
        // rows updated
        console.log(response.affectedRows);
    });
}

// timeout just to avoid firing query before connection happens

setTimeout(() => {
    // call the function
    // update row
    updateRow({
        "user": "Shahid",
        "value": "Just updating a note"
    });
}, 5000);
Deleting Rows from Table
We can permanently delete a row from a MySQL database using the “DELETE” query.
Below is the code to delete a row from a MySQL table:
const mysql = require('mysql');

const pool = mysql.createPool({
    connectionLimit: 100, //important
    host: 'localhost',
    user: 'root',
    password: '',
    database: 'todolist',
    debug: false
});

function deleteRow(userName) {
    let deleteQuery = "DELETE from ?? where ?? = ?";
    let query = mysql.format(deleteQuery, ["todo", "user", userName]);
    // query = DELETE from `todo` where `user`='shahid';
    pool.query(query, (err, response) => {
        if (err) {
            console.error(err);
            return;
        }
        // rows deleted
        console.log(response.affectedRows);
    });
}

// timeout just to avoid firing query before connection happens

setTimeout(() => {
    // call the function
    // delete row
    deleteRow('shahid');
}, 5000);
Calling MySQL Stored Procedure Using Node.js
When a SQL query runs in order to retrieve some data from the MySQL database, MySQL executes that query and returns the requested data, and if our system requires querying the same data regularly we have to write over and over again multiple times, so to solve that problem stored procedure comes into existence.
A store procedure can store SQL statements in the MySQL server which can be directly run by calling that stored procedure.
You can also call a stored procedure directly using Node.js. If you don’t have stored procedures created in MySQL, you can refer to the code below to do the same.
CREATE PROCEDURE `getAllTodo`()
BEGIN
SELECT * FROM todo;
END$$
Below is the code to call this stored procedure from the Node.js:
const mysql = require('mysql');

const pool = mysql.createPool({
    connectionLimit: 100, //important
    host: 'localhost',
    user: 'root',
    password: '',
    database: 'todolist',
    debug: false
});

function callSP(spName) {
    let spQuery = 'CALL ??';
    let query = mysql.format(spQuery, [spName]);
    // CALL `getAllTodo`
    pool.query(query, (err, result) => {
        if (err) {
            console.error(err);
            return;
        }
        // rows from SP
        console.log(result);
    });
}

// timeout just to avoid firing query before connection happens

setTimeout(() => {
    // call the function
    // call sp
    callSP('getAllTodo')
}, 5000);
Conclusion
In this tutorial, we have learned how to create a connection to MySQL database using Node.js. For connecting to the MySQL database we have used the npm mysql module. Along with this, we have also learned how to do connection pooling. We have also executed SQL queries directly from Node.js to insert data into tables, query data in tables, and update and delete data in the table. Finally, we have learned to call MySQL stored procedure using Node.js. Node.js supports all types of databases but it works very well with MySQL, so don’t forget to try it after reading this tutorial.
Read More: Building a URL Shortener with Node.Js and Redis
Reference
https://www.npmjs.com/package/mysql


