New to Rust? Grab our free Rust for Beginners eBook Get it free →
How to Integrate WordPress with ElasticSearch
WordPress is powering more than 70 million websites on the internet. It’s one of the best content management software and it’s evolving in every version update. However, there is one issue which is not addressed properly and of course, there is a valid technical reason for same, it’s Search.
I personally believe that WordPress Search is not the best feature of it and can be improved by introducing the technologies which are proven to perform Search. And I think guys at WordPress.com thinks in a similar way, this is the reason WordPress.com uses ElasticSearch to perform the faceted search.
Click here to read the reference of ElasticSearch at WordPress.com
In this tutorial, We are going to learn how to integrate ElasticSearch in self-hosted WordPress website/blog to make WordPress search awesome.
The Problem
This question might arise in your mind.
“What’s the actual problem? Why do we need to solve it?”.
That’s an obvious question and need to properly addressed. Here are few reasons why there is a need of improvement.
- WordPress uses simple LIKE Query on title and content of posts to search.
- Matched posts are sorted on the basis of a date they are published instead of relevance of the keyword user is searching.
- It’s not a search.
I think the last point covers it all, yes it’s not a search and it needs to be replaced by high performing search logic. Don’t blame me for the harsh word, WordPress.com (Paid version of WordPress) believes it too.
The Solution
MySQL is not meant for search and that is one of the reasons why WordPress team is not able to improve the search logic. I am sure there are some ways to enhance MySQL to adopt faceted search feature but it’s not optimal and widely recommended.
So what do we do? use the database which is meant for search. There comes “ElasticSearch”
Introducing ElasticSearch
ElasticSearch is distributed, fast, RESTful Search engine software meant for search and analytics. It is based on Apache Lucene and written in Java.
You can download the ElasticSearch and spin it in the local system in few minutes ( Only if Java is installed ). Grab the latest version of ElasticSearch from here.
To run ElasticSearch, switch to the bin folder of ElasticSearch directory and run this command.
./elasticsearch
On Windows either click on the .bat or run it using command prompt.
elasticsearch.bat
Once the ElasticSearch is running, point your browser to localhost:9002 and you should be seeing the similar screen as shown below.
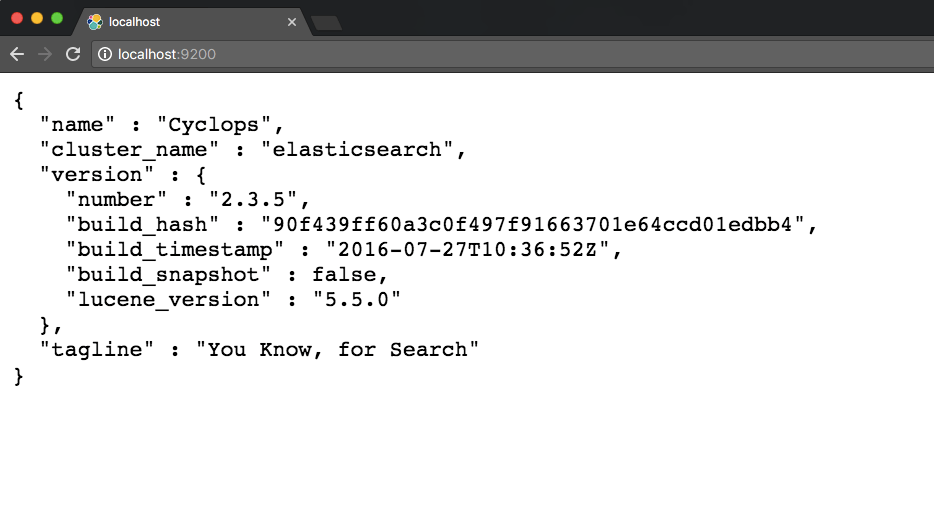
ElasticSearch is running! Easy as cake.
Integrating WordPress with ElasticSearch
To integrate WordPress with ElasticSearch, we need following:
- ElasticSearch running on Server.
- Indexing all posts from current website to ElasticSearch.
- Making sure that every time a new post is published we are indexing it to ElasticSearch.
- Changing WordPress search from MySQL to ElasticSearch.
We can do perform step 2 to 4 using WordPress plugin made by awesome open source folks. However, for step one, we need to install and enable ElasticSearch on some Server.
We need to make a choice here, you can install ElasticSearch on the same server where WordPress is running or install it fresh on free/paid server.
However, steps of installation won’t differ much regardless of the server location.
I am going to cover installation of ElasticSearch on OpenShift Server ( Free ).
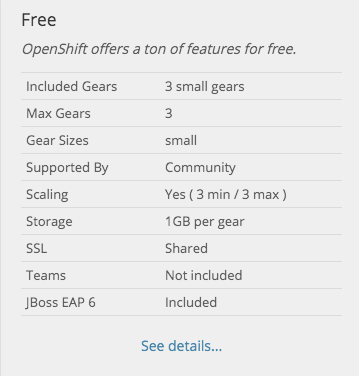
Installing ElasticSearch on OpenShift
OpenShift is public cloud PaaS ( Platform as a Service ) application. They allow 3 free Servers with 1GB storage which you can use to host any application.
We are going to use the free account to host our ElasticSearch instance.
Follow the steps listed below to Install ElasticSearch on OpenShift:
Step 1: Create account on Openshift
Click here to visit OpenShift website registration screen. You can use your Github account to register quickly.
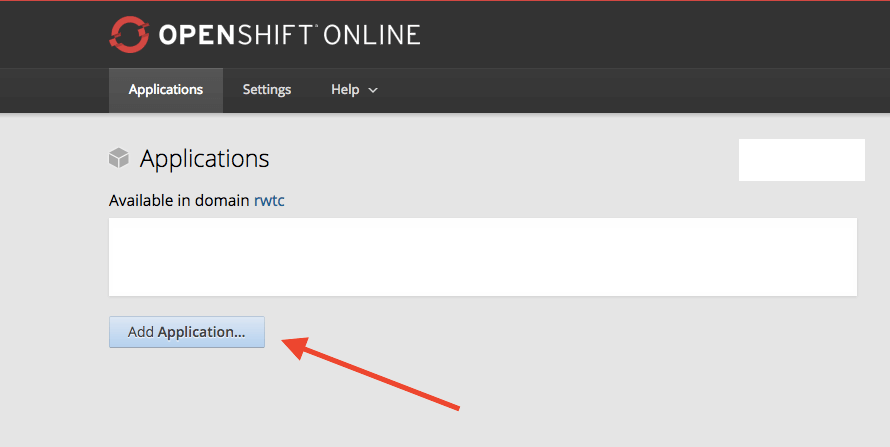
Step 2: Create new Application
Click here to go to Application screen of OpenShift.
Click on Add Application to create new application.
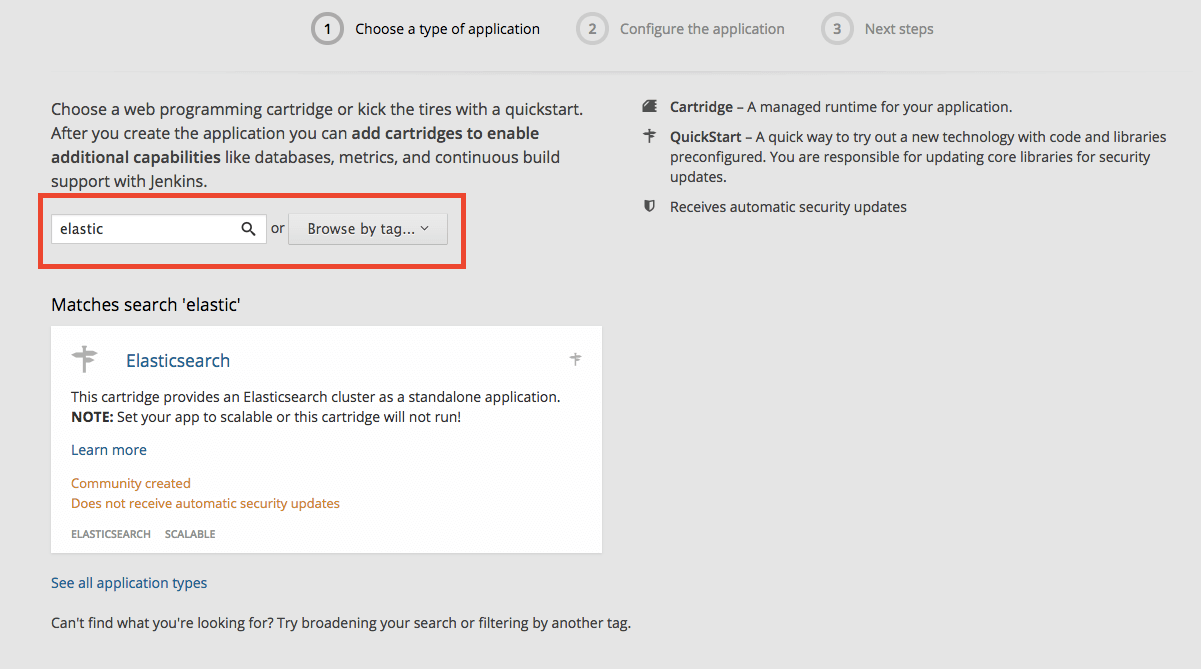
In next screen, OpenShift asks you to choose the application of your choice. OpenShift has a variety of readymade one click install application.
You have two options here:
- Install ElasticSearch with one click installer
- Install ElasticSearch manually using DIY Server
I will explain the option number one as it will save our time. Using both options, we end up having ElasticSearch on Server.
In Application screen, Search ‘Elastic’ as shown below.
Click on the ElasticSearch Application and OpenShift will take you to the configuration screen.
Here is the sample configuration. Change it accordingly as per your need.

Choosing ‘Scale with web traffic’ is important!
Click on ‘Create Application’ button and wait for a minute or two.
Once the application is created, visit the Application page and you should see your Gear listed and running.
Visit the URL mentioned by you in configuration screen to check the working status. You should see something like this as shown below.
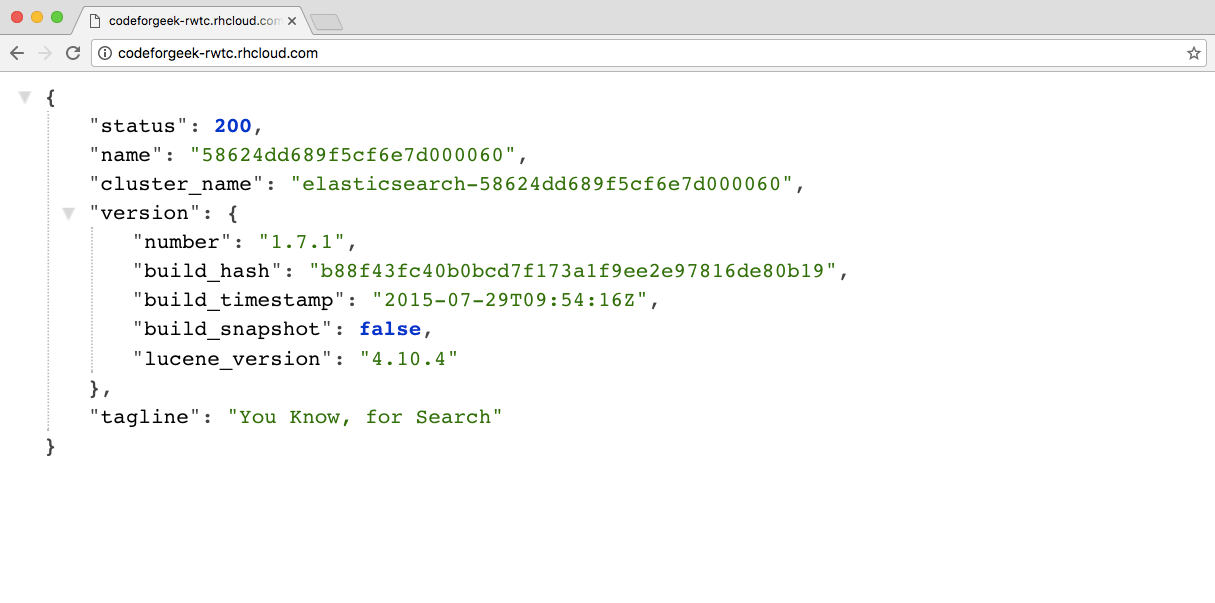
Congratulations! ElasticSearch is hosted and running!
Now, we need to integrate our WordPress site with ElasticSearch.
Configuring WordPress With ElasticSearch
Configuring WordPress Search to use ElasticSearch is really easy and straightforward. Thanks to amazing WordPress contribution community for providing plugins for various tasks. WordPress plugins registry also has a plugin to configure ElasticSearch.
Go to plugins page in WordPress site and search for “fantastic elasticsearch”.
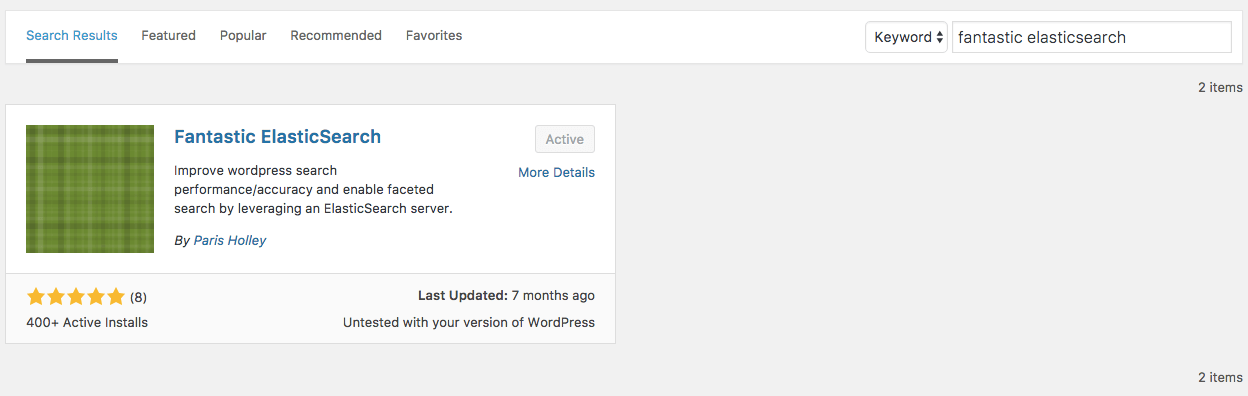
Install and activate the Plugin and you should be viewing the ElasticSearch configuration at WordPress Admin screen.
It has following options:
- WordPress Integration
- Server Settings
- Content Indexing
- Fields Mapping
- Results Scoring
- Manage Index
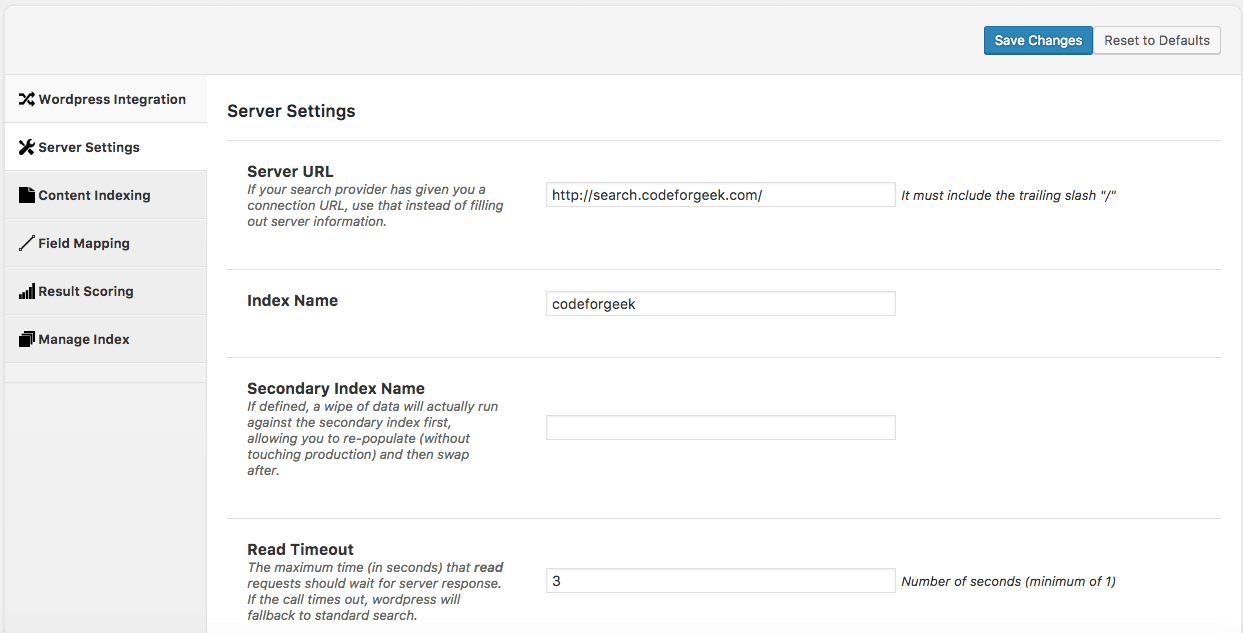
We will first look at setting up ElasticSearch Server with WordPress. Click on ‘Server Setting’ tab and you should be viewing similar screen as shown below.
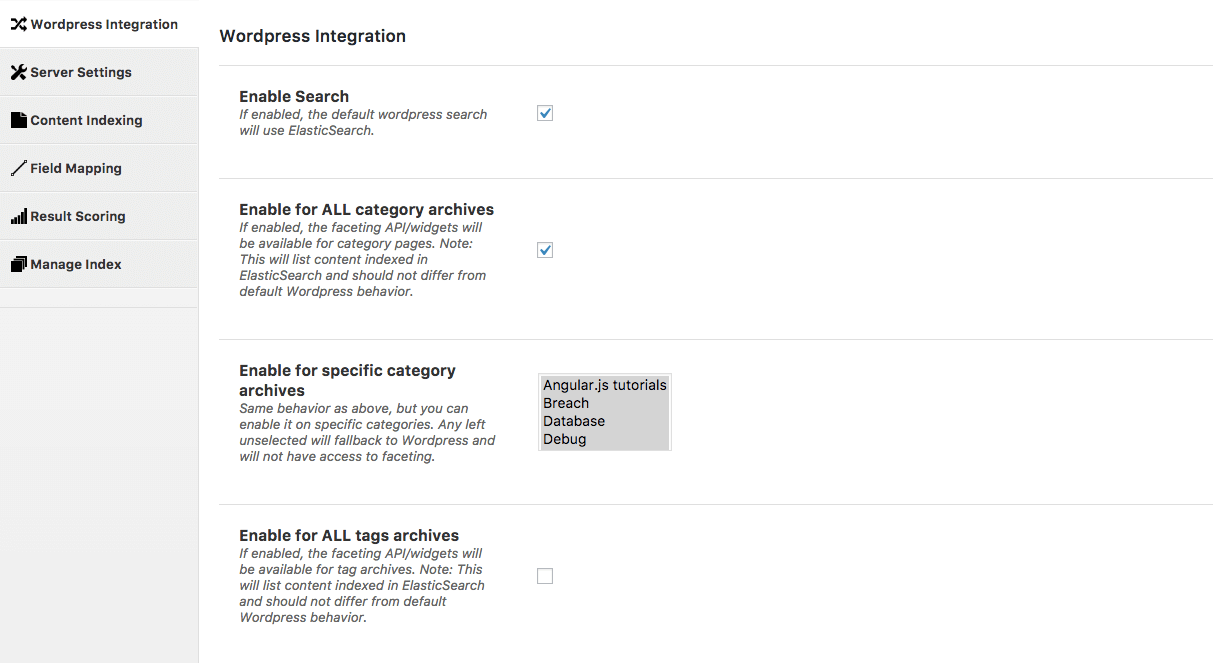
WordPress Integration
In this section, we can enable/disable ElasticSearch to be used in WordPress and also choose which categories we would like to Index in the ElasticSearch.
Content Indexing
In this section, you can choose which fields you want to Index on ElasticSearch. I would recommend at least following 3 fields.
- post_content
- post_title
- post_type
Results Scoring
In this section, we configure the scoring of the result. ElasticSearch uses scoring ( Numeric precedence ) to filter out the results. Here is the screenshot of my result scoring.
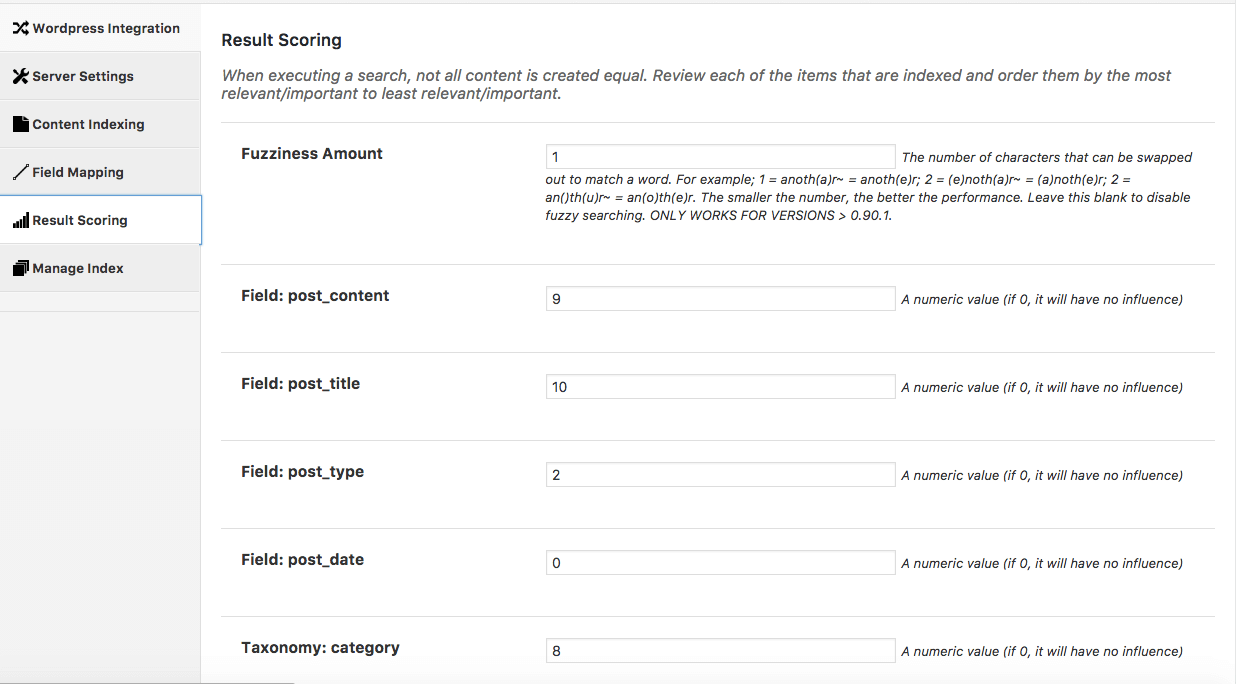
Fuzziness Amount refers to the number of characters can be swap out to match words. For example: If I searched for Nods, then Noda is still consider a match: Nod(e)->Nod(a).
The smaller the number, the better the performance. Don’t set this too high.
I gave precedance to post_title more than post_content. This means that when you search something and ElasticSearch found it’s match, it will look to title of the post first followed by content.
Manage Index
This is the most important section. Here we will do the Indexing of the current WordPress posts to ElasticSearch. Click on ‘Re-Index Data’ button everytime you make any change in scoring or fields mapping.
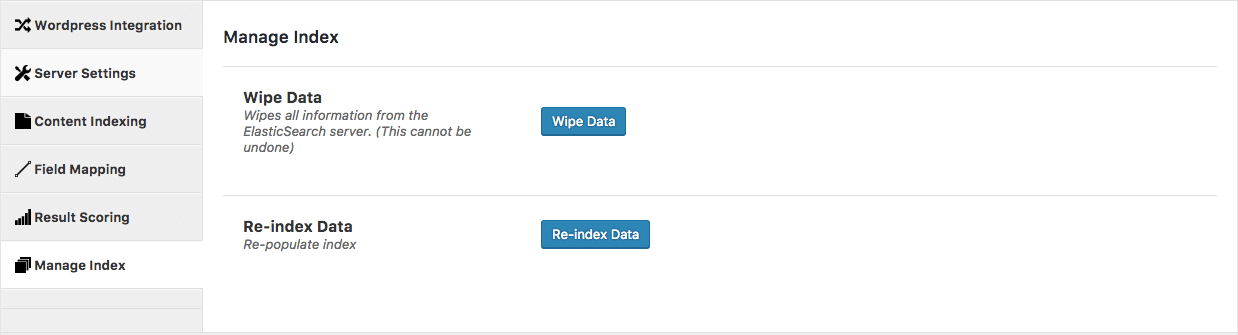
For the first time, it will index all of your WordPress data in ElasticSearch. This plugin will also take care of the ongoing indexing of data, such as new post is published or deleted then ElasticSearch will be notified about those changes.
Now go ahead and make some search, to know the exact difference, disable the plugin and search something with spelling mistakes or fuzzy keyword. Record the result and then activate the plugin and do the same search. You will notice the result difference.
Conclusion
We made WordPress search more accurate and relevant using these simple steps. I recommend every blogger/marketer who is willing to improve their Website search, give ElasticSearch a shot.