New to Rust? Grab our free Rust for Beginners eBook Get it free →
How to Build REST API using Python Django framework
Django REST framework is a powerful and robust toolkit that helps to build Web APIs easily. Django REST Framework is like a wrapper over the default Django Framework. Today we will learn about Django REST API. Now the question comes what is REST API and why do we need them as we already have a website and database running. So let’s understand it first. API stands for Application Programming Interface.
Application is anything which you scroll or handle on your mobile like games, social media apps, etc.
Programming is the logical instructions or code of how apps will work or respond to different user queries.
The interface is a point where two different programs or apps interact with each other.
Any API that uses REST framework architecture is REST API. Google API, Facebook, and Twitter API are REST APIs. Now, what’s the need for API when we have a website and database running perfectly. Suppose you own a website and there is a traffic increase on your website. Now you want to build an app for iOS and android to handle more traffic. In that case, you need to connect to the database of your website through a mobile phone. But, these are different devices they follow different protocols for data handling so how to handle it. The answer is a common data format JSON. JSON is not device-specific. So it works on all devices. We will handle database connection and data manipulation through the JSON data format.
REST API follows the JSON data format so that data connection can be made to different devices. REST API is a set of web addresses that respond with original information, not formatted web pages. It returns JSON format data.
Now move to steps to create a REST API on Django Framework. Assuming that you have already installed python and Django framework and virtual environment. If you are looking for previous installation steps, please refer to the below links:
Python Django Framework Tutorial for Beginners – A Beginner’s Guide to start with Django
If you have Anaconda installed for python, open command prompt cmd.exe from the navigator. If not simply open the command prompt. Let’s move to steps to create a basic REST API:
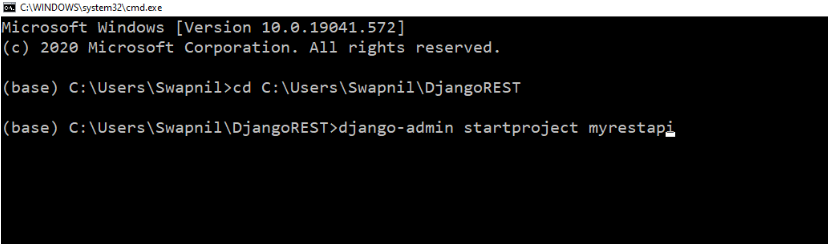
1.Creating a project folder and Starting a web app:
I have created a separate folder DjangoREST for this REST API project. You can create using mkdir command in the same folder where your python is installed. Then you have to create or start the project using djagoadmin command. I have kept the project name as myrestapi, it can be anything you want.
Now you can see the myrestapi project folder, there are many files available with the “.py” extension. You want to see a description of each file in the previous article.
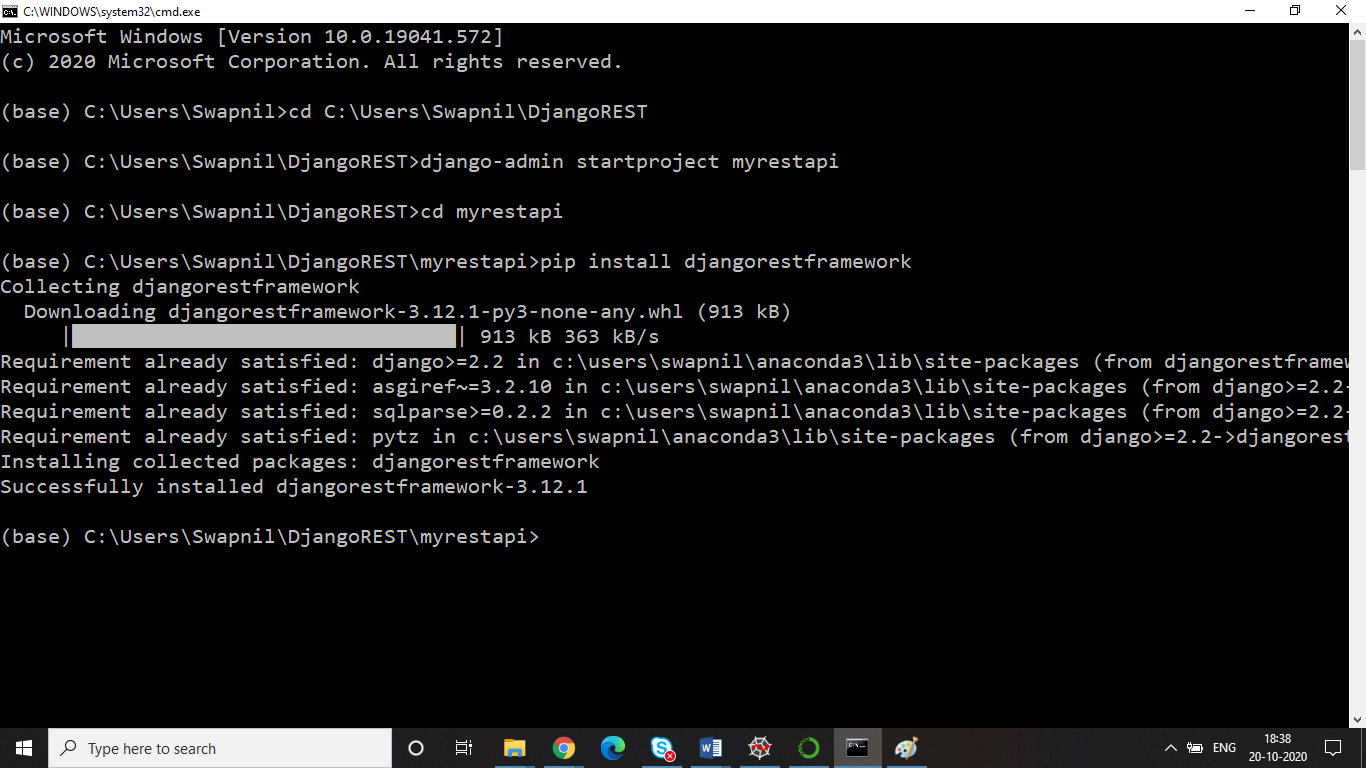
2.Installation of REST framework:
The next step is to install REST framework. You can install the REST framework using the below command.
pip install djangorestframework
3.Creating a web app folder:
Now you have to create a web app for your project. I have kept the web app name as mywebapp. However, it can be anything of your choice using the below command under folder myresapi :
python manage.py startapp mywebapp
This is going to create mywebapp folder inside myrestapi folder. Now how will Django know that it has to follow the rest framework and a new mywebapp is available? We need to tell right? so, add it under Installed_APPS in the settings.py file of myrestapi:
INSTALLED_APPS = [

    'django.contrib.admin',

    'django.contrib.auth',

    'django.contrib.contenttypes',

    'django.contrib.sessions',

    'django.contrib.messages',

    'django.contrib.staticfiles',

    'rest_framework',

    'mywebapp',

    ]
4.Creating Model and Migration:
We have to create a model of data we want. There is a file model.py under mywebapp where models will be defined. Suppose student data needs to be created so add the below code in models.py file:
from django.db import models

# Create your models here.

class student(models.Model):

	firstname=models.CharField(max_length=10)

	lastname=models.CharField(max_length=10)

	student_id=models.IntegerField()
def __str__(self): # There is double underscore both sides
return self.firstname
model and field name can be anything as per requirement. first name, last name, student id are the fields for this project. Now, this model data needs to be registered. So go to admin.py of mywebapp and add the below code:
from django.contrib import admin

from .models import student

admin.site.register(student)
Now the next step is to migrate this. The migration step will create your table with all fields you have given in the student table. Run below command on command prompt:
python manage.py makemigrations
5.Creating Superuser:
: Superuser step will create a log in password for security. This user credentials you have to enter on a localhost or web app before data manipulation. Run below command on command prompt.
python manage.py createsuperuser
Now run the server to see this screen:
python manage.py runserver
Now we are ready to have the first look at our web app so go to browser and type https://localhost:8000/admin . you will see below screen.
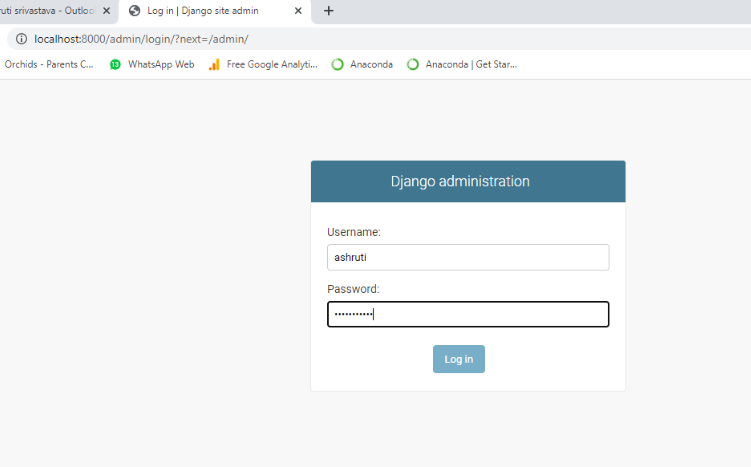
This is an admin credential which we created as a superuser for security concern. You have to log in with superuser credentials here and click on “LOG IN”. here there is no record under students as you can see on chrome. Now click on “add students” and then click on “save and add more”. Add a few records and at the end click on “Save” button.

Now, you will be able to see all records you have created. You can also edit and delete records from here itself if you want.
6.Serialization:
Model data is ready. Now we have to convert this model data to JSON format. This process is called serialization. You have to create a new file named as “serializers.py” under mywebapp with the below code:
from rest_framework import serializers

from .models import student
class studentserializer(serializers.ModelSerializer):
class Meta:
model=student
fields=('firstname','lastname')
Now go to views.py of mywebapp to write what webapp will display when called.
from django.shortcuts import render

from rest_framework.views import APIView

from rest_framework.response import Response

from rest_framework import viewsets

from rest_framework import status

from .models import student

from .serializers import studentserializer

# Create your views here.

class studentdata(APIView):
def get(self,request):
student1=student.objects.all()
serializer=studentserializer(student1,many=True)
return Response(serializer.data)
def post(self):
pass
get and post are methods to retrieve and update data . Hence we have mapped student record (student1) to student model. All() and many=True indicate to multiple records with all fields.
We have to map the URL now for this view right? So, go to myrestapi project and urls.py so that it can display views.
from django.contrib import admin

from django.urls import path

from django.conf.urls import include,url

from rest_framework.urlpatterns import format_suffix_patterns

from mywebapp import views

urlpatterns = [

    path('admin/', admin.site.urls),

    url('student/', views.studentdata.as_view()),
Here we have included the student/ URL.
Now be ready to land on our web app page (REST API) which will display student data. Go to chrome throw the URL localhost:8000/student/. You will see all the data which you entered through the admin terminal in step 4.
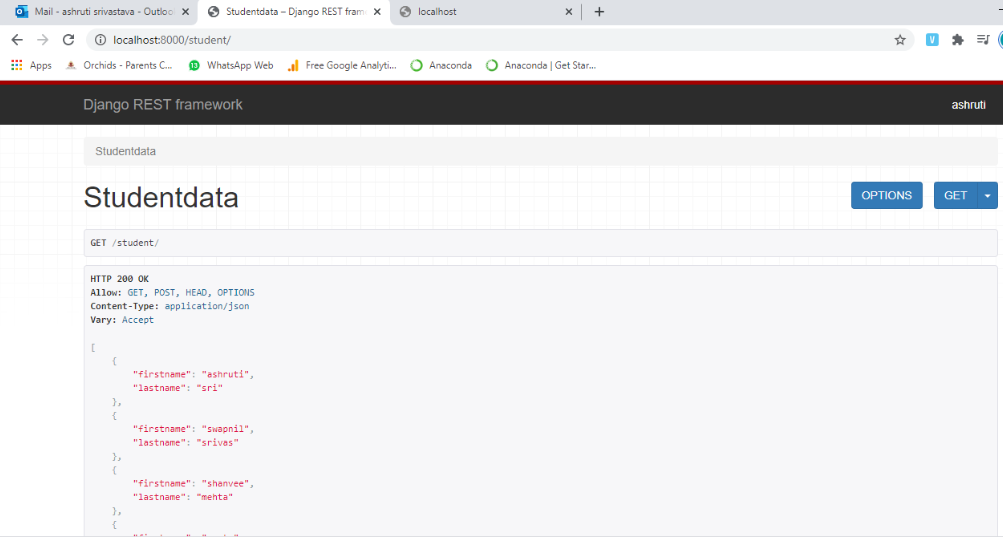
This URL localhost:8000/student/ will be used in any other devices like mobiles and iOS phones to handle data retrieval. This is how we have established a URL for our website data handling through REST API. You can change it to JSON by clicking on the GET button on chrome.
We have dealt with the get() method in this article. There are other methods available for REST API as below:
- GET — It returns some data from the REST API based on the endpoint you visit.
- POST — It creates a new record that gets appended to the database.
- PUT — It looks for a record at the given URI you provide. If it exists, it will update the existing record. If not, it will create a new record.
- DELETE — It deletes the record at the given URI.
- PATCH — It updates individual fields of a given record.
We need to write code (function body) for other methods as well if we want to perform those operations as well. These can be covered in a separate article. I hope you will enjoy this article. You need to explore more for
creating more-complex REST APIs.