
New to Rust? Grab our free Rust for Beginners eBook Get it free →
Building API Rate Limiter Using Nodejs and Redis

Let’s code an API Rate Limiter which will throttle users based on the number of the API requests they are sending to the Server.
Introduction:
Imagine you are running a service where you have allowed your customers to call the public API’s to do the certain operation in your system but due to obvious reason you don’t want them to bombard your system with so many API calls at the moment.
To add a restriction like that, we need an API rate limiter which basically allows an only certain number of API request in a given time frame. For example, 1 API per second or 100 API calls per minute etc.
System requirement:
Our API rate limiter should work in the distributed environment hence consistency must be maintained across the concurrent requests.
The API rate limiter should have configurable option to change the number of API requests allowed by the system.
How rate limiting works:
Rate limiting is a process to define the rate and level of the particular resource that can be accessed by the consumers. We use throttling to monitor the requests and allowing the requests that are valid and in throttle limit.
For example:
Throttle limit is 3 API/sec.
So whenever the incoming requests come in, we check the existing record and see if the throttle is reached.
If throttle reached we return HTTP status code 429 with the message “too many requests”.
There are three different types of throttling:
- Hard throttling: The number of requests cannot reach the limit.
- Soft throttling: The number of requests can be allowed to exceed for certain percentage when the throttle limit reached.
- Dynamic throttling: In dynamic throttling, we allow the requests even if throttle reached if the resources are free and available.
In this article, we are going to code hard throttling.
Rate limiting algorithms:
There are two types of rate limiting algorithm:
- Fixed window algorithm.
- Sliding window algorithm.
In fixed window algorithm, the time frame of the API call is fixed. Let’s try to understand it with an example, say user John sAPIted consuming API at 12:00:00 and the rate limit for him is 5 API per minute so between 12:00:00 to 12:01:00 he can make 5 request API regardless of when he started the api consumption process.
In sliding window algorithm, the window time is considered from the start time of the API call instead of the fixed start time.
We are going to develop the fixed window algorithm for our use case just to keep the logic simple and easy to understand.
High level system design
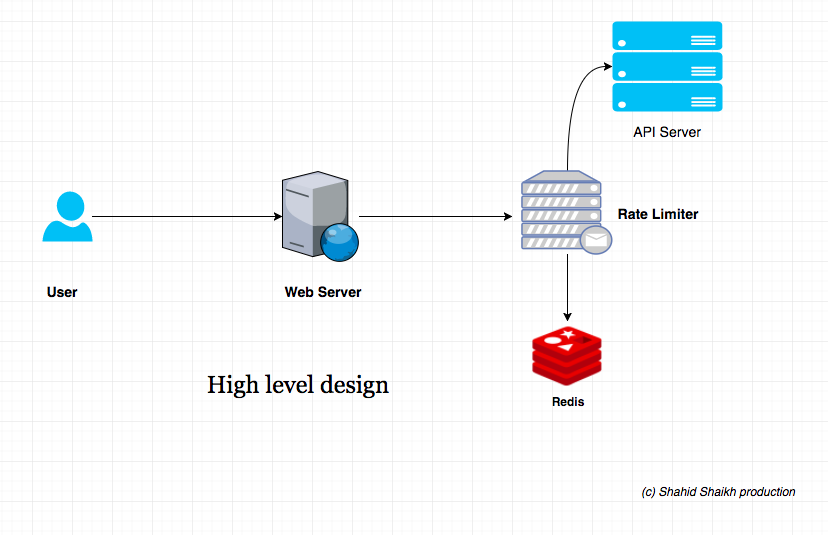
Rate Limiter will be responsible for deciding which request will be served by the API servers and which request will be declined. Once a new request arrives, Web Server first asks the Rate Limiter to decide if it will be served or throttled. If the request is not throttled, then it’ll be passed to the API servers.
Algorithm:
Here are the steps that will be required to perform the rate limiting.
Let’s say our rate limiter allowing 10 requests per minute. So whenever a new request comes in, we need to do the following:
If the ‘UserID’ is not present in the Redis, insert it and set the ‘Count’ to 1 and ‘StartTime’ to the current time in Unix format, and allow the request.
Otherwise, find the record of the ‘UserID’ and if ‘CurrentTime – StartTime >= 1 min’, set the ‘StartTime’ to the current time and ‘Count’ to 1, and allow the request.
If ‘CurrentTime – StartTime <= 1 min’ and If ‘Count < 10’, increment the Count and allow the request. If ‘Count >= 10’, reject the request with status code 429.
Looks simple right! Let’s code.
Software requirements:
You need to install the following software in your system (if not already) before heading forward, the link will take you to the respective installation page.
- Node.js
- Redis
- Postman ( or your favourite API testing tool)
- Atom (Optional, any editor would work)
Creating Node Project
Create a new folder and switch to that folder using the command line. Initiate the Node project using the following command.
npm init --y
Now, run the following command to install the dependencies required by the project.
npm i --S express redis moment
We are going to use the express module for the web server. Redis to store the rate-limiting information and moment to handle the time-related information.
Creating the Server
Here is the code piece of basic Server ready to serve API’s. We are using the express module to create the server.
app.js
const express = require('express')

const app = express()

const router = express.Router()

const rateCheck = require('./ratelimiter')
router.get('/',(req,res) => {
res.send('
API response
')
})
app.use(rateCheck)
app.use('/api',router)
app.listen(3000)
In first three lines, I have declared the dependencies and created the instance of express and express router.
In the fourth line, I have included the file called ratelimiter.js which is actually the express middleware function. I will explain more about it in a minute.
We have created a very basic API which returns the response and added the middleware before the router so that rate limiter function executes every single time an API is been called.
Let’s look at the rate limiter code piece.
Creating Rate Limiter
Here is the code piece of rate limiter.
ratelimiter.js
const redis = require('redis')

const redisClient = redis.createClient()

const moment = require('moment')
module.exports = (req,res,next) => {
redisClient.exists(req.headers.user,(err,reply) => {
if(err) {
console.log("Redis not working...")
system.exit(0)
}
if(reply === 1) {
// user exists
// check time interval
redisClient.get(req.headers.user,(err,reply) => {
let data = JSON.parse(reply)
let currentTime = moment().unix()
let difference = (currentTime - data.startTime)/60
if(difference >= 1) {
let body = {
'count': 1,
'startTime': moment().unix()
}
redisClient.set(req.headers.user,JSON.stringify(body))
// allow the request
next()
}
if(difference < 1) {
if(data.count > 3) {
return res.json({"error": 1, "message": "throttled limit exceeded..."})
}
// update the count and allow the request
data.count++
redisClient.set(req.headers.user,JSON.stringify(data))
// allow request
next()
}
})
} else {
// add new user
let body = {
'count': 1,
'startTime': moment().unix()
}
redisClient.set(req.headers.user,JSON.stringify(body))
// allow request
next()
}
})
}
Ok, let me explain.
The whole piece of code is divided into two important parts.
- If it’s the first request then add in the Redis and allow the request.
- If it’s a recurring request then check the request count and time difference and allow/disallow the request.
In first code block I am checking whether this user exists or not, if it exists then I am getting full information about the user from Redis and doing this:
Is the timestamp of the current request and timestamp of last recorded request in Redis is more than 1 minute? If so, then allow the request and reset the time in Redis.
If not, then check if the user has requested less than or equal to three requests? If it is less than three then allow the request.
If it’s more than three requests then disallow the request and return the response back.
Ok, enough talking. Let’s run the code.
Running the code
Switch to the folder of where you have placed the code using the terminal and run this command.
node app.js
And hit this API using POSTMAN or any other API simulator.
http://localhost:3000/api
Note: Make sure in headers you pass user key and some random value to it.
Or
Watch the video below to see how it works.
Summary
I hope you like this Codeforgeek pro article. This is the first entry and I am going to ship much more content like this, I am also thinking doing videos and audio on various topics.
Do let me know what you think about this article and how it can help you to decode the existing software and how they work.


