New to Rust? Grab our free Rust for Beginners eBook Get it free →
How to Send e-mail using Node.js

In this tutorial i am going to discuss about sending e-mail with Node.js. I have already covered Express.js tutorials and in this tutorial also i am going to use Express.js and NodeMailer package. In many forums and blogs people used to ask about sending e-mail’s using Node.js for account verification, password recovery and promotion. So let’s begin with tutorial and at the end you will have Node application which is able to send e-mail’s to any one’s account.
Links: Watch live Demo on YouTube here and Download it from Github here.
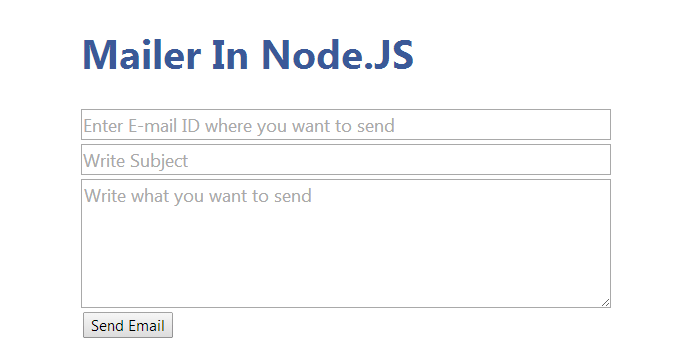
What we are Building ?
Create package.json file and keep it in any folder. Put the below code in it.
package.json
{

  "name": "email-node",

  "version": "1.0.0",

  "dependencies": {

    "nodemailer": "latest",

    "express": "latest"

  }

}
Once done. Switch to that folder using Command prompt or Terminal and type npm install. It will download and install the dependencies our project need. After completion you will able to see node_modules folder in your project directory.
Implementing Server.js:
Let’s begin with creation of our Server file. Paste code shown below in file named as “Server.js”.
Server.js
var express=require('express');

var nodemailer = require("nodemailer");

var app=express();

app.listen(3000,function(){

console.log("Express Started on Port 3000");

});
This is basic block of our app. If you run it in Terminal you will see console message. Now let’s add some routing logic to tell our app what is supposed to do when Request comes from browser. Add these code just above the app.listen line.
app.get('/',function(req,res){

res.sendfile('index.html');

});
Now when you try to open your app from browser, it will return the index.html as response. Let me show you basic snippet of HTML code.
index.html
Node.JS Email application
Mailer In Node.JS
Now next thing to do is to call our Server from HTML page when user hit on ‘Send Email’ Button. To do so at client end i am using jQuery. Here is code snippet of jQuery inside HTML page only.
index.html
Email is been sent at "+to+" . Please check inbox!
"); }
});
});
});
Notice : At $.get we are calling our app with ‘/send’ as handler so now we have to add router in our Server.js file in order to deal with this request. So let’s add some code to handle this route request. Add these code just below of app.get(‘/’) line. File name : Server.js
Server.js
app.get('/send',function(req,res){

//code to send e-mail.

//Will be shown soon.

});
Adding NodeMailer code:
Okay we are almost there, now we have to handle the Mail system. First of all we have to Define Mail transport System (SMTP) so that from that E-mail box our e-mail will be sent. For ease, you can add your Gmail account and password. Add this code just in Server.js just below the ‘var app=express()’ line.
var smtpTransport = nodemailer.createTransport({

    service: "gmail",

    host: "smtp.gmail.com",

    auth: {

        user: "",

        pass: ""

    }

});
We will use this Object to send e-mail. Our app design is when user click on ‘Send email’ Button then only e-mail should be sent, and we have did that part in “app.get(‘/send’)” router. So in that block only paste the code shown below.
var mailOptions={

   to : req.query.to,

   subject : req.query.subject,

   text : req.query.text

}

console.log(mailOptions);

smtpTransport.sendMail(mailOptions, function(error, response){

if(error){

console.log(error);

res.end("error");

}else{

console.log("Message sent: " + response.message);

res.end("sent");

}

});
In above code we have read GET variables send from HTML page and we have call “sendMail()” function using Transport object we have created above. In case there is any confusion here is a complete Server.js file.
Server.js
var express=require('express');
var nodemailer = require("nodemailer");
var app=express();
/*
Here we are configuring our SMTP Server details.
STMP is mail server which is responsible for sending and recieving email.
*/
var smtpTransport = nodemailer.createTransport({
service: "gmail",
host: "smtp.gmail.com",
auth: {
user: "",
pass: ""
}
});
/*------------------SMTP Over-----------------------------*/
/*------------------Routing Started ------------------------*/
app.get('/',function(req,res){
res.sendfile('index.html');
});
app.get('/send',function(req,res){
var mailOptions={
to : req.query.to,
subject : req.query.subject,
text : req.query.text
}
console.log(mailOptions);
smtpTransport.sendMail(mailOptions, function(error, response){
if(error){
console.log(error);
res.end("error");
}else{
console.log("Message sent: " + response.message);
res.end("sent");
}
});
});
/*--------------------Routing Over----------------------------*/
app.listen(3000,function(){
console.log("Express Started on Port 3000");
});
And this is how HTML page looks like with all styles and JS.
index.html
Mailer In Node.JS