New to Rust? Grab our free Rust for Beginners eBook Get it free →
HTML5 Push Notification System Using Nodejs MySQL Socket.io
Real-time web/mobile application is becoming popular day by day. Services like Firebase and Pusher provides API’s and Services to develop effective real-time notification system for your mobile and web apps.
We are not going to use these Services in this post; instead, we will develop an application that pops up a notification on a particular event – Say a new comment added on Post. For notification, we will use Chrome desktop notification and for real-time communication – Socket.io.
I have already covered desktop notification here and Socket.io tutorial here.
Prerequisites :
The level of the tutorial is Medium. Knowledge of Node.js and Socket.io is required.
Points to be covered :
- Installation and Setup.
- Application flow.
- Database design.
- Setting up Grunt.
- Server.
- Client.
- Socket.io integration.
- Notification integration.
- Running the app.
Installation and setup.
We need following node modules :
- socket.io
- mysql
- express
- grunt
- grunt-nodemon
- grunt-jshint
Create new package.json file and paste following code. Use npm init to create package.json file;It’s a best practice.
{

  "name": "socket-notification",

  "version": "1.0.0",

  "description": "Real time notification system using Socket.io and ExpressJS",

  "main": "./Server/",

  "scripts": {

    "start": "node ./Server/"

  },

  "author": "",

  "license": "ISC",

  "dependencies": {

    "express": "^4.13.3",

    "socket.io": "^1.3.6",

    "mysql": "~2.9.0"

  },

  "devDependencies": {

    "grunt": "^0.4.5",

    "grunt-contrib-jshint": "^0.11.3",

    "grunt-nodemon": "^0.4.0"

  }

}
Install dependencies using
npm install
Directory setup.
--- Server

   + -- index.js

   + -- db.js

--- Routes

   + -- index.js

--- Client

   + -- index.html

--- node_modules

--- package.json

--- GruntFile.js
Application Flow :
To keep the demo simple, I have one constant status in the database and the user will add a comment on that. As soon as someone posted a comment all users except the one who has made the comment will receive a desktop notification immediately.
Socket.io will be responsible for detecting events and information back-end as well as a client about the same.
Database design :
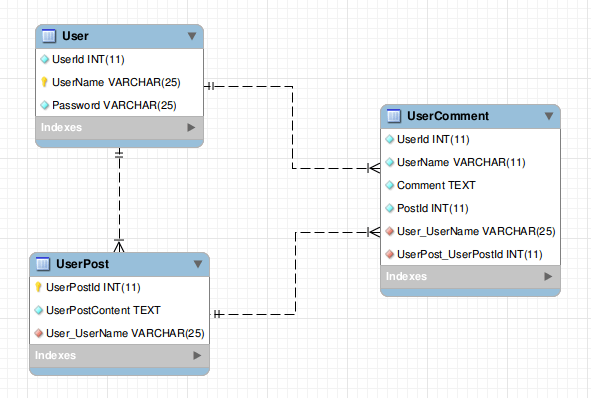
The database is in MySQL and it’s quite simple; It contains 3 tables and they store Status, User, and Comment information. A comment is linked to the User table with a foreign key. The status table linked to the User table too with a foreign key so that we ensure only registered Users can add Status and Comments.
Here is the Database schema. ( SQL file is provided with Source code. )
Open PHPMyAdmin and create new Database name as socketDemo and then import the SQL file provided in Source code. This will create tables and add data needed to run the application.
Setting up Grunt.
Grunt is one of the popular task runner modules used for running various tasks ( Code quality checking, uglify, etc ) before starting the Node Server. This makes sure your code passes various tasks before it actually runs. Here is the following task we will run using Grunt.
- Passing code to JsHint to check quality.
- Running the app using NodeMon.
To read more about Nodemon click here.
You need to install Grunt globally before using it. Here is a command to install it.
sudo npm install grunt-cli -g
Once installed, create GruntFile.js in the project main directory ( Assuming you have installed all modules mentioned above ) and paste the following code.
module.exports = function(grunt) {

    grunt.initConfig({

        pkg : grunt.file.readJSON('package.json'),

        jshint : {

            myFiles : ['./Server//*.js','./Routes//*.js']

        },

        nodemon : {

            script : './Server/'

        }

    });

    grunt.loadNpmTasks('grunt-contrib-jshint');

    grunt.loadNpmTasks('grunt-nodemon');

    grunt.registerTask('default', ['jshint','nodemon']);

};
We have everything ready. Let’s create our Server.
Server.
We are using Express to create a Web Server for us. Here is our Server code stored in Index.js.
var express = require('express');

var app     = express();

var path    = require("path");

var mysql   = require("mysql");

var http    = require('http').Server(app);

var io      = require('socket.io')(http);

var router  = express.Router();
/* Creating POOL MySQL connection.*/
var pool = mysql.createPool({
connectionLimit : 100,
host : 'localhost',
user : 'root',
password : '',
database : 'socketDemo',
debug : false
});
// Require Database operation and router files.
var db = require("./db");
var routes = require("../Routes/")(router,mysql,pool);
app.use('/',router);
http.listen(3000,function(){
console.log("Listening on 3000");
});
Run the app by using following command.
grunt
Here is our router file.
var path = require("path");

module.exports = function(router,mysql,pool){
router.get('/',function(req,res){
res.sendFile(path.join(__dirname,'../Client','/index.html'));
});
router.get('/getStatus',function(req,res){
pool.getConnection(function(err,connection){
if (err) {
connection.release();
return res.json({"error" : true,"message" : "Error in database."});
} else {
var sqlQuery = "SELECT * FROM ??";
var inserts = ["UserPost"];
sqlQuery = mysql.format(sqlQuery,inserts);
connection.query(sqlQuery,function(err,rows){
connection.release();
if (err) {
return res.json({
"error" : true,
"message" : "Error in database."
});
} else {
res.json({"error" : false,"message" : rows});
}
});
}
connection.on('error', function(err) {
return res.json({"error" : true,"message" : "Error in database."});
});
});
});
}
Client.
Here is our view part. I have not used any fancy CSS here and I am using jQuery to do ajax calls.
This is the basic view. We will add ajax calls, sockets, and notifications in the next section.
Socket.io integration.
We have our Server and Client ready. Let’s add Socket support. In Server.js file, we have required socket in io variable. Let’s use it to develop our simple socket handler.
First of all we need to recognise Is the user connected ? This code will do.
io.on('connection',function(socket){

// This event will trigger when any user is connected.

// You can use 'socket' to emit and receive events.

});
The next step is we need to detect whether a particular event happened or not? In our case, **”did someone added a comment ?” **.
Let’s name this event as “comment added”, so in order to listen to this in the back-end, you need to use the following code.
io.on('connection',function(socket){

// This event will trigger when any user is connected.

// You can use 'socket' to emit and receive events.

socket.on('commend added',function(data){

// When any connected client emit this event, we will receive it here.

});

});
In order to generate any event, we can use .emit() function and if you want to emit an event to broadcast it to everyone but not the one who has generated you need to use the following code.
io.on('connection',function(socket){

// This event will trigger when any user is connected.

// You can use 'socket' to emit and receive events.

socket.on('commend added',function(data){

// When any connected client emit this event, we will receive it here.

io.emit('something happend'); // for all.

socket.broadcast.emit('something happend'); // for all except me.

});

});
Here is the updated Server code.
var express = require('express');

var app     = express();

var path    = require("path");

var mysql   = require("mysql");

var http    = require('http').Server(app);

var io      = require('socket.io')(http);

var router  = express.Router();
/* Creating POOL MySQL connection.*/
var pool = mysql.createPool({
connectionLimit : 100,
host : 'localhost',
user : 'root',
password : '',
database : 'socketDemo',
debug : false
});
var db = require("./db");
var routes = require("../Routes/")(router,mysql,pool);
app.use('/',router);
http.listen(3000,function(){
console.log("Listening on 3000");
});
// Handle socket operation.
// On any connection listen for events.
io.on('connection',function(socket){
console.log('We have a user connected !');
// This event will be emitted from Client when some one add comments.
socket.on('comment added',function(data){
// Add the comment in database.
db.addComment(data.user,data.comment,mysql,pool,function(error,result){
if (error) {
io.emit('error');
} else {
// On successful addition, emit event for client.
socket.broadcast.emit("notify everyone",{user : data.user,comment : data.comment});
}
});
});
});
Here is the db.js file with addComment function.
var addComment = function(user,comment,mysql,pool,callback) {

	var self = this;

	pool.getConnection(function(err,connection){

		if (err) {

			connection.release();

			return callback(true,null);

		} else {

			var sqlQuery = "INSERT into ?? (??,??,??) VALUES ((SELECT ?? FROM ?? WHERE ?? = ?),?,?)";

			var inserts =["UserComment","UserId","UserName",

                                     "Comment","UserId","User","UserName",

                                      user,user,comment];

			sqlQuery = mysql.format(sqlQuery,inserts);

			connection.query(sqlQuery,function(err,rows){

				connection.release();

				if (err) {

					return callback(true,null);

				} else {

					callback(false,"comment added");

				}

			});

		}

		connection.on('error', function(err) {

			return callback(true,null);

        });

	});

};
module.exports.addComment = addComment;
In above code, we are adding into the UserComment table and selecting the name of user from User table.
Here is the client-side code.
Notification integration.
You can see the function notifyMe() that will generate the notification window. I have explained the code in detail here.
// Let's check if the browser supports notifications

if (!("Notification" in window)) {

  alert("This browser does not support desktop notification");

}

// Let's check if the user is okay to get some notification

else if (Notification.permission === "granted") {

  // If it's okay let's create a notification

var options = {

      body: message,

      dir : "ltr"

  };

var notification = new Notification(user + " Posted a comment",options);

}

// Otherwise, we need to ask the user for permission

// Note, Chrome does not implement the permission static property

// So we have to check for NOT 'denied' instead of 'default'

else if (Notification.permission !== 'denied') {

  Notification.requestPermission(function (permission) {

    // Whatever the user answers, we make sure we store the information

    if (!('permission' in Notification)) {

      Notification.permission = permission;

    }

    // If the user is okay, let's create a notification

    if (permission === "granted") {

      var options = {

              body: message,

              dir : "ltr"

      };

      var notification = new Notification(user + " Posted a comment",options);

    }

  });

}

// At last, if the user already denied any notification, and you

// want to be respectful there is no need to bother them anymore.

}
Here is a complete client-side code.
Running the app.
Make sure you have configured the database. Open up your terminal and move to the project directory and type
grunt to run the app.
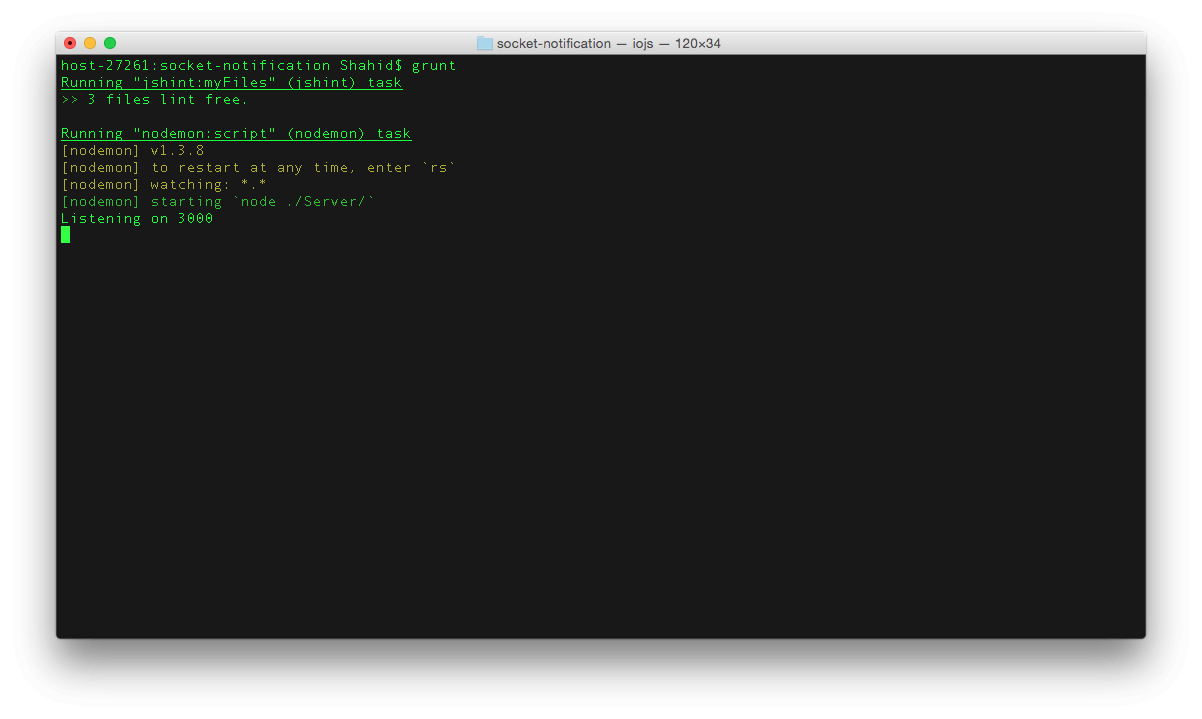
Now open two browser windows and navigate to localhost:3000 to view the app.
Type user name as Shahid and add the proper comment. Upon submitting you should see the notification generated on a second user browser window.
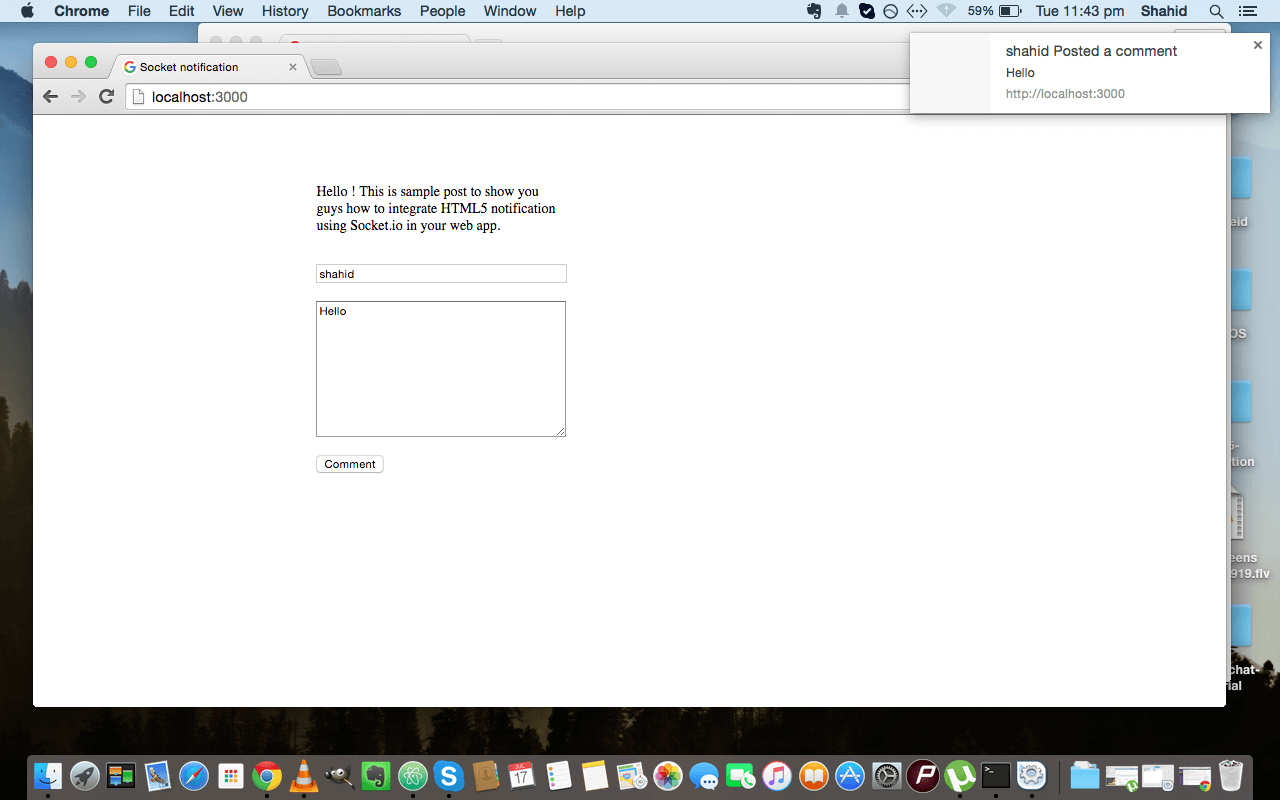
You can add more user by inserting data in User table.
Further study
- Node.js MySQL Tutorial
- Getting Started With Worker Thread in NodeJS
- Synchronization between mysql and IndexedDB
- 10 things you should do while running Node.js in production
Conclusion :
Real-time notifications are a catchy part of any web application. There are other Services like Pusher which provides push-notification to both browser and mobile apps. We will cover them in coming posts.

