New to Rust? Grab our free Rust for Beginners eBook Get it free →
How to Read a Local Text File in JavaScript: JS FileReader Methods with Code Examples

Web apps cannot directly access a file path on the local machine for security reasons, so developers rely on web APIs like FileReader or Node.js fs functions when reading files from disk.
To read local files, we can use the HTML file input and JavaScript FileReader API. Using this we can also read text documents, images, or other data that a user uploads. The FileReader object allows us to read the contents of these files without blocking the web page, making the process smooth and efficient.
Getting Started
To read a local file in a browser, we will need two main things:
- HTML File Input: This is how the user selects a file. We can do this using the <input> element with type=”file”. This creates a button that allows users to browse and pick a file.
<input type="file" id="fileInput" />
- JavaScript FileReader API: The FileReader API lets us read the contents of the selected file. Once a file is chosen through the input, JavaScript can use FileReader to process and access its contents asynchronously (without slowing down the page).
Do you know how you can add text to an image in JavaScript? Click here to learn!
FileReader Methods
The FileReader API has four main methods to read the content of a file.
1. readAsText()
This method reads the file as plain text, such as .txt or.csv files. It is used to display the text content of a file in a web app.
Syntax:
reader.readAsText(file);
Example:
<!DOCTYPE html>
<html lang="en">
<head>
    <meta charset="UTF-8">
    <meta name="viewport" content="width=device-width, initial-scale=1.0">
    <title>readAsText Example</title>
</head>
<body>

    <input type="file" id="fileInput">
    <p id="output"></p>

    <script>
        const fileInput = document.getElementById('fileInput');
        const output = document.getElementById('output');

        fileInput.addEventListener('change', function() {
            const file = fileInput.files[0]; // Get the selected file
            if (file) {
                const reader = new FileReader();// create object

                reader.onload = function(e) {
                    output.textContent = e.target.result; // Display the file content
                };

                reader.readAsText(file); // Read the file as text
            }
        });
    </script>

</body>
</html>
Explanation:
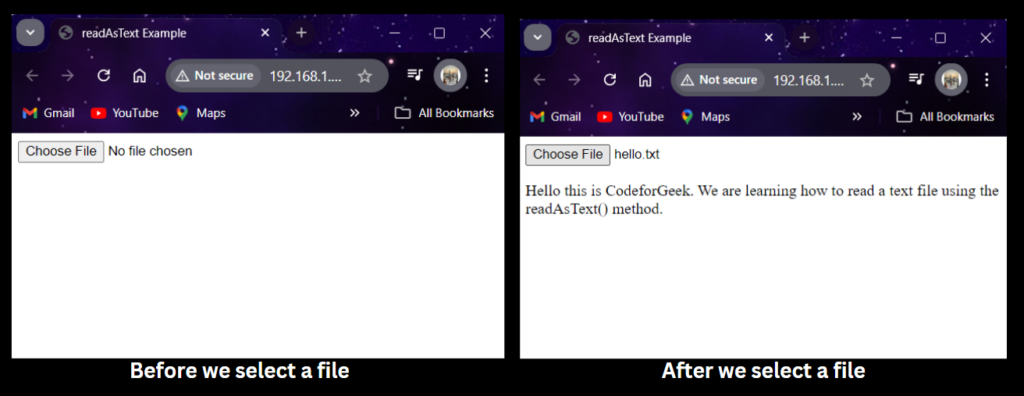
- This code allows the user to select a text file.
- When the file is selected, reader.readAsText() reads the file as a string.
- The file’s text content is displayed inside the <p> element, showing how a simple script can read a txt file and output the result, much like you’d run JavaScript with Node.js on your computer.
Output:
2. readAsDataURL()
This method reads the file and encodes it as a Base64 string (data URL). That means we convert binary data (like an image or file content) into a text string that can be safely transmitted over the web. This helps to display an image file that the user uploads.
Syntax:
reader.readAsDataURL(file);
Example:
<!DOCTYPE html>
<html lang="en">
<head>
    <meta charset="UTF-8">
    <meta name="viewport" content="width=device-width, initial-scale=1.0">
    <title>readAsDataURL Example</title>
</head>
<body>

    <input type="file" id="fileInput">
    <img id="output" alt="Image Preview" style="max-width: 300px;">

    <script>
        const fileInput = document.getElementById('fileInput');
        const output = document.getElementById('output');

        fileInput.addEventListener('change', function() {
            const file = fileInput.files[0]; // Get the selected file
            if (file) {
                const reader = new FileReader();

                reader.onload = function(e) {
                    output.src = e.target.result; // Set the image source to the Base64 Data URL
                };

                reader.readAsDataURL(file); // Read the file as Data URL
            }
        });
    </script>

</body>
</html>
Explanation:
- The user selects an image file, which is read as a Base64-encoded Data URL using FileReader.readAsDataURL().
- The image is previewed by setting the <img> src attribute to the Data URL.
Output:

3. readAsArrayBuffer()
This method reads the file into a binary ArrayBuffer. It is great for reading files like images and videos in a web application, and this method is similar to how you might use Node.js with the fs module on your local machine.
Syntax:
reader.readAsArrayBuffer(file);
Example:
<!DOCTYPE html>
<html lang="en">
<head>
    <meta charset="UTF-8">
    <meta name="viewport" content="width=device-width, initial-scale=1.0">
    <title>readAsArrayBuffer Example</title>
</head>
<body>

    <input type="file" id="fileInput">
    <p id="output"></p>

    <script>
        const fileInput = document.getElementById('fileInput');
        const output = document.getElementById('output');

        fileInput.addEventListener('change', function() {
            const file = fileInput.files[0]; // Get the selected file
            if (file) {
                const reader = new FileReader();

                reader.onload = function(e) {
                    const arrayBuffer = e.target.result; // Get the ArrayBuffer
                    output.textContent = `ArrayBuffer length: ${arrayBuffer.byteLength}`;
                };

                reader.readAsArrayBuffer(file); // Read the file as ArrayBuffer
            }
        });
    </script>

</body>
</html>
Explanation:
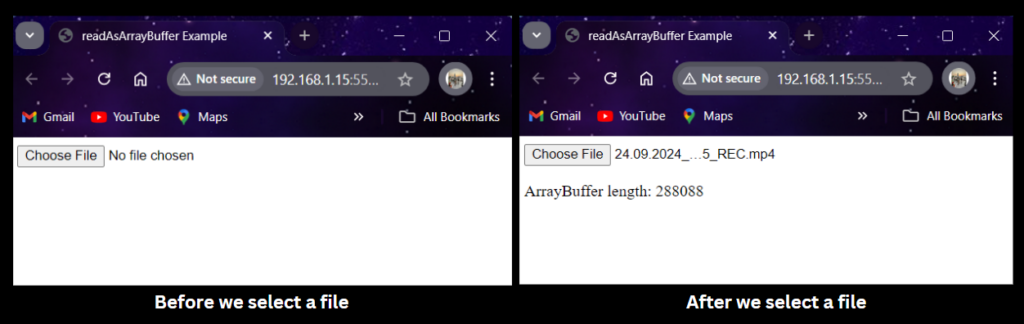
- When we select a file, readAsArrayBuffer() reads it as an ArrayBuffer.
- The length of the ArrayBuffer is displayed, which is useful for understanding the size of binary data.
- We can later manipulate this binary data depending on the type of file.
Output:
4. readAsBinaryString()
This method is deprecated but still supported in some browsers. It is used for handling binary format but is replaced by readAsArrayBuffer().
Syntax:
reader.readAsBinaryString(file);
Example:
<!DOCTYPE html>
<html lang="en">
<head>
    <meta charset="UTF-8">
    <meta name="viewport" content="width=device-width, initial-scale=1.0">
    <title>readAsBinaryString Example</title>
</head>
<body>

    <input type="file" id="fileInput">
    <p id="output"></p>

    <script>
        const fileInput = document.getElementById('fileInput');
        const output = document.getElementById('output');

        fileInput.addEventListener('change', function() {
            const file = fileInput.files[0]; // Get the selected file
            if (file) {
                const reader = new FileReader();

                reader.onload = function(e) {
                    const binaryString = e.target.result; // Get the binary string
                    output.textContent = `Binary String Length: ${binaryString.length}`;
                };

                reader.readAsBinaryString(file); // Read the file as binary string
            }
        });
    </script>

</body>
</html>
Explanation:
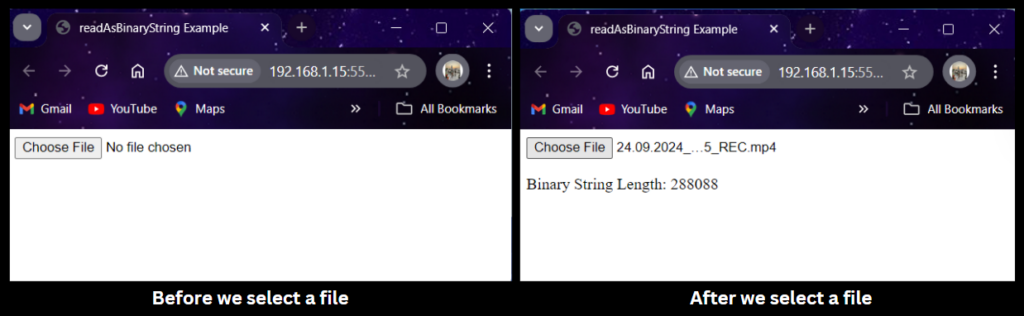
The file is read as a binary string using the method readAsBinaryString(), showing how functions return raw data, which you can later specify encoding like UTF8 when working with the Node.js file system.
Note: This method is deprecated, and it’s recommended to use readAsArrayBuffer for binary data handling, but if you create Node.js programs you may instead use fs.readFile to run JavaScript on your local machine.
Output:
Final Thoughts on Reading Files in JavaScript
- This is a simple approach to reading files in JavaScript using the FileReader API and its four methods.
- Whether you are programming in the browser or running Nodejs on your local machine, these tools let you access file content, specify arguments like encoding (UTF8), and manage memory efficiently.
- The FileReader API is a reliable library, but always check browser compatibility when using any tool across platforms to avoid runtime errors.
- In larger projects, you might also write functions that return file data, demonstrating how file system utilities are a core part of modern programming.
Reference
https://stackoverflow.com/questions/14446447/how-to-read-a-local-text-file-in-the-browser