
New to Rust? Grab our free Rust for Beginners eBook Get it free →
Ultimate Guide to Customizing Flash Messages in Nodejs with Bootstrap
This tutorial on customizing flash messages in Nodejs is a sequel to the post on getting started with using connect-flash in Nodejs to integrate flash messages into your application.
So, let us get started with where we left off in the previous part.
In the prequel, our flash message looked like this:
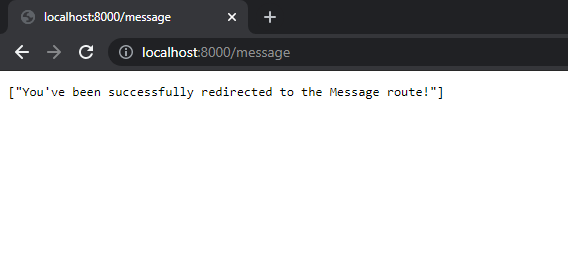
Of course, this way it looks bad. Let us now get started with customizing flash messages a little bit using Bootstrap and render an HTML template for real to make it look presentable to our users.
Getting Started with Customizing Flash Messages in Nodejs
So, for this tutorial, I will be using the Bootstrap library to stylize my application. Although you could take the help of EJS and create boilerplate templates for your Nodejs application, I will stick to manually inserting my Bootstrap code for now.
However, on a bigger real-world application, it is recommended you create boilerplate templates for your webpages for repetitive pieces of HTML code.
Importing the Bootstrap CSS and JavaScript Libraries
Coming back to using Bootstrap to help in customizing flash messages, let us get started by first importing the popular BS library in the message template.
Make sure you have created a ‘views’ directory in your project and inside it, created a ‘message.ejs’ HTML template.
So, this is what my message.ejs looks like after importing the Bootstrap CSS and JS library:

Here’s the HTML snippet for the same.
<code><!DOCTYPE html>
<html lang="en">

<head>
    <meta charset="UTF-8">
    <meta http-equiv="X-UA-Compatible" content="IE=edge">
    <meta name="viewport" content="width=device-width, initial-scale=1.0">
    <!-- CSS only -->
    <link href="https://cdn.jsdelivr.net/npm/[email protected]/dist/css/bootstrap.min.css" rel="stylesheet"
        integrity="sha384-BmbxuPwQa2lc/FVzBcNJ7UAyJxM6wuqIj61tLrc4wSX0szH/Ev+nYRRuWlolflfl" crossorigin="anonymous">
    <title>Message Route</title>

</head>

<body>
    <h1>This is the Message Route</h1>

    <!-- JavaScript Bundle with Popper -->
    <script src="https://cdn.jsdelivr.net/npm/[email protected]/dist/js/bootstrap.bundle.min.js"
        integrity="sha384-b5kHyXgcpbZJO/tY9Ul7kGkf1S0CWuKcCD38l8YkeH8z8QjE0GmW1gYU5S9FOnJ0"
        crossorigin="anonymous"></script>

</body>

</html>
</code>
Creating Templates in EJS for Custom Flash Message Types/Variables
Practically, we cannot keep customizing flash messages of the same type every time we want to render them. This is when it is recommended to use the Partials feature from EJS and create templates for specific types of our flash messages in Nodejs which we are likely to use a couple of times across our application.
To do this, create a ‘partials’ directory in the ‘views’ directory. Next, create a file named flash.ejs inside the directory. This is where we will be creating templates for our commonly used flash message types from now on.
I want to create a custom template for the ‘success’ and ‘error’ types of flash messages in Nodejs. You may choose to create for ‘info’, ‘warning’, ‘alert’, or anything you prefer.
<% if(success && success.length) {%>
    <div class="alert alert-success alert-dismissible fade show" role="alert">
        <%= success %>
            <button type="button" class="btn-close" data-bs-dismiss="alert" aria-label="Close"></button>
    </div>
    <% } %>

        <% if(error && error.length) {%>
            <div class="alert alert-danger alert-dismissible fade show" role="alert">
                <%= error %>
                    <button type="button" class="btn-close" data-bs-dismiss="alert" aria-label="Close"></button>
            </div>
            <% } %>
I have used the different dismissible Alert components provided by Bootstrap and taken the help of EJS to write some conditionals in my HTML.
Fixing the Server Side of Things
Well, our code will still not run yet at this point. Of course, I haven’t yet set up my HTML template completely; but there’s a more important reason behind this. If at this point if I am going to start my server and run my app, it is going to show me an error.
So, what’s the problem? What is up with all this chaos and drama? Well, let me point it out for you. At this point, the ‘success’ and ‘error’ flash message types or variables so to say, are not available everywhere across the application.
As the reason, EJS will not be able to recognize them. These variables must be available in the res.locals object for EJS to recognize and eventually, render them. Let us configure our app.js to achieve this:
app.use((req, res, next) => {
    res.locals.success = req.flash('success');
    res.locals.error = req.flash('error');
    next();
});
Here, we are using Express middleware so that both req.flash(‘success’) and req.flash(‘error’) are available everywhere across our application.
Stylizing Message Template using Bootstrap
Now that we have imported Bootstrap, set up our Partials, and fixed our backend, we can now happily move forward onto stylizing our HTML template and render our webpage in a better way!
<!DOCTYPE html>
<html lang="en">

<head>
    <meta charset="UTF-8">
    <meta http-equiv="X-UA-Compatible" content="IE=edge">
    <meta name="viewport" content="width=device-width, initial-scale=1.0">
    <!-- CSS only -->
    <link href="https://cdn.jsdelivr.net/npm/[email protected]/dist/css/bootstrap.min.css" rel="stylesheet"
        integrity="sha384-BmbxuPwQa2lc/FVzBcNJ7UAyJxM6wuqIj61tLrc4wSX0szH/Ev+nYRRuWlolflfl" crossorigin="anonymous">
    <title>Message Route</title>

</head>

<body class="container py-5 mt-4">
    <%- include('./partials/flash') %>
        <h1>This is the Message Route</h1>

        <!-- JavaScript Bundle with Popper -->
        <script src="https://cdn.jsdelivr.net/npm/[email protected]/dist/js/bootstrap.bundle.min.js"
            integrity="sha384-b5kHyXgcpbZJO/tY9Ul7kGkf1S0CWuKcCD38l8YkeH8z8QjE0GmW1gYU5S9FOnJ0"
            crossorigin="anonymous"></script>

</body>

</html>
Notice I have imported my flash.ejs partial using the include attribute by EJS. You must have also noticed a change in the EJS bracket type, known as the EJS Output Escaped Tag used for importing HTML code.
Speaking of which makes me wonder why I haven’t yet explained the EJS tags to you all, hmm…
Okay so let’s run our app and test our newly customized flash message. I am using the Nodemon package from NPM however you can simply stick to the default node command.
nodemon app.js
Viola! Here’s our customized flash message up and running 😍!
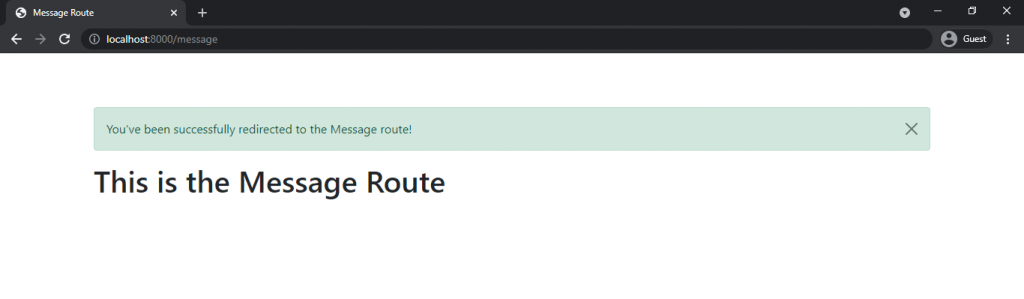
This way you can get going with customizing flash messages in your stunning Nodejs applications! Hope you liked the tutorial.
Conclusion
This tutorial on customizing flash messages in Nodejs is a sequel to the post on getting started with using connect-flash in Nodejs to integrate flash messages into your application.
Stay tuned for more awesome tutorials like this!
Noteworthy References


