
New to Rust? Grab our free Rust for Beginners eBook Get it free →
Linux user creation with useradd: Every option explained


User creation in Linux is one of the first things you learn as a system administrator, and the useradd command is the most common way to do it. This command adds a new user to the system and can create their home directory, assign a login shell and set group membership in a single line. In this article, we walk through the useradd command in detail and cover every option you will actually use when managing accounts on a Linux server.
useradd vs adduser: What’s the difference
Before running any command, it helps to know that Linux actually ships two different tools for creating accounts, and they don’t behave the same way everywhere.
useradd is a low level binary available on every distribution. It does exactly what you tell it to through flags and nothing more, which makes it predictable for scripts but a little bare for a human typing at a prompt.
adduser is a friendlier wrapper found on Debian, Ubuntu and their derivatives (Mint, Pop!_OS, elementary OS). Instead of flags, it walks you through a short interactive install wizard, asking for a password, full name and other optional details, then creates the home directory and copies default files automatically.
The distinction matters most when you cross distributions. On Ubuntu and Debian, reach for adduser for everyday account creation, since it handles the home directory and password in one guided flow:
sudo adduser jane
On RHEL, Rocky Linux, CentOS and Fedora, adduser is usually just a symlink to useradd under the hood, so it skips the interactive prompts and behaves like the plain command below. On these distributions useradd is genuinely the standard tool, and it already creates a home directory by default (unlike on Debian based systems, where you need the -m flag, covered next).
sudo useradd jane
sudo passwd jane
Scripts, configuration management tools (Ansible, Puppet) and automated provisioning almost always use useradd, since it is non-interactive and behaves the same way across distributions once you pass the right flags. Keep that split in mind as you read the rest of this guide: everything below uses useradd, which works everywhere, but on a Debian based desktop or server you may find adduser faster for one-off accounts.
Create a user in Linux with useradd
To use the useradd command, you must be logged in as root or have sudo privileges. Then, you can run the following command to add a new user:
useradd [username]
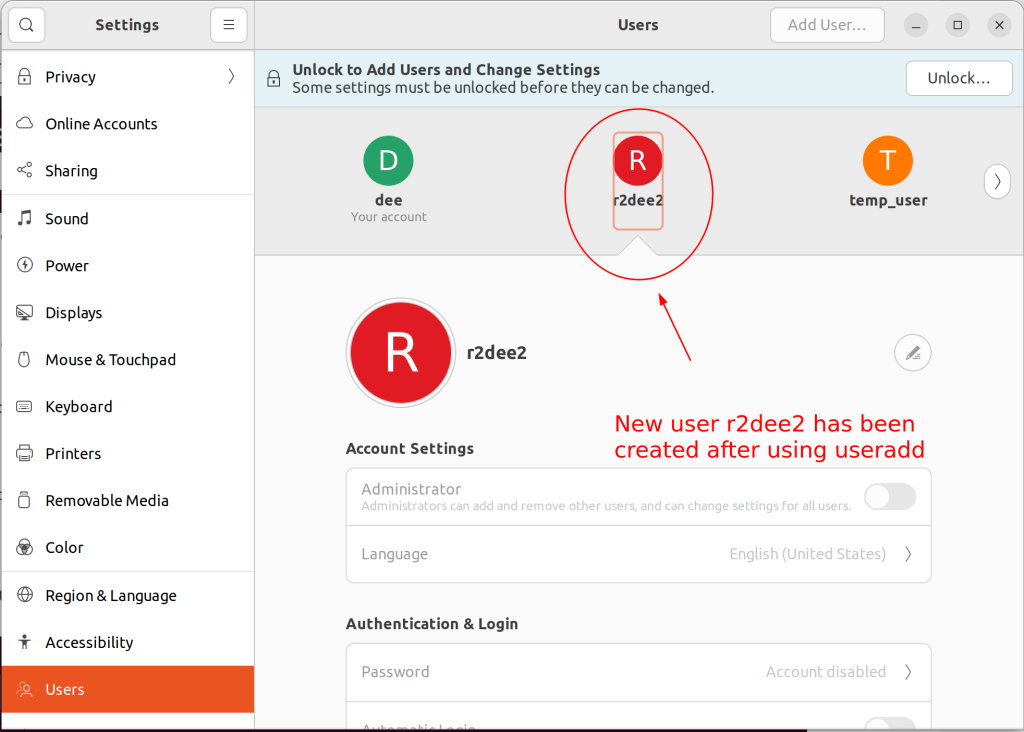
Substitute [username] with the name of the user you want to add. For example, this command would add a new user named r2dee2:
useradd r2dee2
This command will create r2dee2’s home directory at /home/r2dee2/. It will also assign the user to the default group for new users (usually Users).
You can view all of the available options for this command by running man useradd.

Creating a user with a home directory (the -m flag)
On Debian and Ubuntu, plain useradd does not create a home directory unless you tell it to. That surprises a lot of people coming from RHEL, where useradd creates one automatically. The fix is the -m (or --create-home) flag, which also copies the default dotfiles from /etc/skel into the new directory so the account starts with a working .bashrc and .profile.
sudo useradd -m raptor
After running this, /home/raptor exists and already contains the standard shell startup files, so the user can log in and get a working prompt right away instead of an empty home directory. If you forget the -m flag on a Debian based system, the account is still created and can still log in, but there is no home directory until you create one by hand or rerun the command correctly.
Add a new group using he useradd command
You can add groups just like you add users but, instead of the useradd command, we use groupadd. For example, to create a new group called managers, you would type:
sudo groupadd managers

Creating users with a custom home directory
By default, the useradd command will create the user’s home directory at /home/[username].
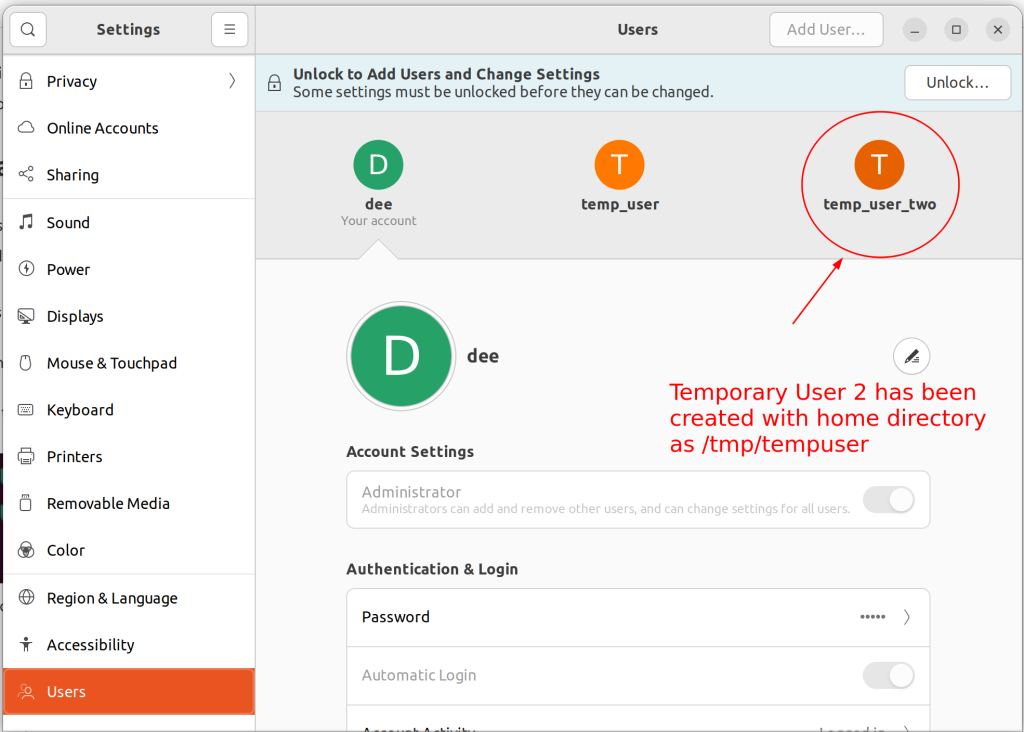
If you want to specify a different location for the user’s home directory, you can use the -d option. For example, this command will create a new user named John with his home directory at /tmp/tempuser:
useradd -d /tmp/tempuser temp_user_two
Keep in mind that you must create the destination directory before running this command. Otherwise, the command will fail.

Creating a user with specific user ID
sudo useradd -u 1001 username
The -u option allows you to specify the user ID (UID) for the new user. This can be useful if you have a set organizational structure and want to standardize how the UIDs are set for each user. Here we can replace 1001 with any permissible UID we like. The username can be changed as per the requirement as well.

Now, let’s check the uid of the specific user, the username will be replaced with the username that exists in the system.
id -u username

Creating a group with specific group ID
Just like every user has their own unique numeric identifier (UID), every group also has its own numeric identifier called GID or Primary Group Identifier.
By default, when creating groups without explicitly assigning any particular GID, most Linux distributions assign them sequential GIDs starting from 1000.
Let’s move on ahead and see how we can add additional groups for our newly created account along with specifying custom GIDs for each group!
Every group also has a unique numeric identifier called a GID. By default, new groups are assigned the next available GID. However, you can use the -g option to specify a custom GID for a new group.
For example, this command will create a new group named developers with GID 0935:
groupadd -g 0935 extinctspecies
This is useful if you are migrating users from another system and need to preserve their existing GIDs. It can also be helpful when setting up certain applications that require specific GIDs.

Creating a user and assign multiple groups
We’ve now learned how to add groups for our newly created account along with custom values. But what if we wanted to go one step further by actually assigning multiple groups to our users?
Luckily! Linux provides us with the usermod command which makes managing groups a whole lot easier.
You can assign multiple groups to a user by using the usermod command with the -a (append) option and -G (secondary group) option followed by a comma-separated list of desired groups. For example, this command will add the dinosaur user to both the sudo and extinctspecies groups:
usermod -aG sudo,extinctspecies dinosaur

We can check what all groups a user belong to by using:
groups <username>

If you want to remove a user from one or more groups, you can use the gpasswd command with the -d (delete) option followed by the username and group name. For example, this command would remove dinosaur from the sudo group:
gpasswd --delete dinosaur sudo
Adding/removing users from additional groups might prove quite useful in multi-user environments where common tasks can be easily automated by making use of cron jobs hence every Linux power user can definitely benefit from knowing this particular technique.

Now that we have removed dinosaur from the sudo group let’s check what all group dinosaur is associated with,

Creating a user with specific login shell
Every user on a Linux system has their own personal login shell. This is the shell that is started when the user logs into the system. By default, new users are assigned the /bin/bash shell.
However, you can use the -s option to specify a different login shell for the user. For example, this command would create a new user named trex with the /bin/zsh shell:
useradd -s /bin/zsh trex
Now let’s try implementing this,

We need to check what all shells are installed in the system. You can view all of the available shells on your system by looking in the /etc/shells file.

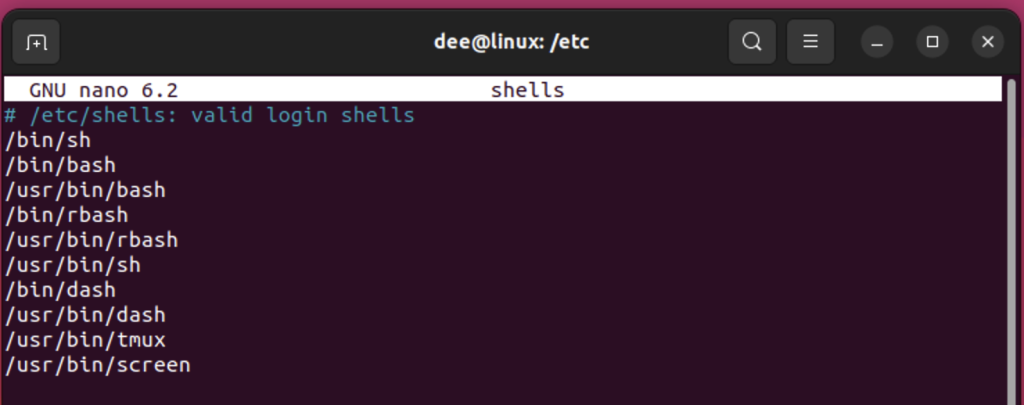
Let’s go with /bin/bash for our user trex

Creating a user with custom comments
Up until now, we’ve pretty much focused on managing regular accounts. What if we wanted to add some sort of description or “comment” associated with each individual account?
Luckily most popular Linux distributions including Ubuntu make it possible to do so using the following command:
useradd -c 'crocodile' sarcosuchus
The -c option allows you to specify a comment for the user. This is useful if you want to add additional information about the user such as their full name or job title.

Creating a user with an expiry date in Linux
It is often desirable to create a user that has a limited lifespan. This might be the case when you want to give someone temporary access to your system. To do this, you can use the -e option with the useradd command. The format for this option is:
-e YYYY-MM-DD
For example, the following command would create a user called tempuser that would expire on May 31st, 2019:
sudo useradd -e 2022-09-29 velociraptor

Creating a system user in Linux
System users are those that are used by system processes and services rather than by human beings. It is therefore important that they have very restricted permissions. To create a system user, you use the –system option with useradd like this:
sudo useradd --system dinosaur_moderator

Adding password to user in Linux
If we want our new users to actually be able to log into our system, we need to give them passwords. We can do this using the passwd command like so:
sudo passwd newusername
Once again, you will be prompted for your password and then asked twice to enter a password for your new user. Be sure not to choose something too easy!
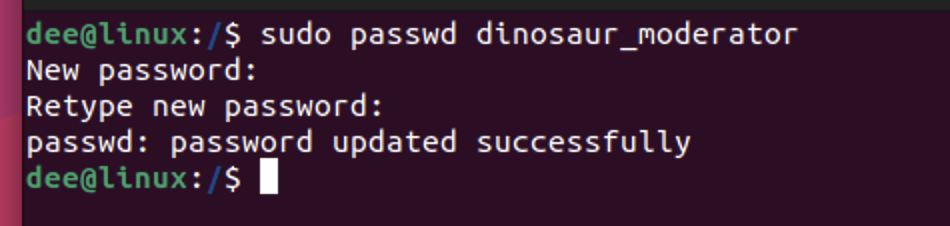
We have now added our first regular non-root user account but there’s still one more thing we should do before logging out of our root account – add our new user account to the sudo group so that it can perform administrative tasks.
We can do this with the usermod command like so:
sudo usermod -aG sudo dinosaur_moderator

Granting sudo privileges to a new user
The usermod -aG sudo command above works on Debian and Ubuntu, but the group name changes on other distributions, and there is a second way to grant access that gives you finer control. It helps to see both.
Adding the user to the sudo or wheel group
On Debian and Ubuntu, the administrative group is called sudo. On RHEL, Rocky Linux, Fedora and CentOS, the equivalent group is called wheel instead.
sudo usermod -aG wheel newadmin
Always use -aG together, since -G alone without -a replaces every existing supplementary group the user has instead of adding to them. That mistake quietly strips a user of every group they had before, so it is worth double checking the command before you run it.
Editing the sudoers file directly
If you want to grant a user access to only a few commands rather than full root access, edit /etc/sudoers with the visudo command instead of a text editor. visudo locks the file and validates the syntax before saving, which prevents a typo from locking every admin out of sudo.
sudo visudo
Add a line like the one below, replacing the username with your own, then save and exit:
newadmin ALL=(ALL:ALL) ALL
That line grants full sudo access. Restricting the last field to a single command path instead of ALL limits the user to only that command, which is a useful pattern for shared servers where you want one person to restart a service without giving them root everywhere else.
Verifying that a user was created successfully
After running useradd, it is worth confirming the account actually looks the way you expect before you hand over credentials or move on to the next step. There are three quick ways to check.
The id command shows the UID, GID and every group the user belongs to in one line:
id newusername
uid=1005(newusername) gid=1005(newusername) groups=1005(newusername),27(sudo)
You can also check the raw entry Linux stores for the user by searching /etc/passwd directly:
grep newusername /etc/passwd
newusername:x:1005:1005::/home/newusername:/bin/bash
Each field in that line, separated by colons, is the username, a placeholder for the password (which actually lives in /etc/shadow), the UID, the GID, an optional comment field, the home directory and the login shell.
Listing every user and group on the system
If you need a full picture rather than checking one account, getent reads the same underlying user database and gives you a clean list:
getent passwd | awk -F: '{ print $1 }'
Swap passwd for group to list every group instead:
getent group | awk -F: '{ print $1 }'
Delete a user
Deleting a user account is just as easy as creating one. The command to use is userdel and, again, we need to be logged in as root or have superuser privileges. The basic syntax for deleting a user account is:
sudo userdel [username]

Locking or disabling a user account instead of deleting
Deleting a user is permanent, and it is not always what you want. If someone is leaving the team temporarily, or you are investigating a compromised account and need to freeze it without destroying evidence, locking the account is the safer move.
The passwd -l option locks the password by prepending an invalid character to the password hash in /etc/shadow, which blocks password based logins immediately:
sudo passwd -l suspended_user
Reverse it with -u once the account should work again:
sudo passwd -u suspended_user
Locking the password only stops password logins though. If the user also has an SSH key set up, they can often still get in that way, so a more complete lock also changes their shell to a non-login shell:
sudo usermod -s /usr/sbin/nologin suspended_user
Reverting the shell back to /bin/bash once access should be restored undoes this second layer of the lock.
Viewing and changing the default useradd settings
Every time you run useradd without options, it fills in the gaps using defaults defined in /etc/default/useradd and /etc/login.defs. You can view the current defaults directly:
useradd -D
GROUP=100
HOME=/home
INACTIVE=-1
EXPIRE=
SHELL=/bin/sh
SKEL=/etc/skel
CREATE_MAIL_SPOOL=no
If your distribution defaults new accounts to /bin/sh and you would rather every new user start with bash, change the default shell once instead of typing -s /bin/bash on every single useradd call:
sudo useradd -D -s /bin/bash
/etc/login.defs controls a related set of values, including the UID and GID ranges used for regular users versus system users, and default password aging rules. Both files are worth a quick look if you are setting up a server that will have many accounts created the same way.
Common useradd errors and how to fix them
A handful of errors come up often enough that it helps to have the fix ready rather than looking it up mid-task.
“useradd: user ‘username’ already exists” means the name is taken. Check the existing account with id username, and if you meant to change it rather than create it, use usermod instead of useradd.
“useradd: Permission denied” means you ran the command without root access. Prefix it with sudo, or switch to the root account first with su.
No home directory after creation usually means you forgot the -m flag on a Debian based system, since useradd there does not create one by default. Rerun with -m, or create the directory by hand and copy the skeleton files from /etc/skel yourself.
User cannot log in right after creation almost always means no password has been set yet. A freshly created account is locked until you run passwd username.
“specified group does not exist” appears when -g or -G reference a group that has not been created. Run groupadd groupname first, then retry the original useradd command.
Key takeaways
- useradd works the same way on every distribution once you learn the flags
- adduser is friendlier for one-off accounts but is just useradd on RHEL
- Debian systems need -m for a home directory, RHEL creates one by default
- Use -M with a nologin shell for service accounts that never log in
- Pair -a with -G when adding groups, or you wipe existing ones
- visudo validates sudoers syntax before saving, unlike a plain text editor
- Verify a new account with id or by checking /etc/passwd first
- Lock an account with passwd -l instead of deleting it when reversible
Frequently asked questions
How do I create a user in Linux with a home directory in one command?
Run sudo useradd -m username on Debian or Ubuntu. RHEL and Rocky Linux create the home directory automatically even without the flag.
What is the difference between useradd and adduser?
useradd is a low level, non-interactive command available everywhere. adduser is a friendlier interactive script on Debian based systems that calls useradd internally.
How do I give a new user sudo access?
Add them to the sudo or wheel group with usermod -aG sudo username, or grant access to only certain commands by editing /etc/sudoers with visudo.
Why does my new user have no password after useradd?
useradd never sets a password by default. Run sudo passwd username right after creating the account so the user can actually log in.
How do I check if a user was created successfully?
Run id username to see the UID, GID and groups the account belongs to, or check the raw entry directly with grep username /etc/passwd.
Can I stop a user from logging in without deleting their account?
Yes. Run sudo passwd -l username to lock the password, and optionally set their shell to /usr/sbin/nologin to block SSH key logins too.
What happens if I forget the -m flag when creating a user?
The account is created and can still be assigned a password, but no home directory exists until you create one manually or rerun useradd with -m.
Conclusion
Creating and managing Linux users well comes down to a handful of habits: always verify what useradd actually did, keep sudo access tied to groups rather than shared passwords, and prefer locking an account over deleting it unless you are certain the data is no longer needed.