New to Rust? Grab our free Rust for Beginners eBook Get it free →
MENDS – A MariaDB Full-Stack Architecture

The goal of MENDS is to combine the awesome magical powers of Deepstream with MariaDB to create the beginnings of a full-stack framework.
DOWNLOAD
Introduction
MENDS stands for:
- MariaDB (or possibly mysql, but let’s use the superior option)
- Express (not covered in this tutorial)
- Node
- Deepstream (Websocket and TCP server)
- Sequelize (SQL ORM for node)
This tutorial will use an extremely simple user-interface to keep the code as short as possible for educational purposes.
Prerequisites
It is assumed that all of the following are available to the reader:
- MariaDB 10 or greater

- Node

- Deepstream

- Chrome browser (or Firefox)

The installation for each of the above is outlined in the INSTALL document, which was written specifically for Centos-7.
Deepstream and Sequelize
Deepstream is an incredibly remarkable service where JSON object structures are literally shared across multiple locations.
When a process “subscribes” to a Deepstream JSON structure, the process is notified of any changes to that JSON structure. Furthermore, Deepstream also has a very powerful yet simple inter-program communication that we will be utilizing.
Sequelize is an SQL ORM that allows us to model our data table and handle all of our database interactions.
First a couple of interesting challenges. Deepstream does not allow us to use several special characters in a javascript object. The two characters we will be dealing with are the period character and the space character. Both of these will have to be substituted when creating a key.
For example, when using an email address as a javascript key, each period will be interpreted as another level:
myTest[‘[email protected]’].data
// just what we want — three levels
Deepstream will misinterpret this as:
[email protected]
// five levels?! this is NOT what we wanted!
So, we have to filter all key values. The dsKeyFilter function will substitute a meta-string for both spaces and periods. Our email address key should end up looking like the following:
myTest.justin__DOT__hayward@gmail__DOT__com.data
// what we want – three levels using meta-data
Another interesting challenge we face is that Mariadb does not use colons to separate the key->value pairs, but rather uses the comma character. So where we might have a situation like this:
‘color’ : ‘gray’, ‘size’ : ‘medium’ // key: value
MariaDB requires us to use the comma character instead:
‘color’ , ‘gray’, ‘size’ , ‘medium’ // key, value
Extracting the data out of MariaDB is a simple matter of using the MariaDB COLUMN_JSON command to convert into actual JSON. So moving the data back to a MariaDB JSON format requires another utility called Dyncol. Dyncol will do the conversion back into MariaDB JSON format, and also handle any of the dreaded SQIi (SQL injection) security issues.
For this tutorial, I am using CentOS 7, the best Linux available.
In the INSTALL document, I have set this up entirely from scratch. You may use whatever Linux you choose. It is recommended to try this on Virtualbox, Google-cloud, or Amazon-ec2 as well.
All of the following mends scripts are available on github:
- server.js – node script to act as a manager that must be running for clients to connect to.
- index.html – minimalistic user interface (UI) to demonstrate the framework.
- server.common.js – common javascript functions used in the server.js and index.html scripts.
- simple.sql – MariaDB script to build tables, populate columns, and establish a MariaDB user. Our table will contain a list of the members of the Moody Blues, the undeniably best rock band on Earth.
- INSTALL – Instructions to install all the necessary utilities.
Please note that the javascript code contained in the index.html script could also be executed independently in a separate node process as well, possibly running in an alternate location.
The schema structure for the JSON is contained entirely in the MariaDB table and does not need to be referenced in the script at all. I have included “size” in the index.html script just to keep the code as short as possible.
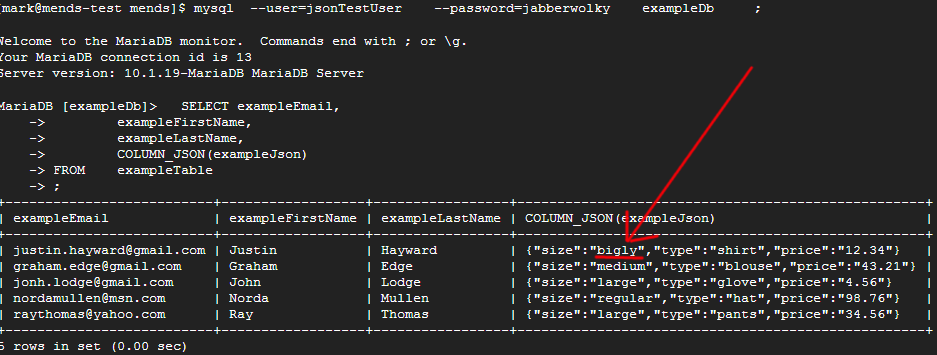
Before we start, we need to populate a simple MariaDB table. the simple.sql script creates the following for us:
- user (jsonTestUser)
- database (exampleDB)
- table (exampleTable)
- COLUMN_CREATE (MariaDB JSON column)
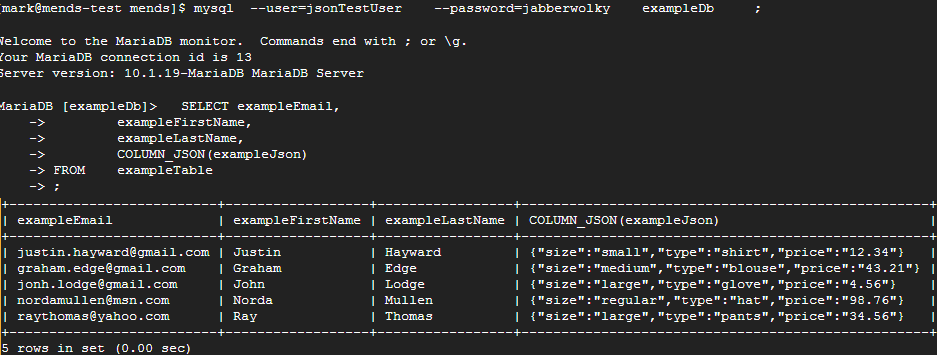
Once we run the simple.sql script, our table exampleTable should look like this:
It’s finally time to start delving into the code! Starting with the server.js script, we see a Sequelize connection to MariaDB, followed with a Sequelize data-model. I will leave it up to the reader to look at the Sequelize.io website documentation for further explanation.
The first line of interest is merely a Deepstream connection:
const ds = deepstream(dsIpPort).login(); // using port 6021, the TCP port
For the sake of brevity, I have skipped the Deepstream security implementation. This simple code line will connect to the Deepstream server using the specified port, in this case, 6021, the Deepstream default port. Of course, you may choose whatever port you want when you start up Deepstream.
Next up, we need to establish a simple “listener”:
ds.rpc.provide( 'rpcExampleRequest', ( data, response ) => {
Here we are creating a listener which will listen to any request made to ‘rpcExampleRequest’.
Once a request is made, our server.js script will make a MariaDB SELECT request with the value passed into it. Assuming we find a matching index value, the JSON data contained in the “exampleJson” column will be converted to actual JSON data using the MariaDB COLUMN_JSON command:
exampleModel.findOne

( { attributes : [ [ sequelize.fn

( 'COLUMN_JSON'

, sequelize.col('exampleJson')

)

, 'exampleJson'

]

]

, where : { 'exampleEmail' : exampleKey

}

}

)

.then( (recordReturned) => {

cb(JSON.parse(recordReturned.exampleJson));

});
Ok, now we have JSON data. The next step is to create what Deepstream refers to as “records”. I like to think of a Deepstream record as a JSON object. But first, the Deepstream record must be named and should have a totally unique name.
We accomplish this using the Guid.create() call:
const _recordName = data.exampleKey + '--' + Guid.create() ;
Now we have a Deepstream record name that is prefixed with the value given to us in the user interface and suffixed with a unique identification number.
The time has come to actually create a record. This is a simple call to getRecord:
const _record = ds.record.getRecord( _recordName ) ;
Next, several of the ‘forbidden’ characters (presently the period and the space character) must be converted into meta-tags for our JSON key structure:
const _key = mends.dsKeyFilter(data.exampleKey) ;
I will be using the following very uninspired meta-tag values:
- __SPACE__
- __DOT__
We now have all the components necessary to make this JSON structure available to any Deepstream listener. This is accomplished by using another simple Deepstream call, “set”.
A quick technical note here: Deepstream requires us to use another level to separate our key from our JSON structure, so I am appending “.data” to the end of the key.
_record.set(_key + '.data' , jsonObject );
And a Deepstream record is created using the JSON object from MariaDB!
Our next step is to wait patiently for changes to be made to our JSON structure. We establish a function that will be fired whenever a change occurs:
_record.subscribe( _key.data, (entireRecord) => {
Once a change occurs, the entire JSON structure will be written back to MariaDB using a simple UPDATE statement. The only noteworthy difference here is that
our JSON structure must be converted back into a MariaDB COLUMN_JSON format. For that, we use the node “dyncol“ package:
{ 'exampleJson' : sequelize.literal

( dyncol.updateQuery('exampleJson', newValue)

)
Again, this merely changes the key:value that was separated by colons into key,value separated by commas. Dyncol also watches for any SQLi (injection) security issues.
Now everything is established, so we need to notify our client of the record name and our successful status. This is accomplished using the Deepstream “send” command:
response.send(

{ 'dsRecordName' : _recordName

, 'returnStatus' : true

, 'returnMessage' : 'example record is ready'

})
Start up the server:
sudo deepstream start & // assuming deepstream is not running yet.
node server.js ; // start our node process
Our server is now hopefully up and running, and ready to take your request.
But how do we contact our server? Lets look in the index.html script now:
const ds = deepstream(dsUrl).login(); // 6020 is the default http port.
Again, a simple command to connect to the Deepstream server. Notice we used the http port number this time (6020), not the TCP port number (6021) the server used.
In order to keep the user-interface as simple as possible, I am using the very low-tech javascript “prompt” command to get a key value:
const defaultKey = prompt('Enter email (example: [email protected]): ' );
Time to call the server! We will call the server simply with this line containing the Deepstream name and our lookup key:
mends.getDsExampleData(ds, defaultKey, (dsRecord, data) => {
Once established, the Deepstream record name must be stored in our session:
globalDsRecord = dsRecord ;
This last step is optional but very useful. Let’s be notified whenever the JSON object is changed. Our server.js script will log this change for us, but it might be informative to see it happen in the browser console as well. Once again, we are using the browser console rather than displaying the JSON data for sake of brevity.
globalDsRecord.subscribe( [mends.dsKeyFilter(defaultKey)] , (value) => {

console.log

( 'subscribed stringify value is now: '

+ JSON.stringify(value)

);

}, false); // false to make sure subscribe is not fired when first initiated.
This step will be required if one is using jQuery to change the displayed results as this model expands.
Finally, let’s do something fun using our boring but simple web page user interface. Click the “Click here” and enter a new size.
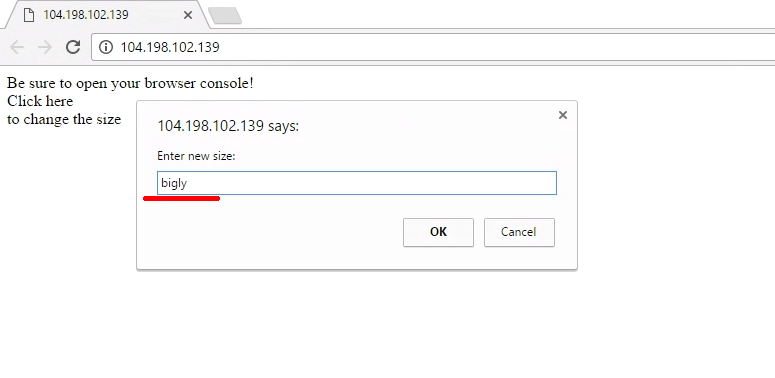
The following will prompt the user for data (again, extreme brevity) and save that data:
var sizeParm = prompt('Enter new size:' ); // low tech method for sure

mends.updateDsJsonDb

( globalDsRecord

, defaultKey

, 'size' // any column name used the COLUMN_JSON will work here.

, sizeParm

);
Look back at the server.js process display console and we should see that the UPDATE has taken place. Or better still, go into the MariaDB console and SELECT COLUMN_JSON(exampleJson), and there you will see your changes have been successfully written back to the database.
Optionally, you can go into your console and enter the following:
mends.updateDsJsonDb(globalDsRecord, defaultKey, 'size', "Bigly!" );
Now you should see the size has changed in your browser console, the node logging, and you will want to verify this in the MariaDB console.
Conclusion
Hopefully, this tutorial will inspire the reader to combine MariaDB JSON and Deepstream to create the beginning of a full-stack framework.
Thank you very much for trying this. Positive comments are always welcome.
Further reading