New to Rust? Grab our free Rust for Beginners eBook Get it free →
How to Display Flash Messages in Node.js Using Connect-Flash
Learn how we can display flash messages in Node.js using Connect-Flash, improve user experience with clear notifications, and discover simple steps inside.

Imagine visiting a website, submitting a form, and instantly seeing a message that tells us if our action was successful or if something went wrong. These quick notifications, known as flash messages, can make any web application feel more interactive and helpful. They are especially important in situations where we want to guide users, such as alerting about errors or confirming a successful operation.
In Node.js, displaying these flash messages is possible with a simple yet powerful module called connect-flash. For example, if we are building a banking application and a user tries to transfer more money than available, a clear message like “insufficient balance” can appear right after the redirect. This immediate feedback not only improves user experience but also builds trust in our application.
Setting up flash messages in Node.js using connect-flash is not always straightforward. There are several steps and best practices to follow to ensure these messages appear at the right time and in the right place. In this guide, we will explore exactly how to display flash messages in Node.js using connect-flash, so we can create more responsive and user-friendly applications.
Key Takeaways
- Connect-flash helps us show messages like errors, warnings or success after actions such as form submissions or redirects
- We need to install express, express-session and connect-flash to use flash messages in a Node.js application
- Flash messages can be used to give feedback for different situations, for example, showing a message when a form is submitted successfully or when an error happens
- We can display different types of messages, such as success and error, by using different keys for each message type
- To show flash messages on the web page, we can use a view engine like EJS and pass the messages from the server to the view
- Adding styles with Bootstrap or custom CSS can make the flash messages more noticeable and improve the user experience
- Flash messages are temporary, they disappear after being shown once, which helps keep the interface clean and clear
Node.js connect-flash Module
Express 2.x has a middleware called ‘flash’ that is used to store messages that pop up on the page that is being rendered. The stored message is removed after being shown. When Express 3.x comes, this middleware is removed. So now if anyone wants to use it, it can be done using ‘connect-flash’.
The ‘connect-flash’ module allows developers to display or render pop messages every time a user is redirected to a certain page. The ‘connect-flash’ module is not a built-in module so we have to install it manually.
Installation Syntax:
npm i connect-flash
Let’s get started with a mini-application to help you get a better understanding.
Using connect-flash to Display Flash Messages in Node.js
To get going, we will first create a Node.js project and then install and import the required packages in it.
1. Create a new folder and initiate the Node app in it:
npm init -y
Your package.json should now be created and look like this:
{
  "name": "7_FLASH_NODEJS_APP",
  "version": "1.0.0",
  "description": "",
  "main": "index.js",
  "scripts": {
    "test": "echo \"Error: no test specified\" && exit 1"
  },
  "keywords": [],
  "author": "",
  "license": "ISC"
}
2. Create the .js file:
touch app.js
3. Install all the required packages:
npm i express connect-flash express-session ejs
Here we will be using express as the server framework and the express-session module to create a session each time a user is redirected to a certain page and a message is flashed.
We are also using ejs as our HTML templating engine so we can serve better-looking web pages of our application. If you do not understand what ejs is, what it does, and how it works, click here to read this post on using EJS Template Engine in Node.js. If you have prior knowledge about ejs, you’re good to go!
4. Set up app.js file and import all the packages that we just installed:
const express = require('express');
const session = require('express-session');
const flash = require('connect-flash');
const path = require('path');

const app = express();

app.set('views', path.join(__dirname, 'views'));
app.set('view engine', 'ejs');

const port = 8000;

app.use(session({
    secret: 'codeforgeek',
    saveUninitialized: true,
    resave: true
}));

app.use(flash());

app.listen(port, (err) => {
    console.log(`App is running on port ${port}`);
});
In the above code, the below lines make sure that the ‘views’ folder is accessible globally:
const path = require('path');
app.set('views', path.join(__dirname, 'views'));
If you don’t get what the path module does, click here to read about it!
5. Using ‘connect-flash’ Module:
Now that we have set the basics of our application, let us move on to implementing ‘connect-flash’ and creating routes for our users.
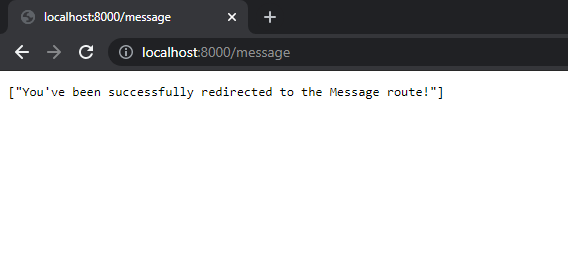
app.get('/', (req, res) => {
    req.flash('success', `You've been successfully redirected to the Message route!`)
    res.redirect('/message')
})

app.get('/message', (req, res) => {
    res.send(req.flash('success'))
})
In the above code snippet, we have created a home route that redirects to the message route when requested. We have also assigned a success flash message on the home route which will be displayed on the message route on successful redirection.
The req.flash() in the home route, accepts two string values as arguments. The first string defines the type of flash message you want to render, and the second string accepts the actual flash message. Although defining a type for your flash messages doesn’t change the way they look, it is good for reference for you or other developers reading your code later.
However, you could pass many types of flash messages you like but then the redirected page trying to render your flash message shouldn’t clash with similar types. This is why you should keep each of the type names unique.
The message route is where the flash message of your choice is called. We defined a success type flash message and are calling that same flash message on the message route by simply passing req.flash(‘success’).
Now, whenever a user is redirected to the message route, he/she will receive a flash message saying “You’ve been successfully redirected to the Message route!”.
Complete Code:
const express = require('express');
const session = require('express-session');
const flash = require('connect-flash');
const path = require('path');

const app = express();

app.set('views', path.join(__dirname, 'views'));
app.set('view engine', 'ejs');

const port = 8000;

app.use(session({
  secret: 'codeforgeek',
  saveUninitialized: true,
  resave: true
}));

app.use(flash());

app.get('/', (req, res) => {
  req.flash('success', `You've been successfully redirected to the Message route!`)
  res.redirect('/message')
})

app.get('/message', (req, res) => {
  res.send(req.flash('success'))
})

app.listen(port, (err) => {
  console.log(`App is running on port ${port}`);
});
Run the Application:
The application code is written in a single file “app.js” that runs on executing the below command in the terminal.
node app.js
Open the Application:
Enter the below URL inside the search bar of a web browser to open the application.
http://localhost:8000/
Output:
This way we can successfully render any flash messages in Node.js.
Common Pitfalls
Not Setting Up Sessions Correctly
A common mistake is forgetting to set up express-session before using connect-flash. The connect-flash module depends on sessions to store messages. If we skip this step, flash messages will not work. For example, if we only install connect-flash and try to use it without initializing express-session, the application will throw errors or the messages will not appear. To fix this, always initialize express-session before connect-flash in the application setup.
Forgetting to Clear Flash Messages
Flash messages are designed to show only once and then disappear. Sometimes, we forget to clear them after displaying, so users might see the same message again after refreshing the page. For example, if a user logs in and sees a success message, refreshing the page should not show the same message again. To solve this, make sure to render and remove the flash message from the session as soon as it is displayed in the view.
Displaying Messages on the Wrong Page
Another pitfall is trying to show flash messages on the same page where the action happens, instead of after a redirect. Flash messages are meant to be shown after a redirect, because they are stored in the session and accessed on the next request. For instance, if a user submits a form and we want to show a success message, we should redirect to another route and display the message there. To avoid confusion, always use a redirect after setting a flash message.
Not Passing Flash Messages to the View
Sometimes, we forget to pass the flash messages from the route handler to the view template. This means the message is set in the session but never displayed to the user. For example, if we use EJS as the view engine, we need to pass the flash message as a variable when rendering the page. The solution is to always include the flash message in the render call, so the template can display it.
Using Flash Messages Without a View Engine
Some developers try to use flash messages in applications that do not use a view engine, like EJS or Pug. Flash messages are designed to be displayed in rendered views, so if we are building an API or a project without templates, flash messages will not be visible to users. In such cases, it is better to use other ways to send feedback, like JSON responses. Always check if the project uses a view engine before choosing connect-flash for notifications.
Frequently Asked Questions
What is a flash message in Node.js?
Flash message in Node.js is a special type of message sent to the user to give notifications about the success or failure of any operation.
What is the purpose of a flash message?
Flash messages are used to notify the user for various reasons, such as when an operation fails, whenever an error occurs, or to pop up some type of information.
What is an example of a flash message?
An example of a flash message could be when a user book a ticket online and for some reason the payment is not made successfully, the booking website sends a flash message to the user, showing that the transaction is incomplete.
What is the difference between a flash message and a normal message?
A normal message can be used for most things to show a variety of information to the users, while a flash message is used on special occasions to inform that something special has happened.
How to set flash messages in Node.js?
The best way to set up flash messages in Node.js is to use middleware like connect-flash or express-flash.
Where are flash messages stored?
Flash messages are stored in session variables that can be accessed using the request object.
How does the connect-flash module work in Node.js?
The connect-flash module stores messages in the session and displays them after a redirect, then removes them so they only appear once.
What are the main dependencies needed to use connect-flash?
We need to install express, express-session, and connect-flash to set up flash messages in a Node.js application.
Can we use connect-flash with template engines like EJS?
Yes, connect-flash works well with template engines such as EJS, allowing us to display messages in our rendered views.
Why are flash messages important for user experience?
Flash messages provide immediate feedback about actions like form submissions or errors, helping users understand what happened after an operation.
Is connect-flash compatible with the latest versions of Express?
Yes, connect-flash is designed to work with Express 3.x and newer, since the built-in flash middleware was removed after Express 2.x.
How do we clear flash messages after they are shown?
Flash messages are automatically removed from the session after they are displayed, so they do not appear again on the next page.
Can we display different types of flash messages, like errors and successes?
Yes, we can set different types of messages such as success, error, or info and display them based on the situation.
Do flash messages require cookies or sessions to work?
Yes, flash messages rely on sessions, which usually use cookies to track the session for each user.
Is it possible to customize the appearance of flash messages?
We can style flash messages using CSS in our templates, so they match the look and feel of our application.
Can we use connect-flash for notifications after user login or logout?
Yes, connect-flash is commonly used to notify users after actions like logging in or logging out.
Do we need to configure anything special in Express to use connect-flash?
We need to set up express-session middleware before connect-flash in our Express application for it to work properly.
Is connect-flash suitable for production applications?
Yes, connect-flash is widely used in production Node.js applications to provide user feedback and improve usability.
AI Dev Assistant Tips
AI tools like GitHub Copilot and ChatGPT can make working with connect-flash in Node.js much easier. These tools can help us write code faster, find mistakes, and understand how to use new modules. For example, if we are not sure how to set up express-session or display messages in EJS, we can ask an AI assistant for a code example or a step-by-step guide. This saves time and helps us learn best practices for using connect-flash in our projects.
Copy-Paste-Ready AI Prompt
Show me a simple example of how to use connect-flash in a Node.js application with Express and EJS. Include code for setting up express-session, adding flash messages in a route, and displaying them in the EJS view.
- Be clear about what we want to build or fix when asking the AI for help, for example, “How do I show both success and error flash messages on the same page?”
- Ask for complete code snippets that include setup and usage, not just one part of the process
- Check the AI’s code for accuracy and make sure it matches the latest versions of the modules we are using
- If the AI gives a solution that does not work, try asking for a different approach or a step-by-step guide
- Use AI to learn best practices, like how to handle different types of flash messages or how to keep the code clean and easy to read
Conclusion
In this article, we learned how to display flash messages using the third-party Node.js dependency connect-flash. Using the connect-flash module in Node.js we can easily set up a message and show it when the user is redirected to another page. Just make sure you have installed connect-flash manually in the project directory before using it otherwise you will end up getting an error.
Reference
https://www.npmjs.com/package/connect-flash
About the Author
Aditya Gupta is a Senior Full Stack Developer with over 3 years of experience building scalable and maintainable web applications. He is passionate about writing clean code and helping other developers level up their skills in the modern JavaScript ecosystem.
Connect on LinkedIn: https://www.linkedin.com/in/dev-aditya-gupta/
My Mission: To demystify complex programming concepts and empower developers to build better software.