New to Rust? Grab our free Rust for Beginners eBook Get it free →
Visual Studio Code with Copilot: The Complete 2026 Setup and Workflow Guide
Visual Studio Code with Copilot has changed a lot in the past year compared to the previous three combined. Agent mode, custom instructions, MCP servers, a standalone CLI, etc. If you set this up a year ago and never looked again, you’re missing most of what’s actually there.
This guide goes from a clean install through the features that change how you work day to day, and flags what’s outdated in older tutorials, since both the setup flow and the chat interface have shifted significantly.
What You Need Before Installing Copilot
Copilot needs three things to run: VS Code itself, a GitHub account, and a Copilot subscription (a free tier exists, so this isn’t a hard paywall).
VS Code. Download the latest stable build from code.visualstudio.com. Copilot Chat ships in lockstep with VS Code releases, so an old VS Code version can leave you stuck on an old Copilot Chat version too.
A GitHub account. Sign up at github.com if you don’t have one already.
A Copilot plan. As of mid-2026, GitHub offers Copilot Free, Pro ($10/month), Pro+ ($39/month), Max ($100/month), Business ($19/seat/month) and Enterprise ($39/seat/month). The Free plan gives you a monthly allowance of completions and chat requests with no card required, which is enough to decide if you want to pay for more.
Note that as of April 20, 2026, new sign-ups for Pro, Pro+, Max and Student plans were temporarily paused, so check GitHub’s current plans page before assuming a paid tier is available to new users right now.
One more thing worth knowing going in: GitHub moved Copilot to usage-based “AI Credits” billing on June 1, 2026. Code completions stay unlimited on every paid plan, but chat, agent mode and code review now draw from a monthly credit pool tied to actual token usage rather than a flat request count. This matters mostly if you’re running agent mode for hours at a stretch, since that’s where credit usage adds up fastest.
Installing and Signing In to Copilot Using VS Code
The setup flow changed in 2026, and a lot of tutorials still show the old version (an Extensions Marketplace search, then a separate sign-in step through a Copilot icon in the Activity Bar). The current flow is shorter.
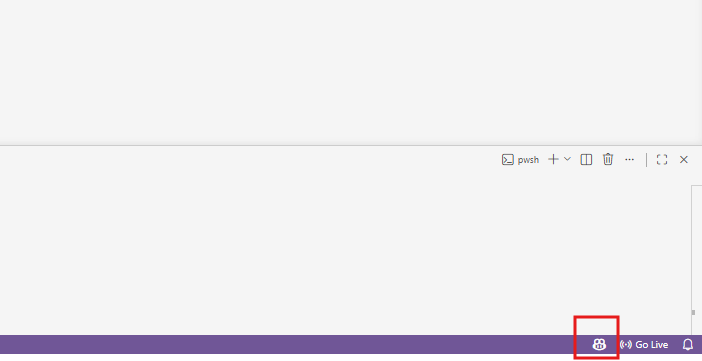
Step 1: Turn On AI Features
Open VS Code and look at the status bar at the bottom of the window. Hover over the Copilot icon there and select Use AI Features.
Step 2: Sign In
Choose a sign-in method and follow the prompts.
- If you already have a Copilot subscription tied to your GitHub account, VS Code picks it up automatically.
- If you don’t have one yet, you’re signed up for the Copilot Free plan on the spot, with a monthly allowance of completions and chat credits.
If your subscription is tied to a GitHub Enterprise (GHE) account instead of a regular GitHub.com account, choose Continue with GHE.com in the sign-in dialog and enter your GHE instance URL.
Step 3: Set Up Your Project
Once you’re signed in, open a chat session and type /init. This command scans your codebase and generates custom instructions, a file Copilot reads on every future request so its suggestions match your project’s actual conventions instead of generic defaults. It’s a five-second step that measurably improves output quality, and it’s easy to skip if you don’t know it exists.
Switching GitHub Accounts
If you need to use a different GitHub account for Copilot, whether that’s switching between a work and personal account or using GHE for one workspace and GitHub.com for another, VS Code supports per-workspace and per-profile account settings. Open the Accounts menu in the Activity Bar, select Manage Extension Account Preferences, choose GitHub Copilot Chat from the extension list, and pick the account for that workspace and profile.
How GitHub Copilot Works in VS Code
Before getting into the interface, it helps to know what’s actually happening. GitHub Copilot is built on large language models trained on public code, fine-tuned by GitHub and OpenAI to predict and generate code from natural-language prompts. It doesn’t search a database of existing snippets and paste them back at you. It predicts the most statistically likely continuation of your code given everything it can see: your current file, your open tabs, and (in agent mode) your whole workspace.
That’s also where its limits come from. Suggestions can be wrong, outdated, or subtly insecure, since the model is pattern-matching against training data rather than reasoning about whether the code is right for your project. Treat every suggestion as a draft to review, not a finished answer.
Inline Completions: The Original Copilot Feature
Inline completions are still the simplest way to use Copilot, and they’re the one feature every Copilot tutorial from the last few years actually gets right, since the mechanics haven’t changed.
Start typing and Copilot shows a gray “ghost text” suggestion for the rest of the line or block.
- Accept a suggestion: press Tab.
- Reject it: press Esc, or just keep typing your own code.
- Cycle through alternatives: Alt + ] (Windows/Linux) or Option + ] (macOS).
For example, type this and pause (this works the same whether you’ve set up Python with the usual VS Code extensions or you’re working in a fresh install):
def add_numbers(a, b):
Copilot will typically suggest a return a + b body, sometimes with a docstring, based on the function name and parameters alone. Try a case with a clearer hint:
# Create a list of squares from 1 to 10
squares = [
Copilot fills in a list comprehension like x**2 for x in range(1, 11)] because the comment gives it a clear target. This is the pattern worth internalizing early: a clear name or comment produces a clear completion, a vague one produces a vague guess.
VS Code also has next edit suggestions, a newer layer on top of ghost text that predicts where your next change will land, not just what comes after your cursor. If you rename a variable in one place, next edit suggestions can flag the other places that now need the same change and let you Tab through them.
Using Copilot Chat
Chat is where most of Copilot’s actual problem-solving lives, and it’s also where the interface has shifted the most. Open the Chat view with Ctrl+Alt+I (Windows/Linux) or ⌃⌘I (Mac), or use inline chat in the editor with Ctrl+I / ⌘I for a quick edit without leaving your file.
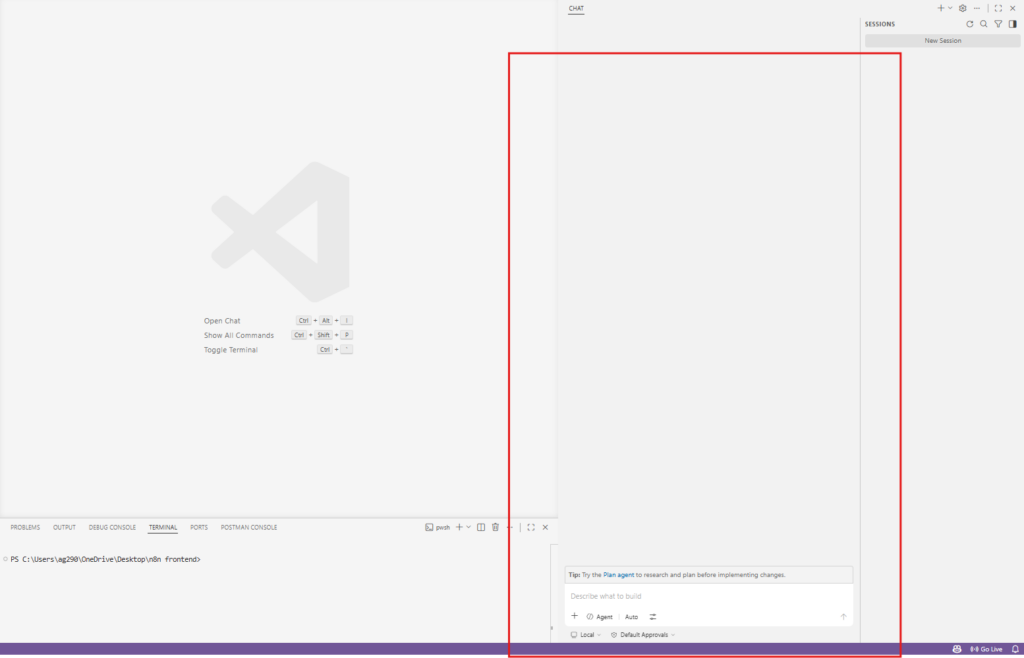
Chat Modes
At the bottom of the Chat view is a mode dropdown. The two modes that matter day to day:
- Ask mode answers questions without touching your code. Good for “what does this regex do,” “how do I structure this SQL query,” or working through an error message before you decide how to fix it.
- Agent mode takes a task description and runs with it: finds the relevant files, edits them, runs terminal commands, and iterates on errors until the task is done or it needs more input from you.
Older tutorials also describe a separate “Edit mode” that sat between Ask and Agent, for picking a few files and applying a described change across just those. That three-way split (Ask, Edit, Agent) is genuinely how Copilot worked in 2025. The functionality lives on, mostly folded into agent mode’s options today, so don’t be surprised if a guide referencing “Edit mode” by name doesn’t match what you see in a current install.
Adding Context
Chat is only as good as what it can see. A few ways to point it at the right material:
- Type
#followed by a filename to pull that file into context. - Use
@workspacein a prompt to give Copilot awareness of your entire project rather than just the open file, useful for questions like “where is authentication handled” that a single file can’t answer. - Drag and drop a file into the chat input, or use the Add Files button, for the same effect as
#file.
Slash Commands
Type / in the chat input to see shortcuts for common requests, like /init for the custom-instructions setup mentioned earlier, or /new to scaffold a new project from a description. These save you from re-typing the same boilerplate prompt every time.
Agent Mode: Letting Copilot Work Autonomously
Agent mode is the feature that separates current Copilot from the autocomplete tool most people still picture when they hear the name. Instead of generating one suggestion and stopping, it loops: read relevant files, propose an edit or a terminal command, check whether that worked, and keep going until the task is finished.
A Worked Example
Suppose your code has a bug:
def divide(a, b):
    return a / b

result = divide(10, 0)
print(result)
Switch to agent mode and ask it to fix the division-by-zero crash. Copilot will typically read the function, recognize the missing guard, and propose something like:
def divide(a, b):
    if b == 0:
        return "Cannot divide by zero"
    return a / b
In agent mode, this edit gets applied directly to your file, not just shown as a suggestion to copy. You review the diff in the Total Changes panel and keep or discard each change.
Reviewing What Agent Mode Does
Every tool call agent mode makes shows up in the UI as it happens, and it asks for your approval before running a terminal command or using any tool that isn’t built in. If you want to inspect exactly why it made a particular choice, two views help:
- Agent Logs shows a timeline of tool calls, model requests, and which instruction files got loaded.
- Chat Debug view shows the raw system prompt, your prompt, and the full context sent to the model for a given turn.
Neither is something you’ll open often, but both are useful the first time agent mode does something unexpected and you want to know why.
Running Multiple Sessions
You can run several agent sessions in parallel and track them from one place. Starting a new session doesn’t kill the previous one, it keeps running in the background, so you can switch back to it later without losing context. This is genuinely useful if you want to kick off a long refactor and keep working on something else while it runs.
Subagents
Inside a chat session, you can delegate a piece of work to a subagent: an isolated agent with its own context window that works independently and reports back the final result, without cluttering your main conversation. This is worth reaching for when a sub-task (writing a batch of unit tests, researching an unfamiliar API) would otherwise fill up your primary context with details you don’t need to see directly.
Customizing Copilot for Your Project
Out of the box, Copilot doesn’t know your team’s conventions. A few features close that gap.
1. Custom Instructions
Custom instructions are project-wide or task-based guidelines that Copilot reads on every request, the file /init generates automatically. You can also write or edit these by hand to specify things like preferred naming conventions, which testing framework to use, or architectural patterns you want followed consistently.
2. Agent Skills and Custom Agents
Agent skills are folders of instructions, scripts, and resources Copilot loads when a task matches their description, similar in spirit to giving a new team member a runbook for one kind of job. Custom agents go further: they’re specialized personas with their own access to a defined set of tools and instructions, so you can define a “refactor-specialist” agent or a “test-writer” agent and either invoke it directly or let Copilot delegate to it automatically when a prompt matches.
3. MCP Servers
Model Context Protocol (MCP) servers extend Copilot’s reach beyond your codebase. An MCP server is a small program that exposes tools, data, or APIs in a format Copilot’s agent can call directly, so it can pull from a database, query an internal API, or read project-management tickets without you having to copy-paste that information into chat manually. If you want to use MCP capabilities at all, you need agent mode active. There’s a growing public registry of community and partner-built servers if you don’t want to write your own.
GitHub Copilot CLI: Copilot Outside the Editor
This is the part that generates the most confusion, and it’s also the subject of one of the more active recent threads on r/GithubCopilot asking essentially: should I be using the CLI, VS Code chat, or both? (Note: I wasn’t able to load that Reddit thread directly while researching this piece, since Reddit blocks automated fetching, but the question it raises shows up across multiple developer forums and is worth answering directly here.)
What the CLI Actually Is
Copilot CLI brings the same agentic coding capability you get in VS Code’s agent mode into a standalone terminal tool, in the same spirit as terminal-native coding agents like Claude Code and Aider. It’s not a different product competing with the editor extension, it’s the same underlying agent, accessed through a different interface. Install it with:
npm install -g @github/copilot
Node.js 22 or later is required. You can also install it via Homebrew, WinGet, or a shell install script depending on your platform. On first launch, run /login and follow the prompts to authenticate with your GitHub account.
When the CLI Actually Helps
The honest answer to “CLI or VS Code” is that they’re not really competing tools, since VS Code can call Copilot CLI for you directly when you set a chat session to run in the background. There’s also a terminal built into VS Code itself, so even “I want a terminal-native workflow” doesn’t strictly require leaving the editor.
That said, the CLI earns its place in a few situations:
- Editors without a Copilot extension. The CLI operates independently of any IDE, so it’s useful if you’re working in an editor that doesn’t have official Copilot support.
- Headless and scripted use. Pass a prompt with the
-pflag (copilot -p "explain this git command") to get a one-shot answer without starting an interactive session, which works well inside scripts and automation. - Long-running background tasks. Autopilot mode (cycle into it with Shift+Tab) lets Copilot keep working on a task without stopping for step-by-step approval, suited to tasks you want to kick off and check on later rather than babysit.
- GitHub-native operations. The CLI has direct slash commands for working with pull requests (
/pr) and for coordinating multiple subagents on a multi-step plan (/fleet), which can feel more natural from a terminal than clicking through a chat panel.
If your day-to-day is mostly “edit this file, test this change, repeat,” staying in VS Code’s agent mode is simpler since you get the diff view and inline review for free. If you’re scripting something, working without an IDE, or want a task to run unattended for a while, the CLI is the better fit. Most developers end up using both, switching based on what the task in front of them calls for rather than picking one permanently.
Copilot Studio Extension vs. GitHub Copilot
One source of naming confusion worth clearing up directly: the Microsoft Copilot Studio extension for VS Code, which reached general availability in January 2026, is a different product from GitHub Copilot. Copilot Studio is Microsoft’s low-code platform for building conversational agents (the kind used for customer support bots or internal helpdesk assistants), and its VS Code extension lets you clone an agent definition locally, edit it with syntax highlighting and IntelliSense, and sync changes back to the cloud through standard Git workflows. You can use GitHub Copilot inside that extension to help write the agent’s logic, but the two are separate tools solving separate problems. If you searched for “Copilot extension for VS Code” expecting GitHub Copilot and landed on Copilot Studio instead, this is why.
Limitations to Keep in Mind
Copilot is a strong assistant, not a replacement for knowing your own code.
- Accuracy isn’t guaranteed. Suggestions are generated from patterns in training data, not verified against what your project actually needs, so they can be subtly wrong even when they compile and run.
- Context has limits. Even with
@workspaceand custom instructions, what Copilot grasps about a very large or unusually structured codebase will be incomplete. The bigger and more idiosyncratic your project, the more you’ll need to course-correct it. - It needs an internet connection. Both inline completions and chat depend on a live connection to Copilot’s service. There’s no fully offline mode.
- Review before you ship. Treat every suggestion, especially agent mode’s multi-file edits, as something to read and test, not something to accept on faith because it looks plausible.
None of this makes Copilot less useful day to day. It just means the workflow that gets the most out of it involves staying in the loop, not handing off and walking away. If you’re curious how Copilot stacks up against other AI extensions for VS Code, that’s worth a separate look once you’ve got Copilot itself dialed in.
Key Takeaways
- Copilot setup in 2026 runs through the Status Bar’s “Use AI Features” option, not the old Extensions Marketplace search and separate sign-in flow.
- A Copilot Free plan exists with no card required, alongside Pro, Pro+, Max, Business and Enterprise tiers. New sign-ups for several paid tiers were temporarily paused starting April 20, 2026.
- Billing moved to usage-based AI Credits on June 1, 2026. Standard completions stay unlimited, but chat and agent mode draw from a monthly credit pool.
- Inline completions (Tab to accept, Esc to reject, Alt+] to cycle) work exactly as they always have and are the easiest entry point.
- Chat has Ask mode for questions and agent mode for autonomous multi-file work. The older three-way Ask/Edit/Agent split has mostly folded into agent mode.
- Custom instructions, agent skills, custom agents, and MCP servers let you shape Copilot around your project and connect it to external tools and data.
- GitHub Copilot CLI brings the same agent to your terminal via
npm install -g @github/copilot, and it complements VS Code rather than replacing it, useful for headless scripts, non-IDE editors, and long unattended tasks. - The Copilot Studio VS Code extension is a separate Microsoft product for building conversational agents, not GitHub Copilot, despite the similar name.
- Treat every suggestion, especially from agent mode, as something to review and test, not a finished answer.
Frequently Asked Questions (FAQs)
Is GitHub Copilot free to use in VS Code?
Yes, GitHub offers a Copilot Free plan with a monthly allowance of code completions and chat requests and no payment card is required to start. If you outgrow the free allowance, paid tiers start at Copilot Pro for $10 a month.
What’s the difference between Copilot CLI and Copilot in VS Code?
They’re the same underlying AI agent accessed through two different interfaces. VS Code’s agent mode gives you inline diff review and stays inside your editor, while Copilot CLI runs in any terminal, works with editors that don’t have a Copilot extension, and supports scripted, one-shot prompts with the -p flag. VS Code can even call the CLI for you in the background, so they’re complementary rather than competing.
Do I need agent mode to use MCP servers in VS Code?
Yes. MCP server capabilities are only available when agent mode is active, since MCP tools are designed to be called autonomously by an agent rather than invoked manually through Ask mode.
Why does Copilot sometimes suggest outdated or incorrect code?
Copilot generates suggestions by predicting likely code based on patterns in its training data, not by verifying correctness against your project. It works best with clear context: well-named functions and variables, descriptive comments, and custom instructions that describe your conventions. Always review and test suggestions, particularly larger agent-mode edits, before merging them.
Is the Copilot Studio extension the same as GitHub Copilot?
No. Copilot Studio is a separate Microsoft product for building and managing conversational agents, with its own VS Code extension that reached general availability in January 2026. You can use GitHub Copilot inside that extension to help author an agent’s logic, but they serve different purposes.
Can I use GitHub Copilot with languages other than Python and JavaScript?
Yes. Copilot works with any language represented in public code repositories, including Java, C#, Go, Ruby, PHP and C++. Suggestion quality tends to track how much of that language appears in public repositories, so widely used languages generally get stronger completions than niche ones.
How do I switch between different GitHub accounts for Copilot?
Open the Accounts menu in the Activity Bar, select Manage Extension Account Preferences, choose GitHub Copilot Chat, and pick the account you want active for that workspace and profile. This setting is saved per workspace and per profile, so you can use a work account on one project and a personal account on another without re-authenticating each time.
Copilot in VS Code has grown into something closer to a development partner than an autocomplete tool, and the gap between using it well and just tolerating its suggestions usually comes down to setup: custom instructions, the right chat mode for the task and knowing when agent mode or the CLI fits better than typing it all out yourself.