Many IT giants like Facebook, Google, and especially BFSI (Banking, Financial Services, and Insurance) sector have a strong liking towards OTP (One Time Password) based authentication technique in order to get genuine users since users are prompted to provide something they know and something they have.
Based on my experience, I would love to make a statement that Laravel’s ecosystem makes the implementation of such an application easy. In this article, we are going to build an OTP-based application for the verification of mobile numbers in PHP using Laravel.
So, the basic idea is to verify users’ mobile numbers by sending OTP on their phones and ask them to enter it.
How It Works
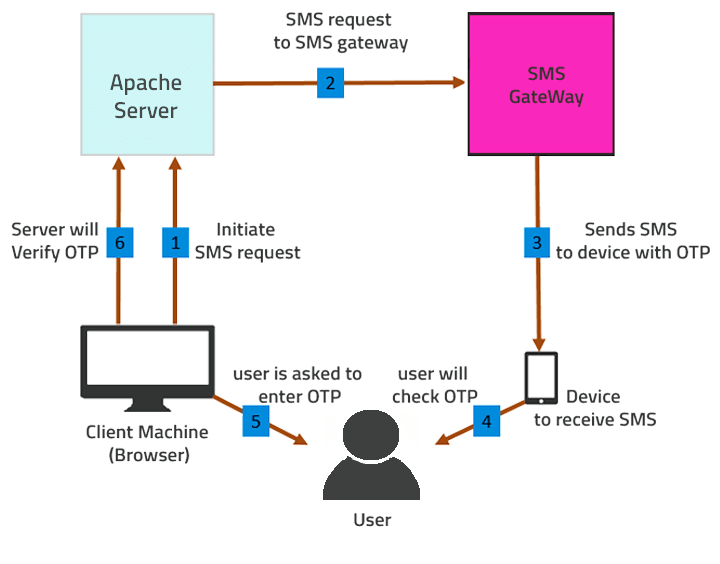
Before we start the development let’s have an overview of how the mobile number Verification system works.
Application Flow
- User information along with their mobile number is stored.
- Whenever a user is asked to verify his/her mobile number, a request is sent to the SMS gateway to send an SMS with a randomly generated OTP.
- An OTP is sent to user’s mobile number via SMS gateway.
- The User is asked to enter the OTP.
- The Mobile number gets activated after successful verification.
Tell Me More….!!!
Signing up with SMS Gateway
SMS Gateways have a contract with almost all the mobile network service providers. In order to send SMS to a mobile number, we have to buy a subscription from an SMS Gateway.
I did my research to find out right SMS Gateway to deliver messages and I found Msg91, Solutions Infini,SMS Gupshup and Twilio are quite popular. But Unfortunately, none of them are free to Test.
However, for the demonstration in this article, I am using Msg91 as they have a flexible price range.
Obtaining MSG91 API KEY
- Sign up on Msg91
- Visit this link and click on Buy credits and fill the form as shown below.

- Now click next, you will be asked to fill a form where you have to provide your personal details. Upon successful completion of this form, you will be redirected to the payment page.
- Proceed with the payment. Once the payment is done, you should see the SMS credits credited to your account.
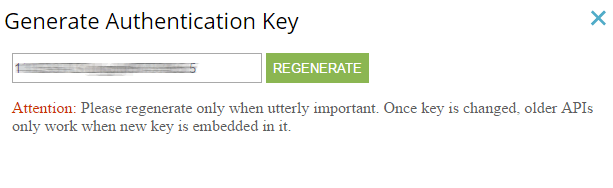
- To obtain API key, go to the API doc and click on KEY in the top right corner. You will be shown your API Key in a popup window.
I am starving….Let’s talk Business!!
Getting our Database Ready
In this application, we will have an authentication system where the user must log in to the application to perform mobile number verification.
We need to set up our database using .env file.
MIGRATIONS
We can manipulate our database using Migrations without using tools like PHPMyAdmin. For more information visit the official docs.
Here, we will use the artisan command-line interface to create Migrations. Go to the main root and type the below command.
This will automatically create a migrations file inside database/migrations folder and the newly created file should contain below code.
use Illuminate\Database\Schema\Blueprint;
use Illuminate\Database\Migrations\Migration;
class CreateUsersTable extends Migration {
/**
* Run the migrations.
*
* @return void
*/
public function up()
{
//
}
/**
* Reverse the migrations.
*
* @return void
*/
public function down()
{
//
}
}
In the above code, we have two functions as explained below.
- Function up() is used to create a table.
- Function down() is used to drop a table.
Use Schema Builder to create a table named as users. Replace above code with the below code.
use Illuminate\Database\Schema\Blueprint;
use Illuminate\Database\Migrations\Migration;
class CreateUsersTable extends Migration {
/**
* Run the migrations.
*
* @return void
*/
public function up()
{
Schema::create('users', function(Blueprint $table){
$table->increments('id');
$table->string('name',255);
$table->string('email',255);
$table->string('password',255);
$table->integer('mobile');
$table->integer('isVerified');
$table -> string('remember_token', 100) -> nullable();
});
}
/**
* Reverse the migrations.
*
* @return void
*/
public function down()
{
Schema::drop('users');
}
}
Now your migration file is ready. To run the migration and create the ‘users’ table, use the command line given below and run:
If you want to revert the migration then use the below command.
SEEDING
Why seeding? Because seeding allows us to fill the table with sample data to test our application. Create PHP file named as UserTableSeeder.php inside database/seeds folder and write below code.
use Illuminate\Database\Seeder;
use Illuminate\Database\Eloquent\Model;
class DatabaseSeeder extends Seeder {
/**
* Run the database seeds.
*
* @return void
*/
public function run()
{
DB::table('users')->insert([
'id' => '',
'name' => 'Shashank',
'email' => '[email protected]',
'password' => Hash::make('shashank'),
'mobile'=>'098765432',
'isVerified'=>0
]);
}
}
Our seeder file is ready. Now push the data into the table by using the below command.
Creating new appliction
So, we are ready with our Database and Table, with the help of Laravel migration.
Let’s create Routes, Controller, and Views for our application.
Routes
In this application, we will create six routes which are very much important as listed below.
- / : I believe this route needs no introduction .
- /login : As the name itself suggests user can login using this route.
- /home : Used to display the home page.
- /sendOtp : This route will be used to send SMS to user’s mobile number.
- /verifyOtp : Using this route we will verify the OTP entered by the user.
- /logout : Finally Logout.
Now open your routes.php file and add the below routes.
'uses'=>'userController@index'
]);
Route::post('/login', [
'uses'=>'userController@userLogin'
]);
Route::get('/home', [
'uses'=>'userController@home'
]);
Route::post('/sendOtp', [
'middleware' => 'checkSession',
'uses'=>'userController@sendOtp'
]);
Route::post('/verifyOtp', [
'middleware' => 'checkSession',
'uses'=>'userController@verifyOtp'
]);
Route::get('/logout', [
'uses'=>'userController@logout'
]);
In the above GET/POST method, the first parameter is the name of the route and the second parameter is an array where we provide the name of the Controller. This controller is required to execute when the URL is run.
You must have noticed POST method where we have one more key =>value pair as ‘middleware’ =>’checkSession’ in second parameter. We can pass middleware into routes before controller method executes to perform any operation.
Magic of Middleware
The appropriate method to filter HTTP requests in Laravel is the use of HTTP Middlewares. The best example is, checking whether a user is verified and authenticated in our application, which is what we are going to see in this application. Read more about middleware.
We will create middleware, once again by using PHP artisan command named checkSession. Below command will create checkSession.php file inside app\Http\Middleware folder.
Now open checkSession.php file and write down below code. The below code will enable us to verify if a user is logged in or not.
use Closure;
use Illuminate\Support\Facades\Auth;
class checkSession {
/**
* Handle an incoming request.
*
* @param \Illuminate\Http\Request $request
* @param \Closure $next
* @return mixed
*/
public function handle($request, Closure $next)
{
if (Auth::user() === null){
exit(
json_encode(
array(
'error' => 1,
'message' => 'You are logged out, Login again.',
'loggedIn' => 0
)
)
);
}else{
return $next($request);
}
}
}
Till now our middleware is nothing but a stranger to our Laravel framework. For Laravel, this is just a normal file inside a particular folder.
To make this middleware work, we have to tell Laravel –
“Laravel, this is my middleware and you have to run this on XYZ route.”
Technically, we have to register our middleware in kernel.php file, which is located inside app\Http\Middleware folder. Open kernel.php file and search for $routeMiddleware array and add the below key/value pair.
Now you have registered your middleware and it should work properly.
Controller
We have covered Migrations, Routes, and Middlewares. So, let’s create a controller named asuserController.php using the artisan command. Write below command in terminal.
Now open userController.php which is located in app/HTTP/Controllers directory. To be honest, all the functions defined in this controller are self-explanatory except one. We will get to it as we progress.
use App\Http\Requests;
use App\Http\Controllers\Controller;
use Illuminate\Http\Request;
use Illuminate\Support\Facades\Session;
use Auth;
use App\User;
use \App\MSG91;
class userController extends Controller {
/**
* Display Home page.
*
* @return Response
*/
public function index(){
if (Auth::user() == null){
return view("login");
}else{
return redirect('/home');
}
}
/**
* Function for Login.
*
* @return Response
*/
public function userLogin(Request $request){
$password = $request->input('password');
$email = $request->input('email');
if (Auth::attempt([ 'email'=> $email, 'password' => $password ])) {
echo json_encode(array(
'loggedIn' => true
));
}else{
echo json_encode(array(
'loggedIn' => false,
'error' => "Wrong Email password Combinatoin."
));
}
}
/**
* Display the the Home page.
*
* @return Response
*/
public function home(Request $request){
if (Auth::user() != null){
//Getting User information.
$users = User::where('id', Auth::user()->id)->first();
$users['mobile'] = substr($users['mobile'], -4);
return view("myHome",compact('users'));
}else{
return redirect('/');
}
}
/**
* Function to log out User
* @return Response
*/
public function logout(){
Auth::logout();
return redirect('/');
}
}
We have covered all the basic functions like login, fetching user’s information, and showing the home page without logout operation.
Sending and verifing OTP
Ah!! Finally, the MSG91 comes into the picture. We will make a CURL request to MSG91 API to send OTP on the user’s mobile device. Let’s create a class inside App folder named as MSG91.php.
Below code sends SMS calls to the MSG91 API. This function expects two parameters – OTP and Mobile Number.
namespace app;
/**
* class MSG91 to send SMS on Mobile Numbers.
* @author Shashank Tiwari
*/
class MSG91 {
function __construct() {
}
private $API_KEY = 'API_KEY';
private $SENDER_ID = "VERIFY";
private $ROUTE_NO = 4;
private $RESPONSE_TYPE = 'json';
public function sendSMS($OTP, $mobileNumber){
$isError = 0;
$errorMessage = true;
//Your message to send, Adding URL encoding.
$message = urlencode("Welcome to www.codershood.info , Your OPT is : $OTP");
//Preparing post parameters
$postData = array(
'authkey' => $this->API_KEY,
'mobiles' => $mobileNumber,
'message' => $message,
'sender' => $this->SENDER_ID,
'route' => $this->ROUTE_NO,
'response' => $this->RESPONSE_TYPE
);
$url = "https://control.msg91.com/sendhttp.php";
$ch = curl_init();
curl_setopt_array($ch, array(
CURLOPT_URL => $url,
CURLOPT_RETURNTRANSFER => true,
CURLOPT_POST => true,
CURLOPT_POSTFIELDS => $postData
));
//Ignore SSL certificate verification
curl_setopt($ch, CURLOPT_SSL_VERIFYHOST, 0);
curl_setopt($ch, CURLOPT_SSL_VERIFYPEER, 0);
//get response
$output = curl_exec($ch);
//Print error if any
if (curl_errno($ch)) {
$isError = true;
$errorMessage = curl_error($ch);
}
curl_close($ch);
if($isError){
return array('error' => 1 , 'message' => $errorMessage);
}else{
return array('error' => 0 );
}
}
}
?>
Sending OTP
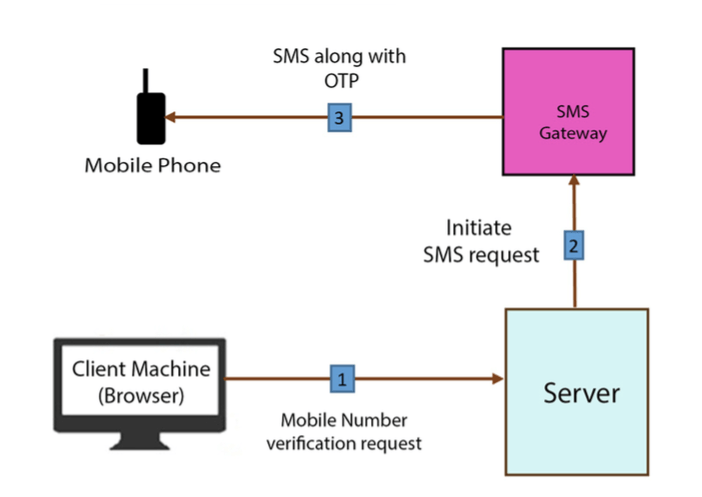
Above image is the pictorial representation of how this process works. Basically, it involves the three steps as listed below,
- The user sends a mobile number verification request to the server.
- The server initiates an SMS request to SMS Gateway.
- Then, SMS gateway sends an SMS along with OTP to the mobile phone.
Create a function inside userController and name it sendOtp(). This function will call MSG91 by making its object. If CURL executes successfully, OTP will be stored into the session.
* Sending the OTP.
*
* @return Response
*/
public function sendOtp(Request $request){
$response = array();
$userId = Auth::user()->id;
$users = User::where('id', $userId)->first();
if ( isset($users['mobile']) && $users['mobile'] =="" ) {
$response['error'] = 1;
$response['message'] = 'Invalid mobile number';
$response['loggedIn'] = 1;
} else {
$otp = rand(100000, 999999);
$MSG91 = new MSG91();
$msg91Response = $MSG91->sendSMS($otp,$users['mobile']);
if($msg91Response['error']){
$response['error'] = 1;
$response['message'] = $msg91Response['message'];
$response['loggedIn'] = 1;
}else{
Session::put('OTP', $otp);
$response['error'] = 0;
$response['message'] = 'Your OTP is created.';
$response['OTP'] = $otp;
$response['loggedIn'] = 1;
}
}
echo json_encode($response);
}
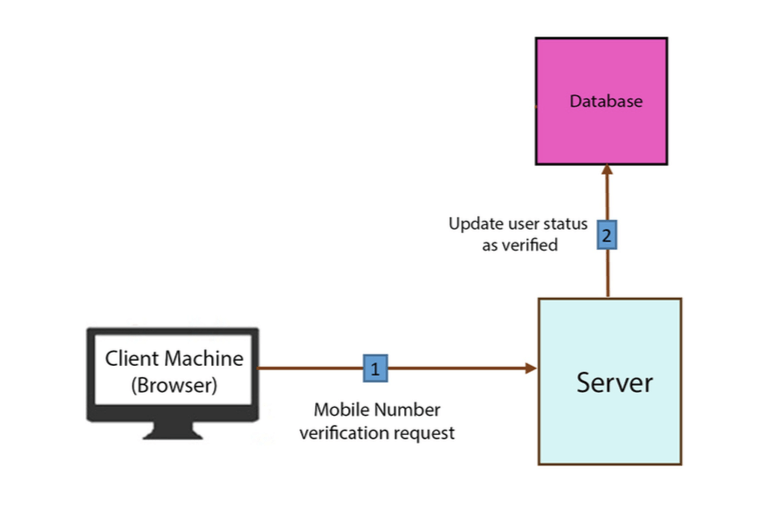
Verifing OTP
- The user sends a mobile number verification request to a server along with OTP.
- The server verifies the user’s OTP with OTP sent to Mobile number.
- If OTP entered by users is equaled to OTP sent to the mobile number, then server updates the user’s status as verified as shown in below Image.
After sending an SMS to the user’s registered mobile number, our application will ask the user to enter the OTP. When the user enters OTP into the input box and clicks on the verify button, a call to the verifyOtp() function is made.
In this function, OTP stored in session and OTP entered by the user, are going to be cross verified. If both the OTPs match, we will update user’s isVefired status as 1.
* Function to verify OTP.
*
* @return Response
*/
public function verifyOtp(Request $request){
$response = array();
$enteredOtp = $request->input('otp');
$userId = Auth::user()->id; //Getting UserID.
if($userId == "" || $userId == null){
$response['error'] = 1;
$response['message'] = 'You are logged out, Login again.';
$response['loggedIn'] = 0;
}else{
$OTP = $request->session()->get('OTP');
if($OTP === $enteredOtp){
// Updating user's status "isVerified" as 1.
User::where('id', $userId)->update(['isVerified' => 1]);
//Removing Session variable
Session::forget('OTP');
$response['error'] = 0;
$response['isVerified'] = 1;
$response['loggedIn'] = 1;
$response['message'] = "Your Number is Verified.";
}else{
$response['error'] = 1;
$response['isVerified'] = 0;
$response['loggedIn'] = 1;
$response['message'] = "OTP does not match.";
}
}
echo json_encode($response);
}
View
At the end of the tunnel, we will be using Laravel’s Blade templating. To let Laravel know that Laravel’s Blade templating engine is being used, we have to add a .blade.php extension after the name of the file.
Create two views as follows:
- login.blade.php
- myHome.blade.php
Below code is for login.blade.php.
<head>
<title>Mobile Number verification in Laravel</title>
<link rel="stylesheet" href="css/bootstrap.min.css">
<link rel="stylesheet" href="css/font-awesome.min.css">
<link rel="stylesheet" href="css/style.css">
</head>
<body ng-app="Login" ng-controller="LoginController" class="loginContainer">
<div class="container">
<div class="row">
<h2>Login</h2>
<label >Username:</label>
<input type="text" class="form-control" ng-model="email" name="email" placeholder="Enter your email">
<br/>
<label >Password:</label>
<input type="password" class="form-control" ng-model="password" name="password" placeholder="Enter your password">
<br/>
<button class="btn " ng-click="login()">Login</button>
</div>
</div>
<script type="text/javascript">
'use strict';
const BASE_URL = '{!! url().'/' !!}';
</script>
<script src = "{{ asset('/js/angular.min.js') }}"></script>
<script src = "{{ asset('/js/script.js') }}"></script>
</body>
</html>
That was the login page. Let us write code for the home page now. When the user logs into the application he/she will be redirected to /home URL which will use the myHome.blade.php file to show the home page.
Below code is for myHome.blade.php.
<head>
<title>Mobile Number verification in Laravel</title>
<link rel="stylesheet" href="{{ asset('/css/bootstrap.min.css') }}">
<link rel="stylesheet" href="{{ asset('/css/font-awesome.min.css') }}">
<link rel="stylesheet" href="{{ asset('/css/style.css') }}">
</head>
<body ng-app="home" ng-controller="index" class="container">
<div class="row">
<div class="header">
<div class="col-md-4">
Hello {{ $users['name'] }}
</div>
<div class="col-md-8">
<ul class="navigator">
<li>
<a href="{{ url('/home') }}" title="Home">
<i class="fa fa-home" aria-hidden="true"></i>
</a>
</li>
<li>
<a href="{{ url('/logout') }}" title="Logout">
<i class="fa fa-sign-out" aria-hidden="true"></i>
</a>
</li>
</ul>
</div>
</div>
</div>
<div class="userInfo row">
<div class="information">
<h3>Your mobile number ******{{ $users['mobile'] }} is
<span id="isVerified">
@if ( $users['isVerified'] === 0) not Verified. @else Verified. @endif
</span>
</h3>
</div>
<div id="otpSection" class="otpSection">
<input type="hidden" name="_token" id="_token" ng-model="_token" value="{{ csrf_token() }}">
<div id="sendOtpSection" class="sendOtpSection"
style="display:@if ( $users['isVerified'] === 0) block @else none @endif" >
<button class="btn btn-primary sendOtp" id="sendOtp" ng-click="sendOTP({{$users['id']}})">Send OTP</button>
</div>
<div id="verifyOtpSection" class="verifyOtpSection" style="display:none">
<input type="number" class="form-control" id="otp" placeholder="Enter OTP" ng-model="enteredOtp">
<br/>
<button class="btn btn-primary verifyOtp" id="verifyOtp" ng-click="verifyOTP()">Verify OTP</button>
</div>
</div>
</div>
<script type="text/javascript">
'use strict';
const BASE_URL = '{!! url().'/' !!}';
</script>
<script src = "{{ asset('/js/angular.min.js') }}"></script>
<script src = "{{ asset('/js/home.js') }}"></script>
</body>
</html>
In this application, JavaScript is used only to perform few Ajax requests. You can find JavaScript and CSS on GitHub.
Final thoughts
Well, we are at the end of the tunnel and yes the light is there isn’t it? Verifying a user’s mobile number is important from a security perspective and now you know how to build such an application. Let’s review what we have dealt with, in this article –
- 1. We saw the concept of Migrations and Seeding.
- 2. Added Middleware.
- 3. Created account on MSG91 and learned how to integrate into Laravel application.
- 4. Added controllers and Views.
Let us know your thoughts on this article, we would like to hear from you.
This article is written by Shashank Tiwari of Codershood.info